Introduction
Mighty School is a modern, all-in-one School Management System built with Flutter and Laravel. It is designed for schools, colleges, and educational institutions to manage daily academic and administrative activities efficiently.
The system provides student and teacher management, class and subject organization, attendance tracking, exams and results, fees management, online classes, and detailed reports — all from a single powerful platform.
Simple & Easy Installation on Live Server
Step 1 — Download the Script from Envato
Log in to your Envato (CodeCanyon) account. Go to Downloads → Click Download → All Files & Documentation. After downloading, extract the ZIP file on your computer.
Step 2 — Log in to Your Hosting Control Panel
Log in to your hosting control panel such as cPanel or DirectAdmin. This panel will be used to manage your domains, files, and databases.
Step 3 — Check Server Requirements
Make sure your server meets the following minimum requirements:
- PHP Version: 8.2 or higher
- MySQL Version: 5.7+ or MariaDB
- Required PHP Extensions:
- Fileinfo
- GD
- JSON
- OpenSSL
- PDO
- XML
- Mbstring
- CURL
Step 4 — Open the Target Folder
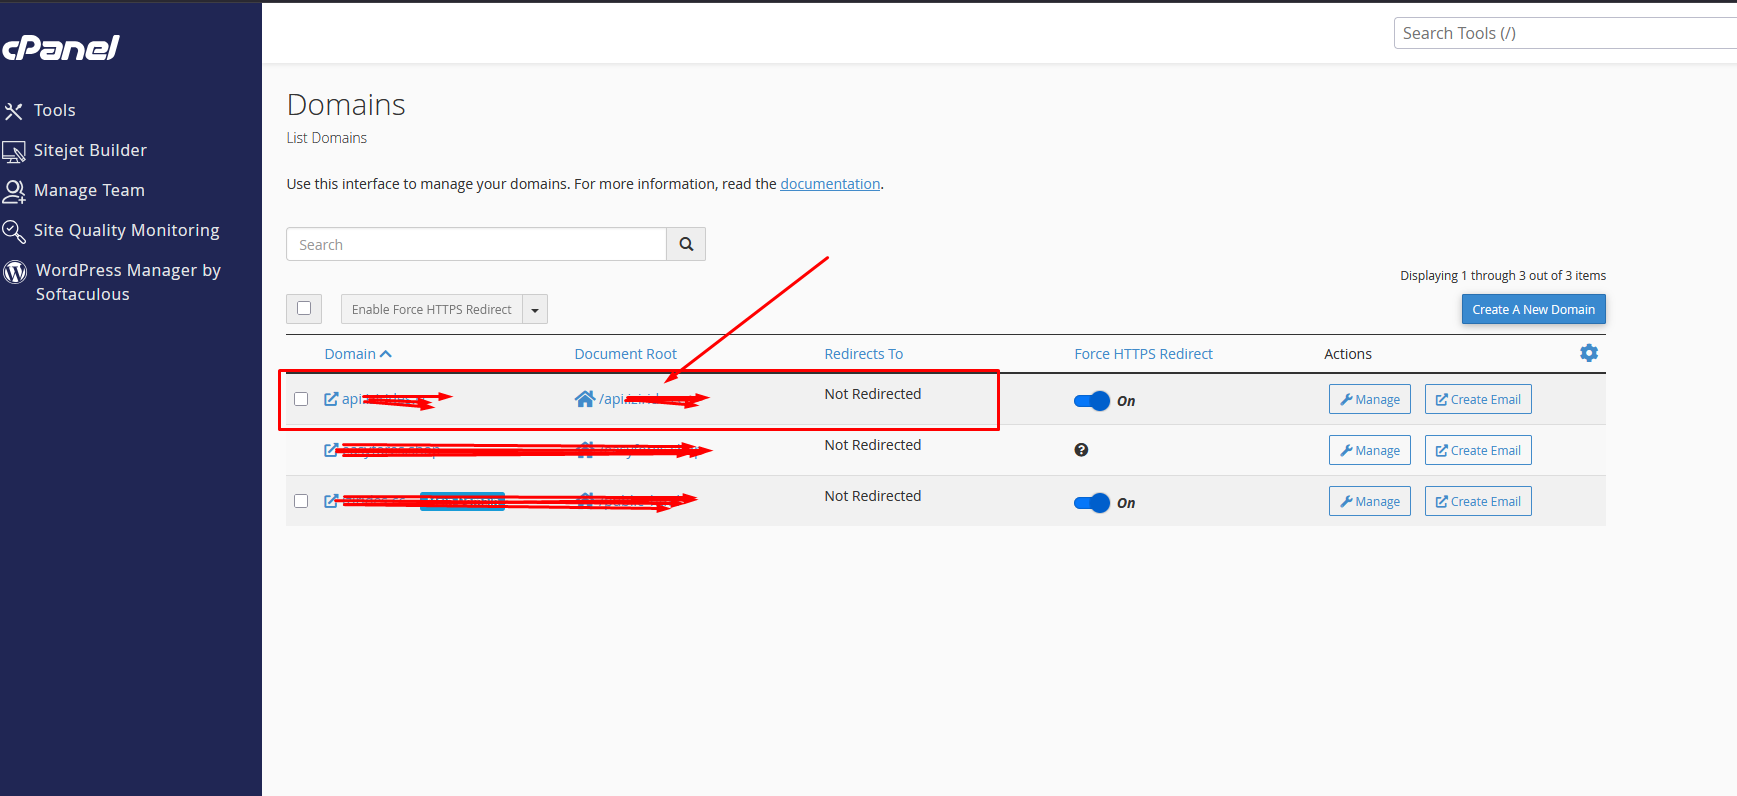
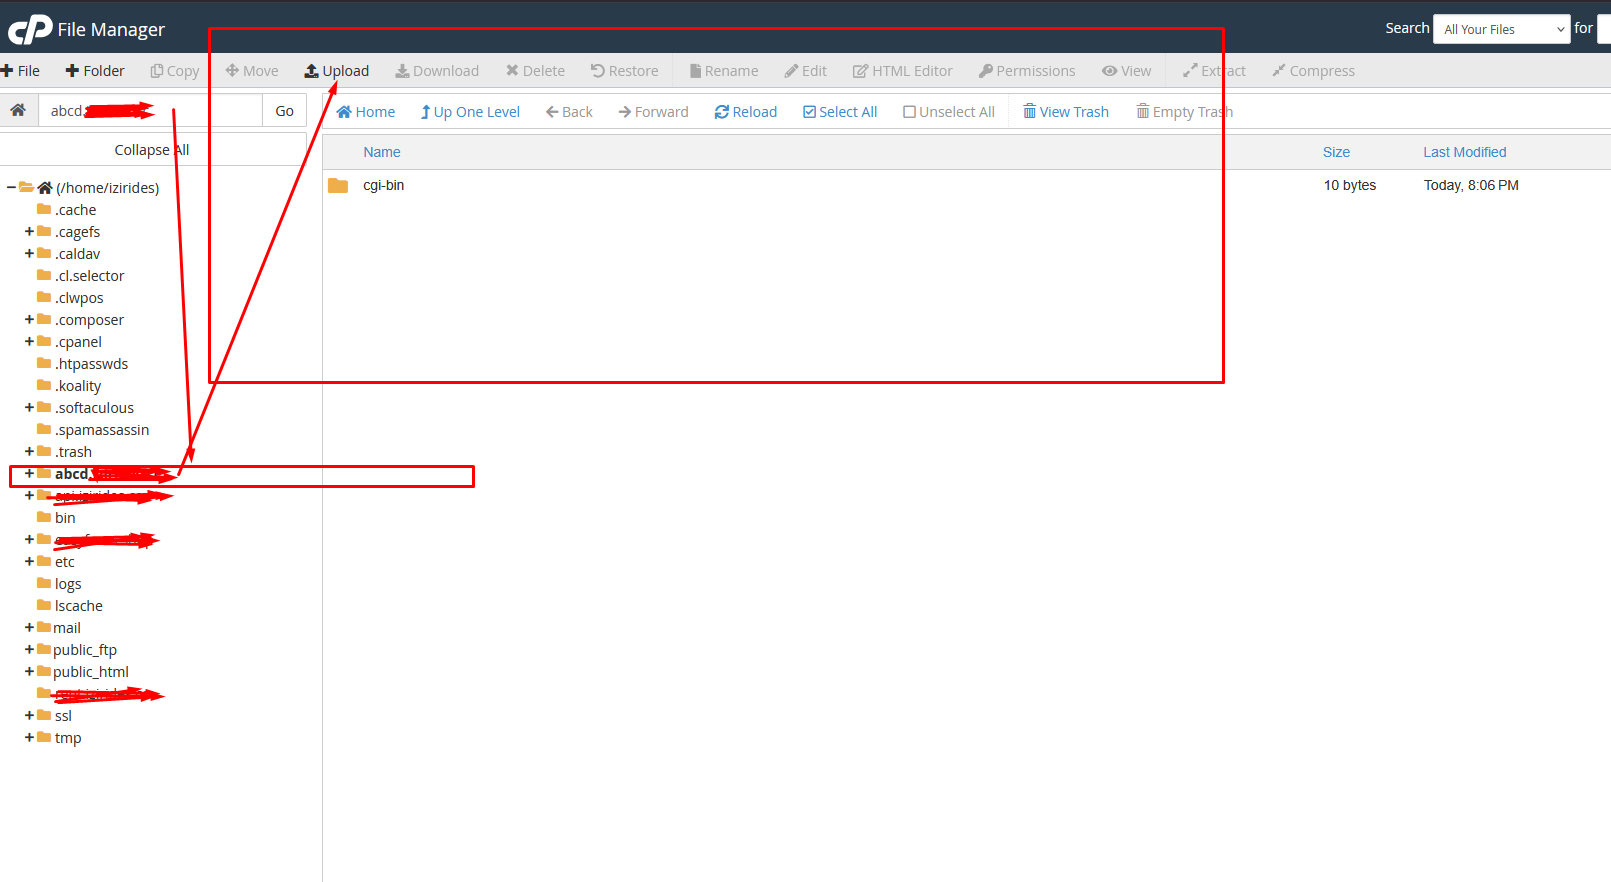
Open the target folder using the File Manager. This is where the system files will be uploaded.
Step 5 — Upload System Files
Upload the following ZIP file into the selected folder:
mighty-school-code.zip
After the upload is completed, extract the ZIP file.
Step 6 — Create a Database
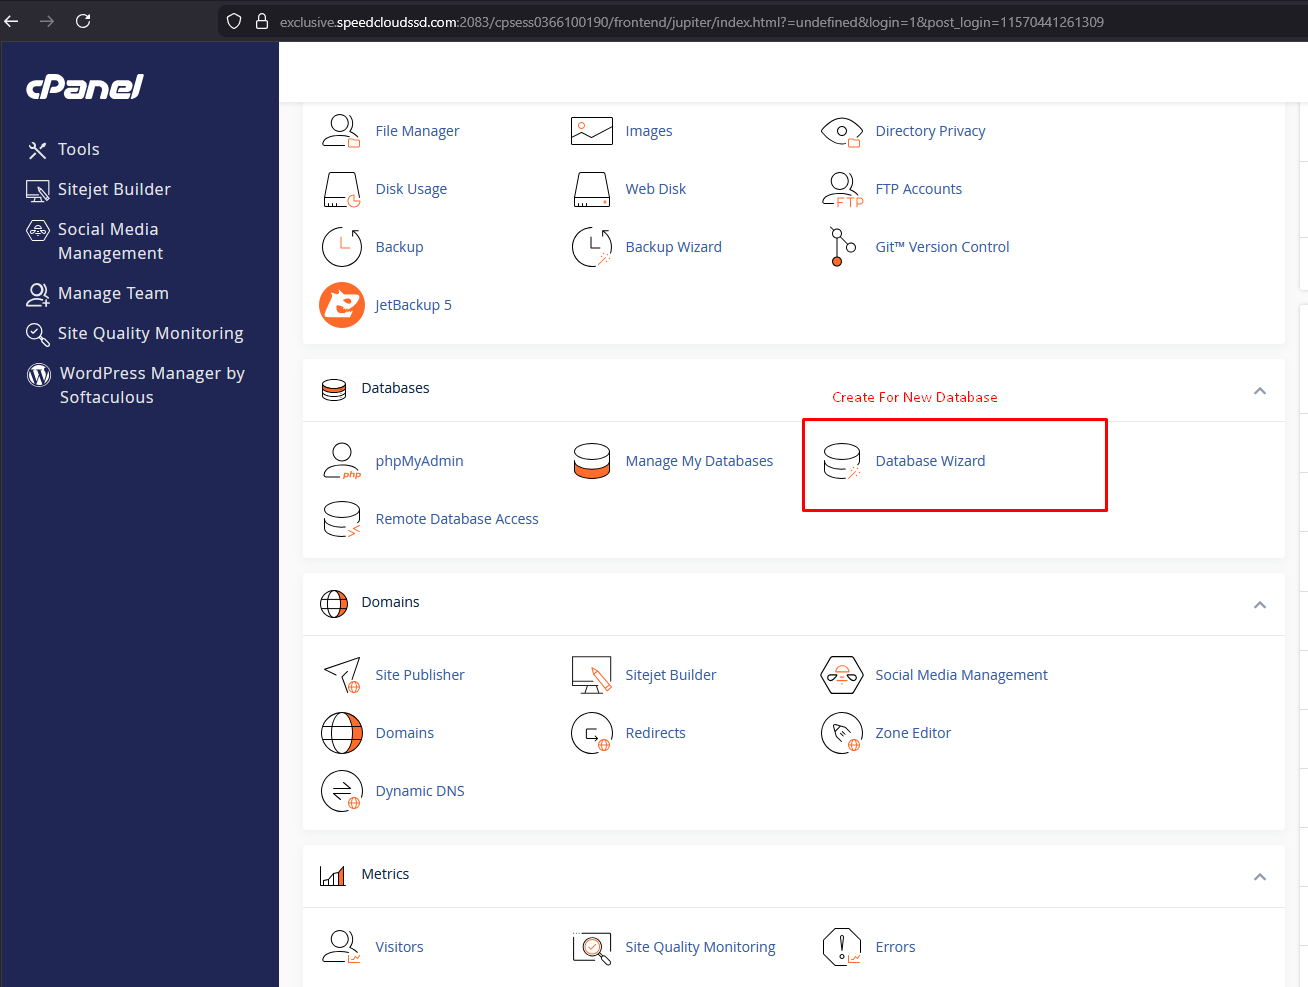
Open MySQL Database Wizard from cPanel.
Step 7 — Create a Database Name
Enter your database name and click Next.
mighty_school_db
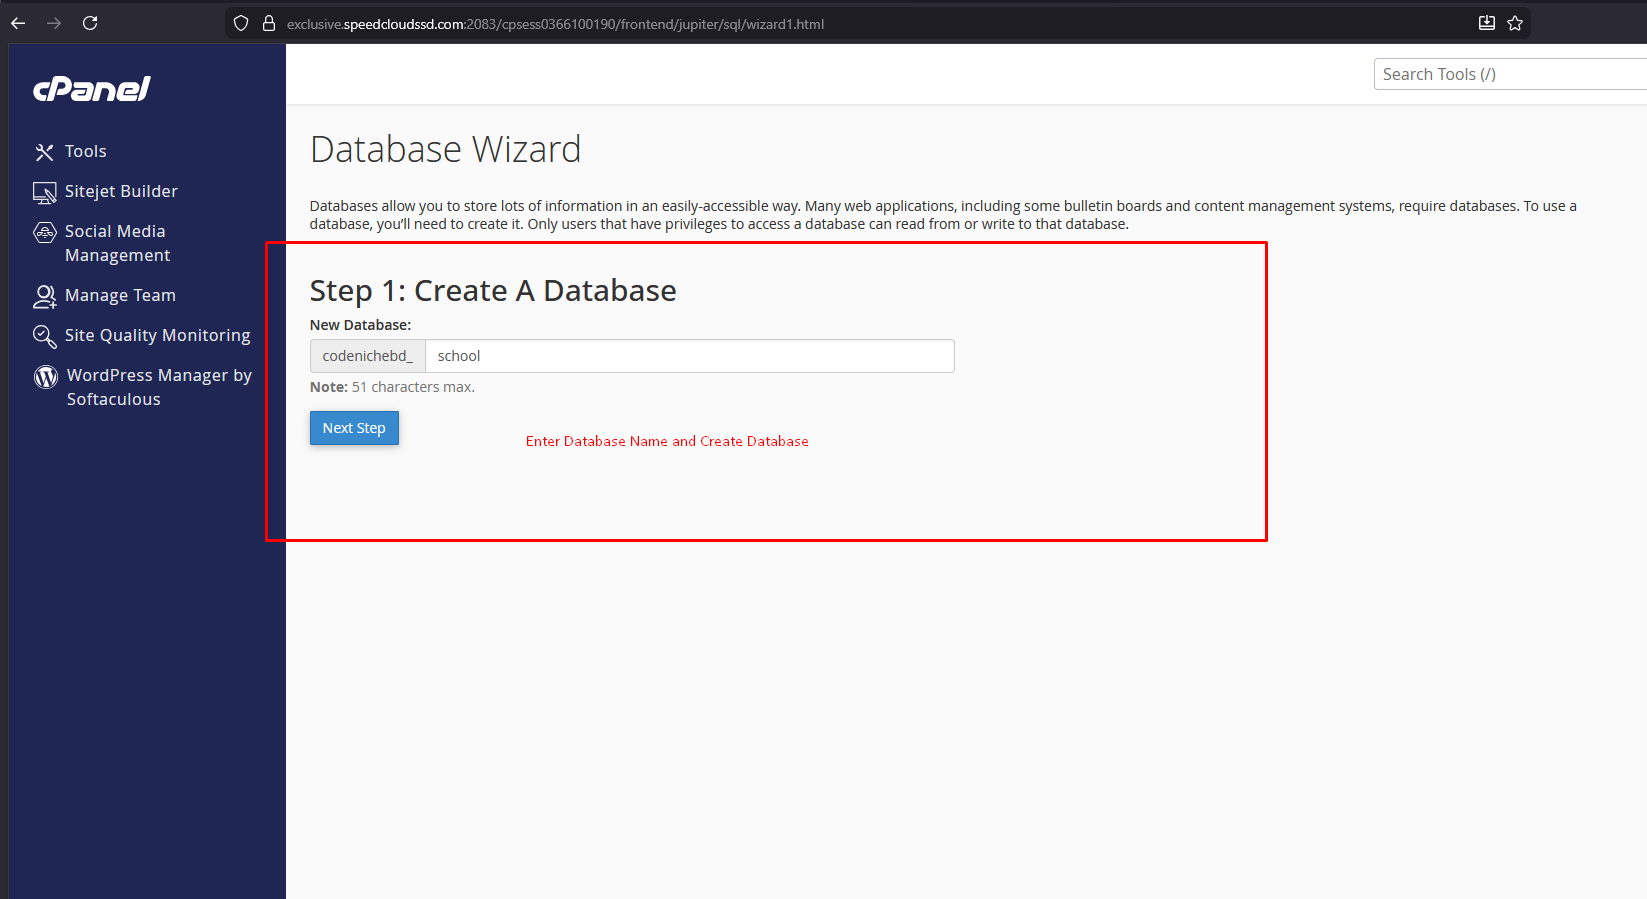
Step 8 — Create a Database User
Create a database username and password. Make sure to save these credentials securely.
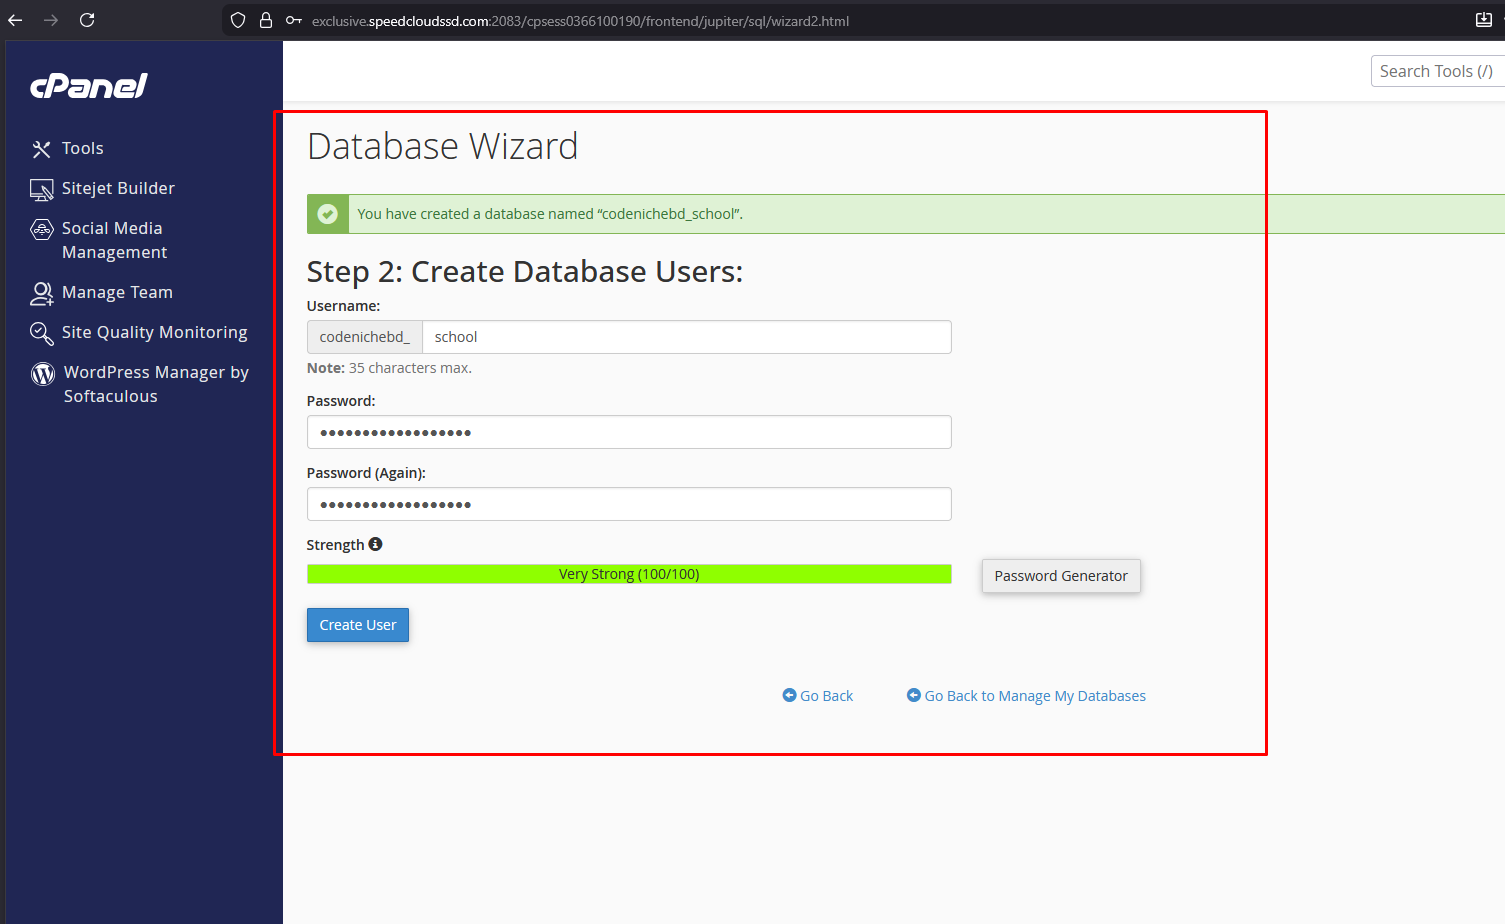
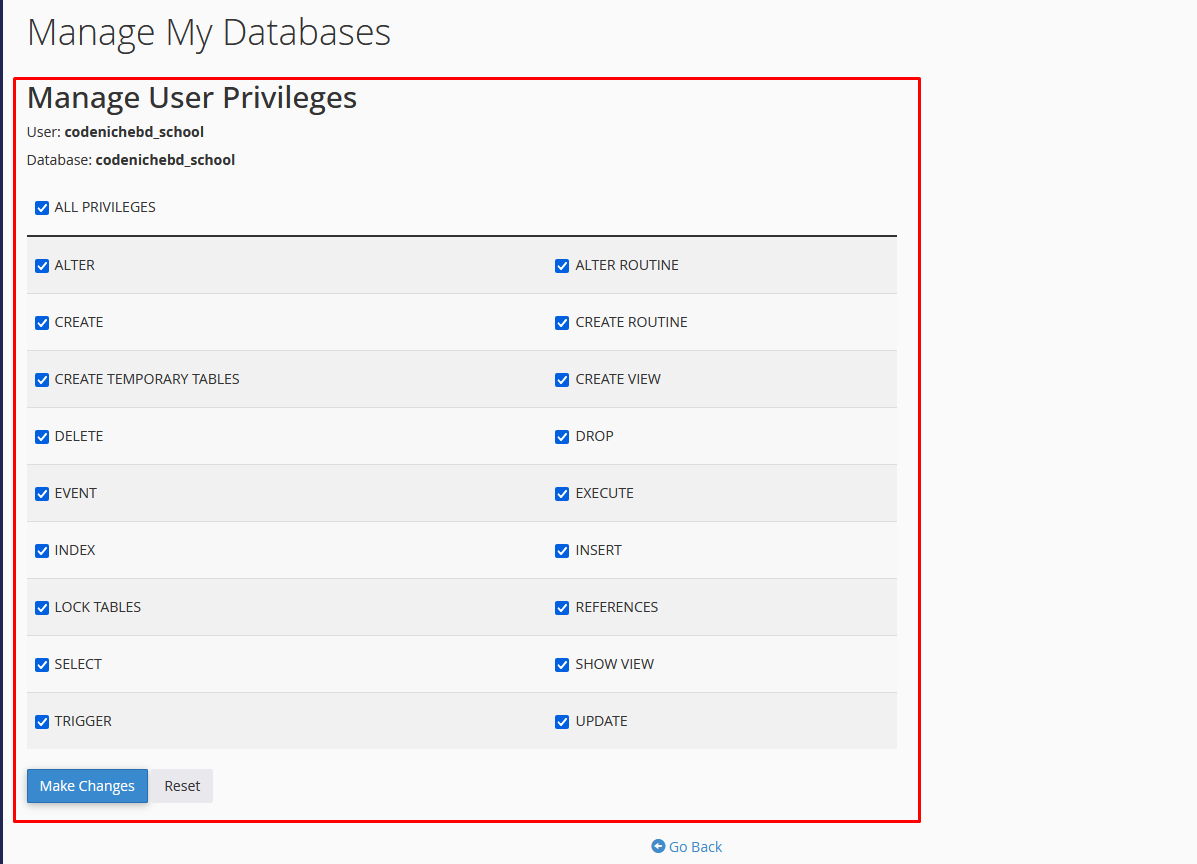
Step 9 — Assign Database Privileges
Select ALL PRIVILEGES and continue.
Step 10 — Open the Installation Wizard
Open your browser and visit the following URL:
https://api.yoursite.com/install

Step 11 — Set Folder Permissions
Set the following folder permissions to 775:
- storage
- bootstrap/cache
These permissions are required for Laravel cache, logs, sessions, and file uploads.

Step 12 — Verify Server Requirements
The installer will automatically verify:
- PHP Version
- Required PHP Extensions
- Writable Folder Permissions

Step 13 — Verify Purchase Code
Enter your Envato purchase code and username to activate your license.
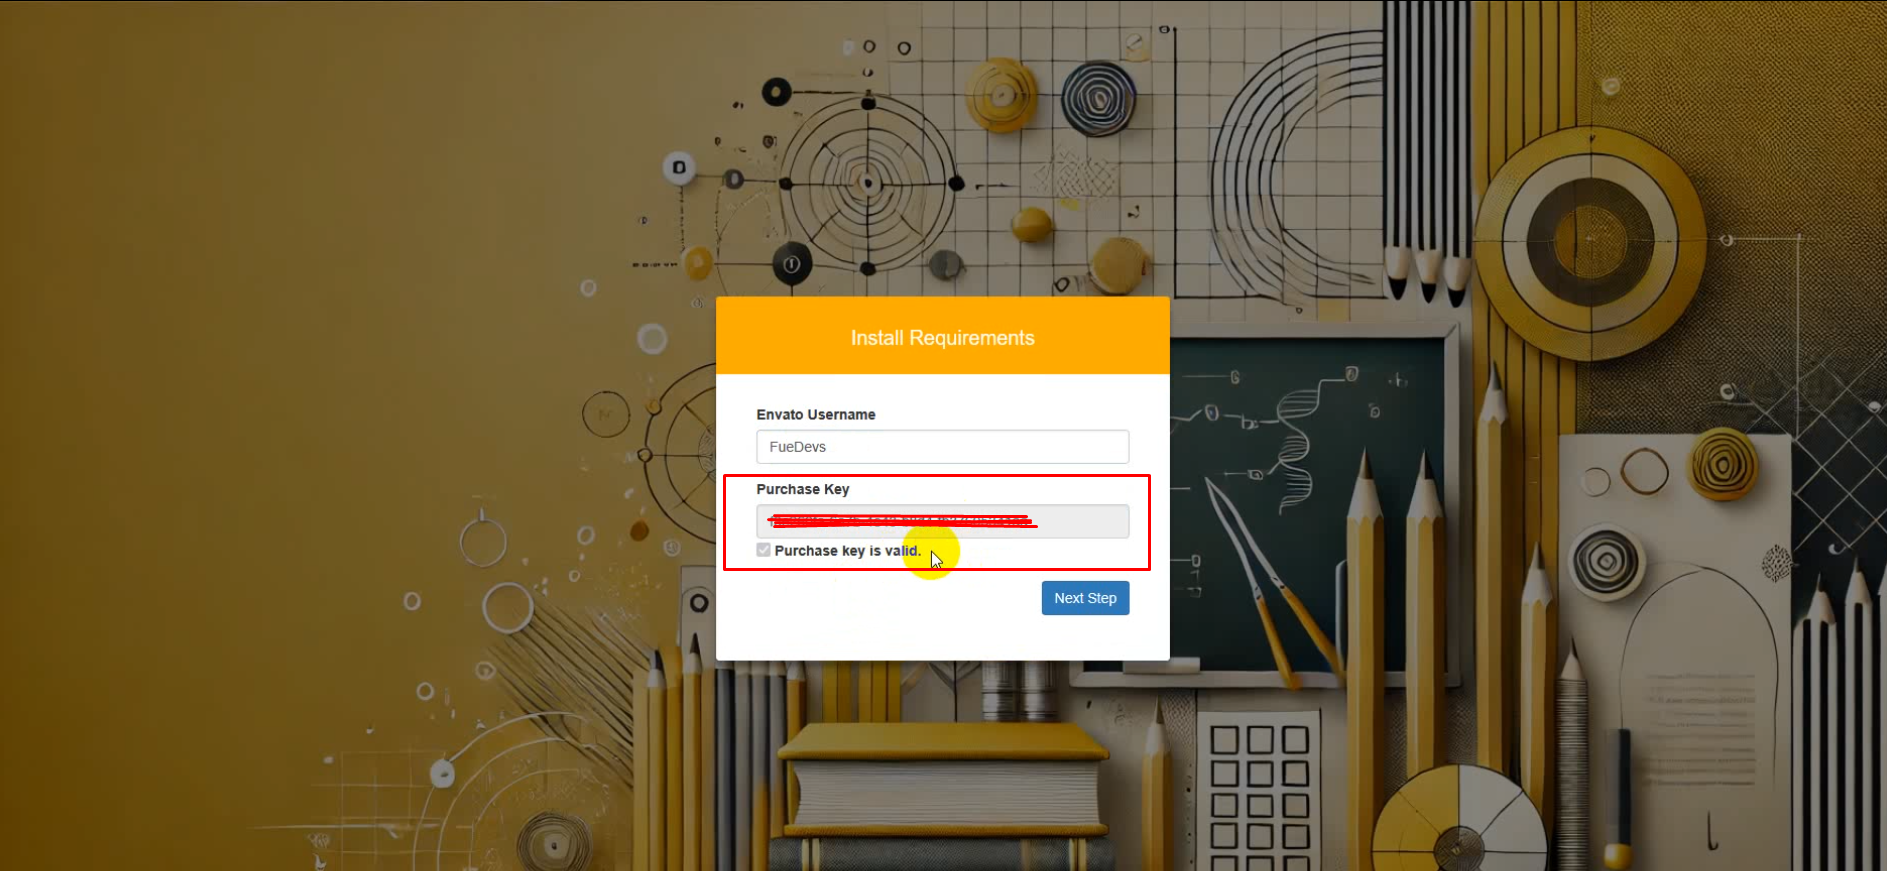
Step 14 — Configure Database Settings
Enter your database credentials:
- Database Name
- Database Username
- Database Password
- Database Host (usually localhost)

Step 15 — Test Database Connection
Click Test Connection. If the connection is successful, continue to the next step.

Step 16 — Installation Processing
The system will now:
- Create database tables
- Insert demo data
- Generate the application key
- Optimize configuration files

Step 17 — Installation Completed Successfully
The installation has been completed successfully. You can now log in to the admin panel and start using the system.
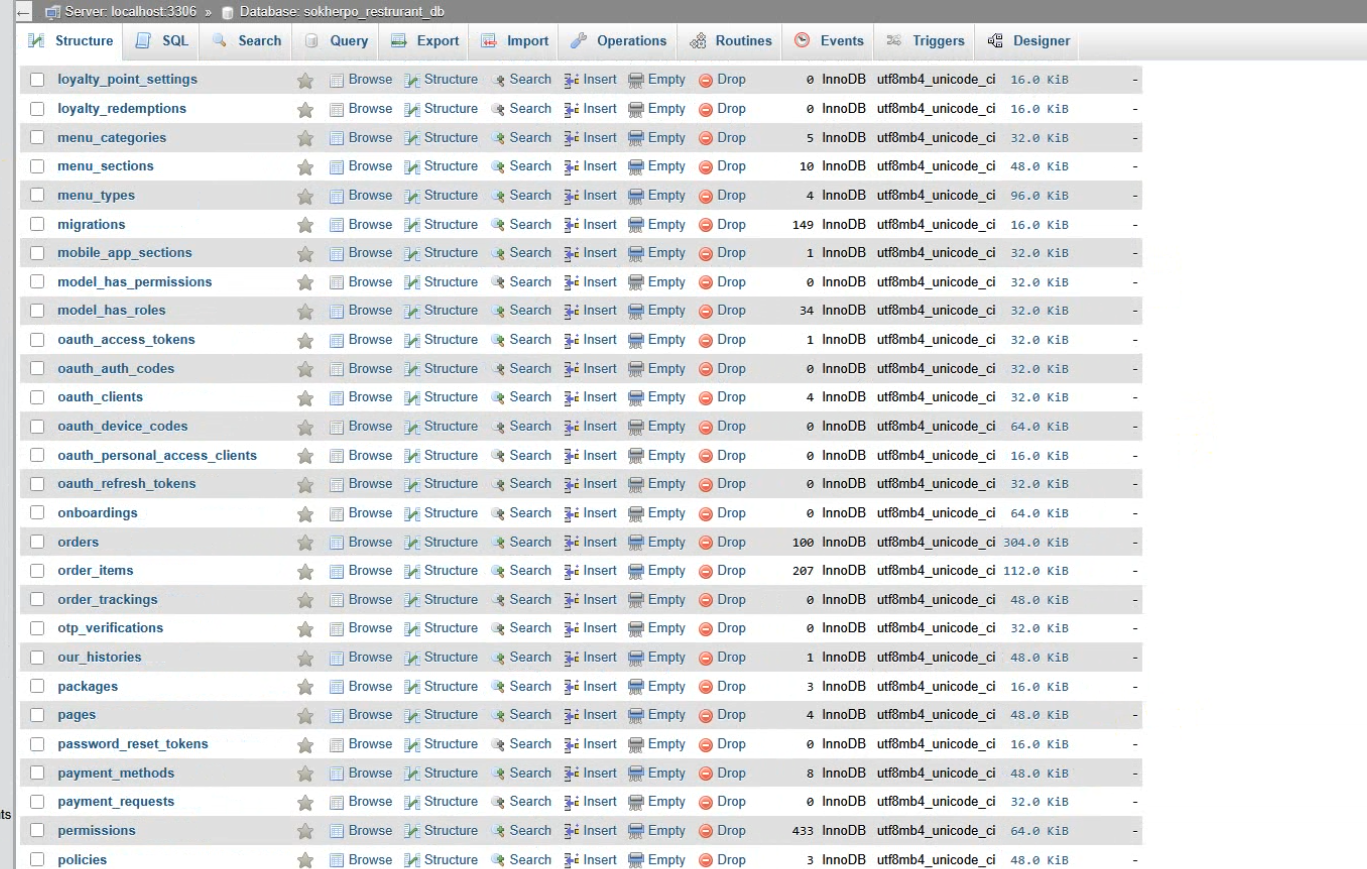
Step 18 — You Are Live Now
Congratulations! Your system is now live and ready to use. Best of luck with your project.
📱 App Setup
Mighty School allows you to launch your own branded app easily with minimal configuration.
🌐 Set Base URL
Open the following file:
/lib/utils/app_constant.dart
Update the base URL:
static const String baseUrl = "https://domain.com";
The Base URL must be your server domain
Example:
✅ Correct: https://yourdomain.com
Rebuild the app after updating.
Change App Name
- Edit
appNamein/lib/utils/app_constant.dart - Update label in
AndroidManifest.xml - Update app name in
Info.plist


Change App Package Name
Use IDE global replace carefully. Replace the existing package name with your new one.
 ⚠ Warning: Incorrect changes may break the build.
Change App Icon & Logo
- Generate icons from appicon.co
- Android: Replace mipmap folders in
/android/app/src/main/res - iOS: Replace
Assets.xcassetsin/ios/Runner - Replace logo in
/assets/image/logo.png
🔥 Firebase Configuration
Mighty LMS uses Firebase for Push Notifications (FCM) and other Firebase services. Before running the application, you must connect your Flutter project with Firebase.
Firebase setup is required for Push Notifications (FCM) in the Flutter mobile app. Make sure you complete both Android and iOS configuration steps.
Step 1: Create a Firebase Project
- Go to the Firebase Console.
- Click Create a project (or Add project).
- Enter your project name (e.g., "Mighty LMS").
- Optionally enable Google Analytics (recommended for push notification analytics).
- Click Create Project and wait for the setup to complete.
- Click Continue to open the project dashboard.
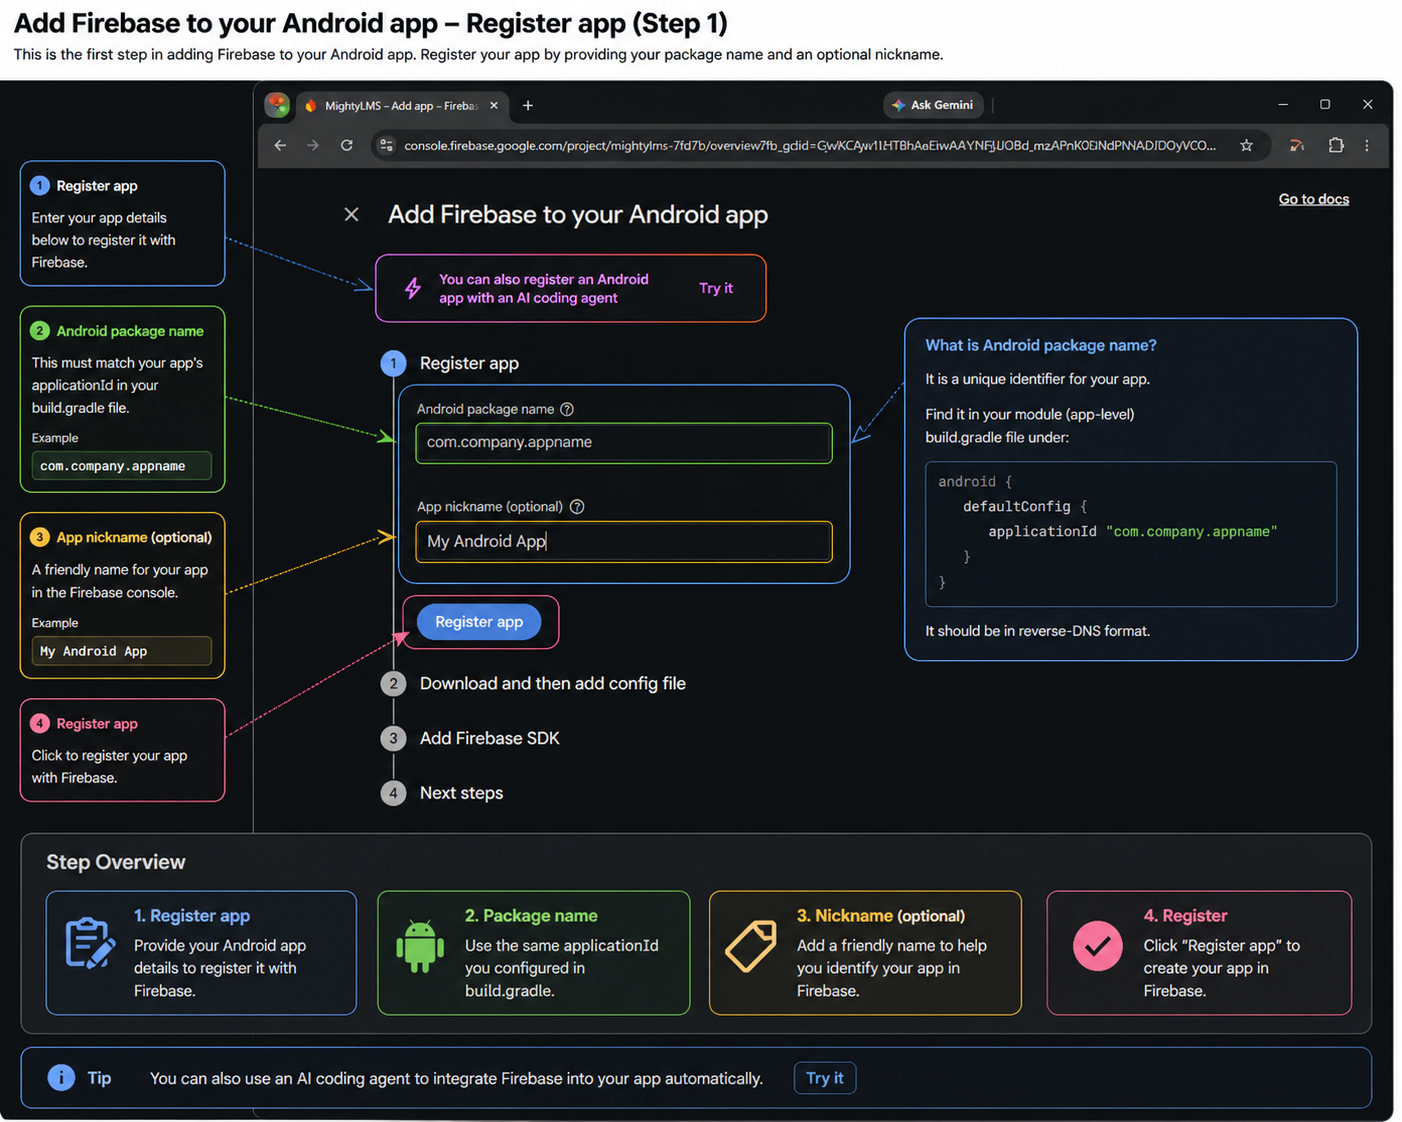
Step 2: Register Android App in Firebase
- On the Firebase project overview page, click the Android icon to add an Android app.
- Enter your Android package name (e.g.,
com.fuedevs.lms). - Optionally enter the app nickname (e.g., "Mighty LMS Android").
- Enter your debug signing certificate SHA-1 (optional, required for Google Sign-In if used).
- Click Register app.
Step 3: Download and Add google-services.json
- Download the
google-services.jsonconfiguration file. - Place it in the following location in your Flutter project:
android/app/google-services.json
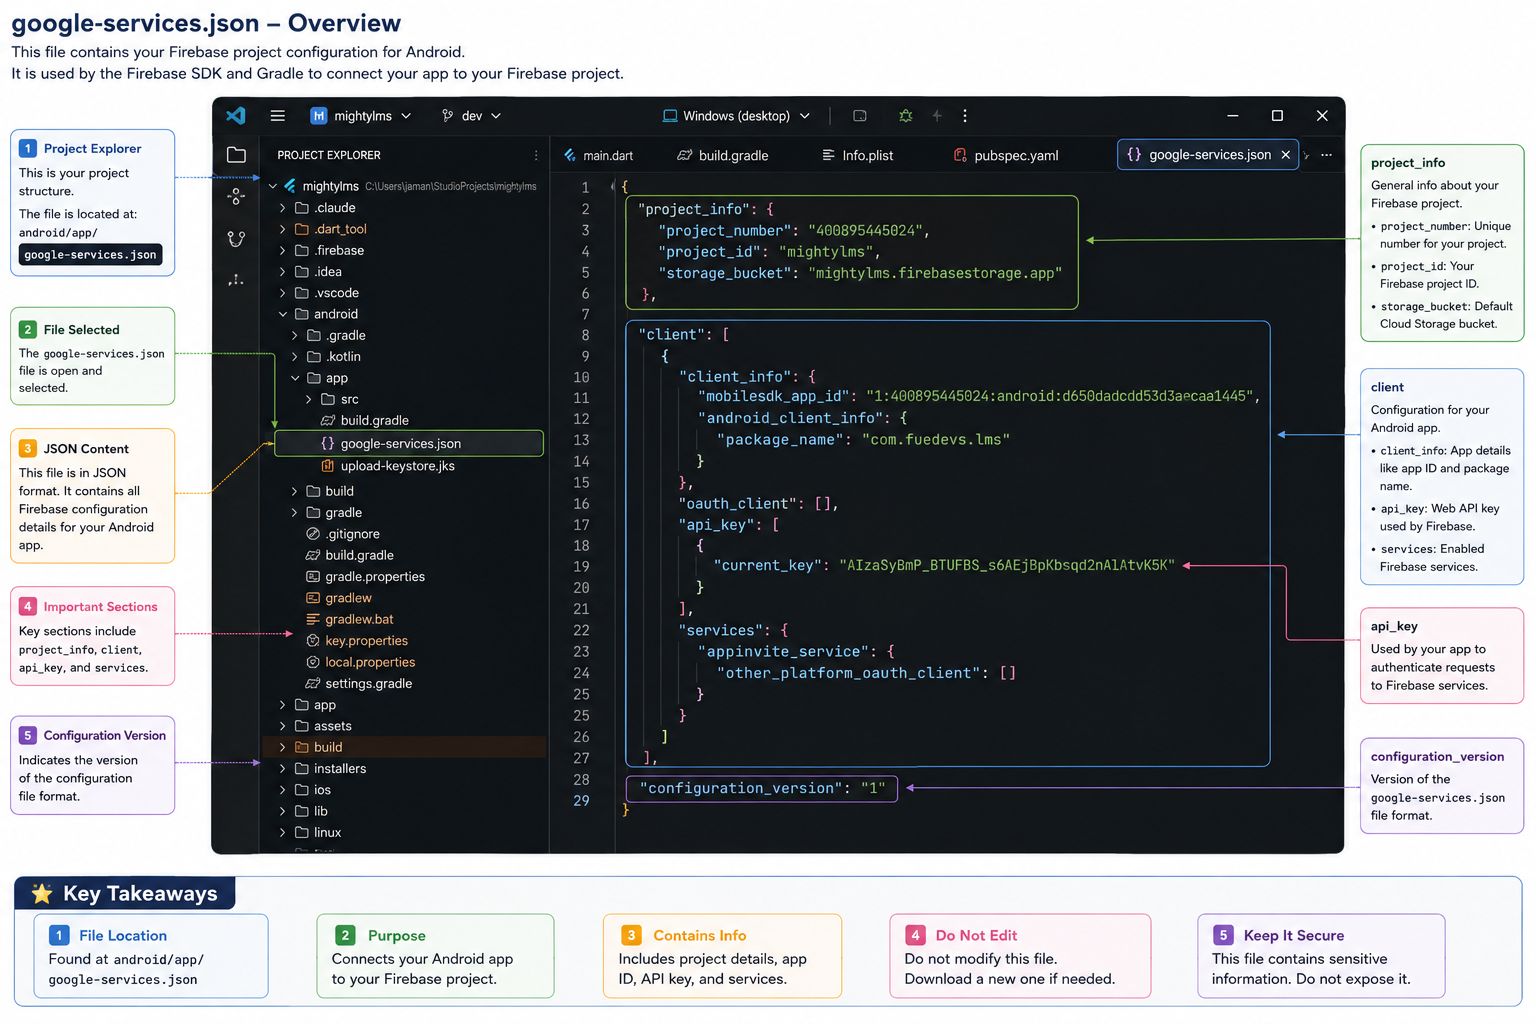
google-services.json file enables your app to connect with Firebase services on Android.
Step 4: Register iOS App in Firebase
- Back in the Firebase project overview, click the iOS icon to add an iOS app.
- Enter your iOS bundle identifier (e.g.,
com.fuedevs.lms). - Optionally enter the app nickname and App Store ID.
- Click Register app.

Step 5: Download and Add GoogleService-Info.plist
- Download the
GoogleService-Info.plistconfiguration file. - Place it in the following location in your Flutter project:
ios/Runner/GoogleService-Info.plist
Step 6: (Recommended) Configure Firebase Using FlutterFire CLI
The FlutterFire CLI is the recommended way to configure Firebase across all platforms.
It automatically generates the firebase_options.dart file used by the app.
Install FlutterFire CLI
dart pub global activate flutterfire_cli
Log in to Firebase
firebase login
Run Firebase Configuration
flutterfire configure
This command will:
- List your Firebase projects — select the one you created in Step 1
- Detect your Android package name and iOS bundle identifier
- Generate the
lib/firebase_options.dartfile automatically
Step 7: Verify Firebase Initialization
In your Flutter project, Firebase is initialized in the main.dart file.
Ensure it uses the generated options:
void main() async {
WidgetsFlutterBinding.ensureInitialized();
await Firebase.initializeApp(
options: DefaultFirebaseOptions.currentPlatform,
);
runApp(const MyApp());
}
If you used FlutterFire CLI (Step 6), this is set up automatically.
Step 8: Enable Firebase Cloud Messaging (FCM)
- In the Firebase Console, go to Project Settings → Cloud Messaging.
- Verify that FCM is enabled for your project.
- Obtain the Server Key and Sender ID — these are needed in your Laravel backend's
.envfile for sending push notifications.
Add the following to your Laravel .env file:
FCM_SERVER_KEY=your_fcm_server_key_here
FCM_SENDER_ID=your_fcm_sender_id_here
Push notifications in Mighty LMS are used for:
- Course enrollment confirmations
- New lesson or course updates
- Quiz and assignment reminders
- Certificate issued notifications
- Payment and invoice notifications
- General system announcements
Step 9: Android Notification Permission (Android 13+)
Android 13 (API level 33) and newer require runtime notification permission.
The Mighty LMS Flutter app already includes the flutter_local_notifications plugin
with the required permission handling. Users will see a system prompt to allow notifications
on first launch.
Step 10: Test Push Notifications
- Build and install the app on a physical device (emulators may not receive FCM reliably).
- Log in to the app.
- In the Firebase Console, go to Cloud Messaging and click Send your first message.
- Compose a test notification and send it to your device.
- Verify the notification appears in the device's notification tray.
Once the Firebase configuration files are in place and the app has been rebuilt, push notifications will be fully operational.
Apply Changes
flutter clean
flutter pub get
flutter run
Build for Android
Once the application setup is complete, you can generate Android build files for testing or production release using Flutter CLI commands.
Generate APK
Run the following command to generate a full release APK:
flutter build apk
This command creates a release APK that supports all major Android device architectures.
Output location:
build/app/outputs/flutter-apk
Generate Split APKs (Smaller Size)
To generate separate APK files for different CPU architectures (recommended for smaller file size), run:
flutter build apk --target-platform android-arm,android-arm64,android-x64 --split-per-abi
This command generates multiple APK files. Use the APK that matches the target device architecture.
Generate App Bundle (Google Play Store)
The Android App Bundle (.aab) is the recommended format for publishing apps on the Google Play
Store.
Step 1 — Configure Signing
Open the following file:
android/app/build.gradle
Inside buildTypes > release, set:
signingConfig = signingConfigs.release
Step 2 — Generate New Keystore (JKS)
Run the following command in your terminal.
macOS / Linux:
keytool -genkey -v -keystore ~/upload-keystore.jks -keyalg RSA \
-keysize 2048 -validity 10000 -alias upload
Windows (PowerShell):
keytool -genkey -v -keystore $env:USERPROFILE\upload-keystore.jks `
-storetype JKS -keyalg RSA -keysize 2048 -validity 10000 `
-alias upload
Step 3 — Create key.properties File
Create a file named:
android/key.properties
Add the following content:
storePassword=YOUR_STORE_PASSWORD
keyPassword=YOUR_KEY_PASSWORD
keyAlias=upload
storeFile=./upload-keystore.jks
The keystore file location may be:
- macOS/Linux: your home directory, e.g.
~/upload-keystore.jks - Windows: your user profile folder, e.g.
%USERPROFILE%\upload-keystore.jks
key.properties.
Step 4 — Build App Bundle
Run the following command:
flutter build appbundleand the output file path is
build/app/outputs/bundle/release/app-release.aab
This command generates the Android App Bundle (.aab), which is required for publishing apps on the Google Play Store.
Build for iOS
iOS applications cannot be installed directly on physical devices in the same way as Android APK files. Apple requires iOS apps to be distributed through official channels such as TestFlight for testing or the App Store for public release.
To install and test the app on an iPhone or iPad, you must configure your Apple Developer Account, set up code signing in Xcode, and upload the build to TestFlight or the App Store.
Certificate Signing Request (CSR) Creation and Installation Guide
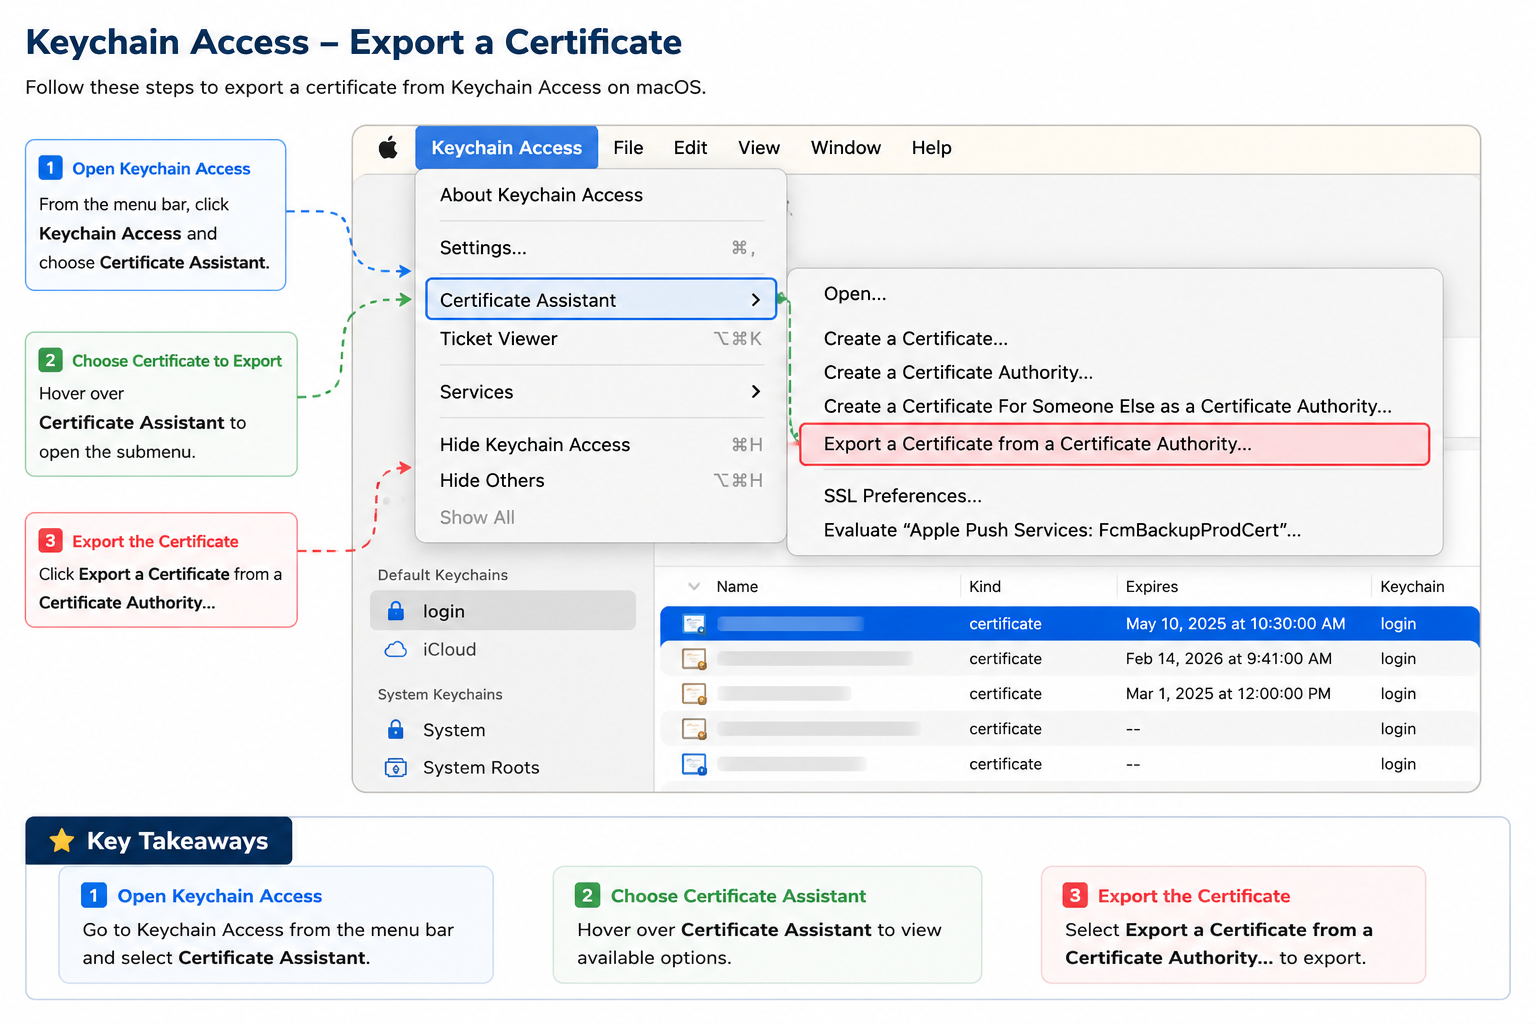
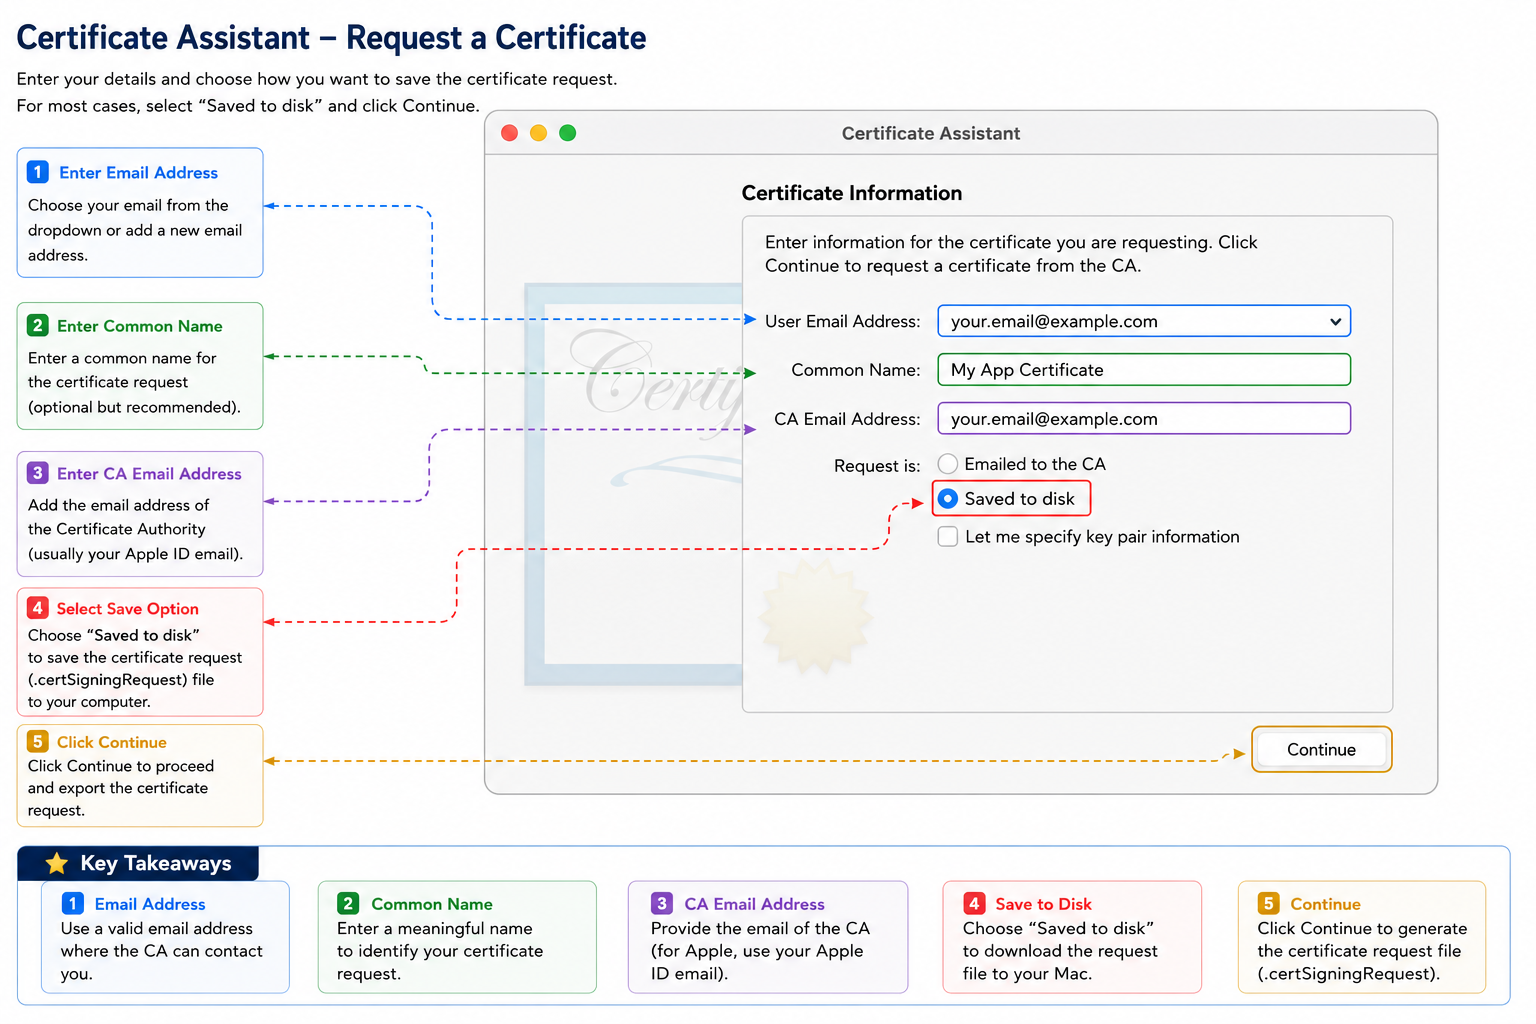
Step 1: Create a Certificate Signing Request (CSR)
- Open Keychain Access on your Mac.
- Go to Keychain Access → Certificate Assistant → Request a Certificate from a Certificate Authority.
- Enter your email address, CA email address, and a common name (you may use your app name).
- Select "Save to Disk".
- Click Continue and save the CSR file to your computer.
Step 2: Generate the .p12 Certificate
- Go to your Apple Developer Account.
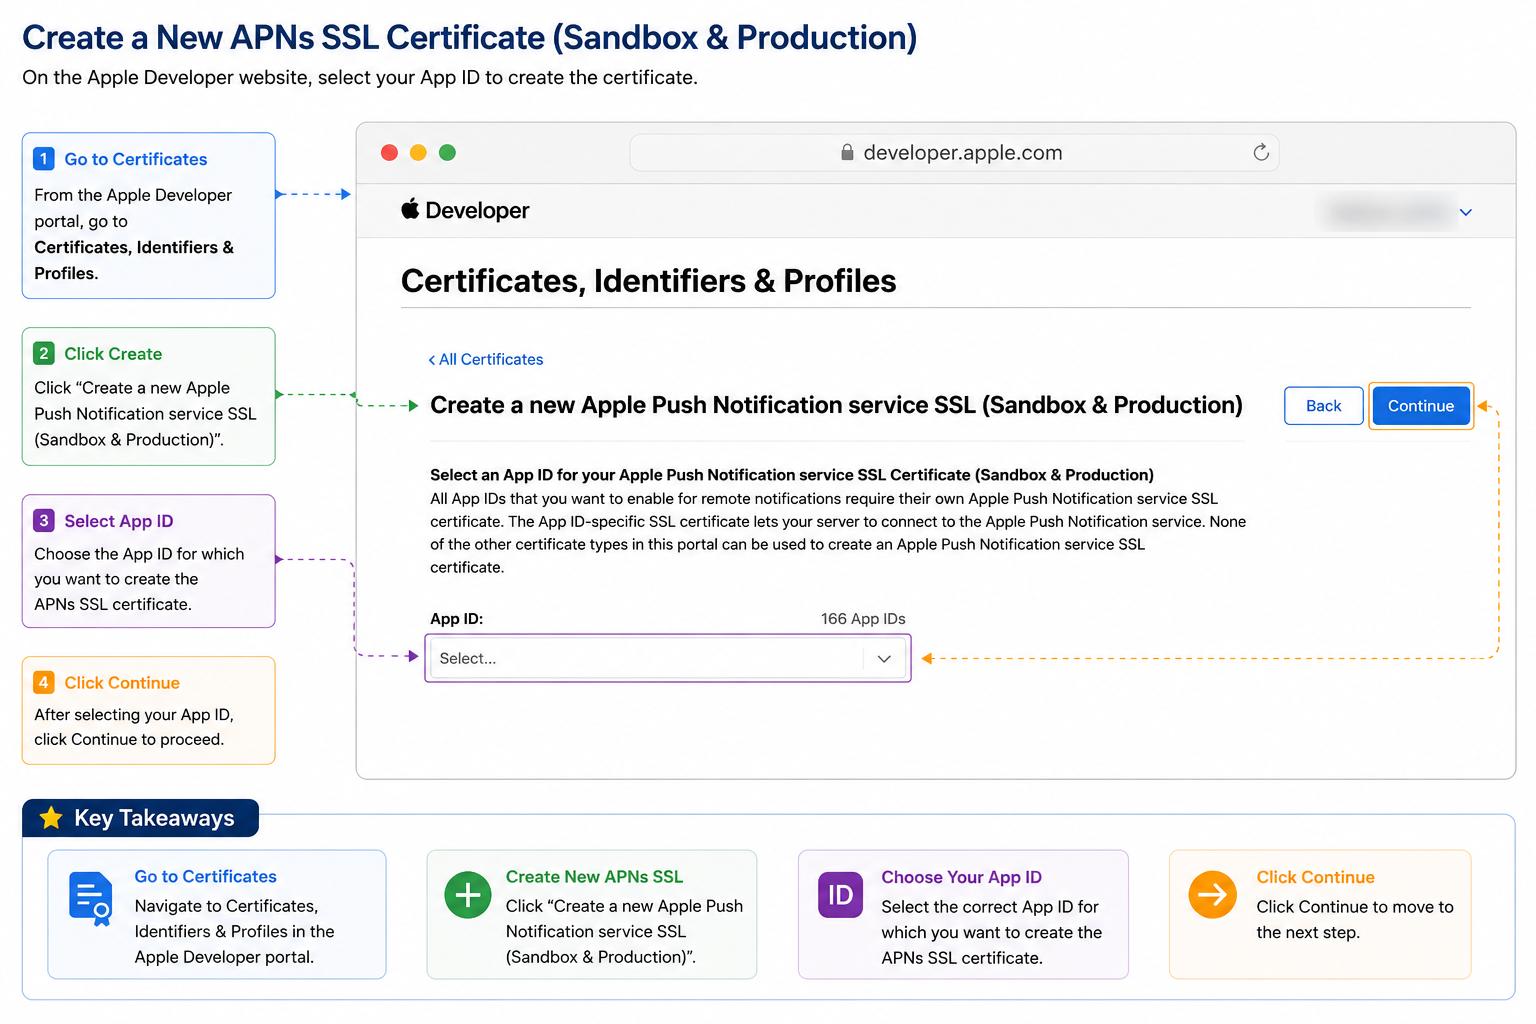
- Navigate to Certificates, Identifiers & Profiles.
- Click on Certificates and then click the (+) button.
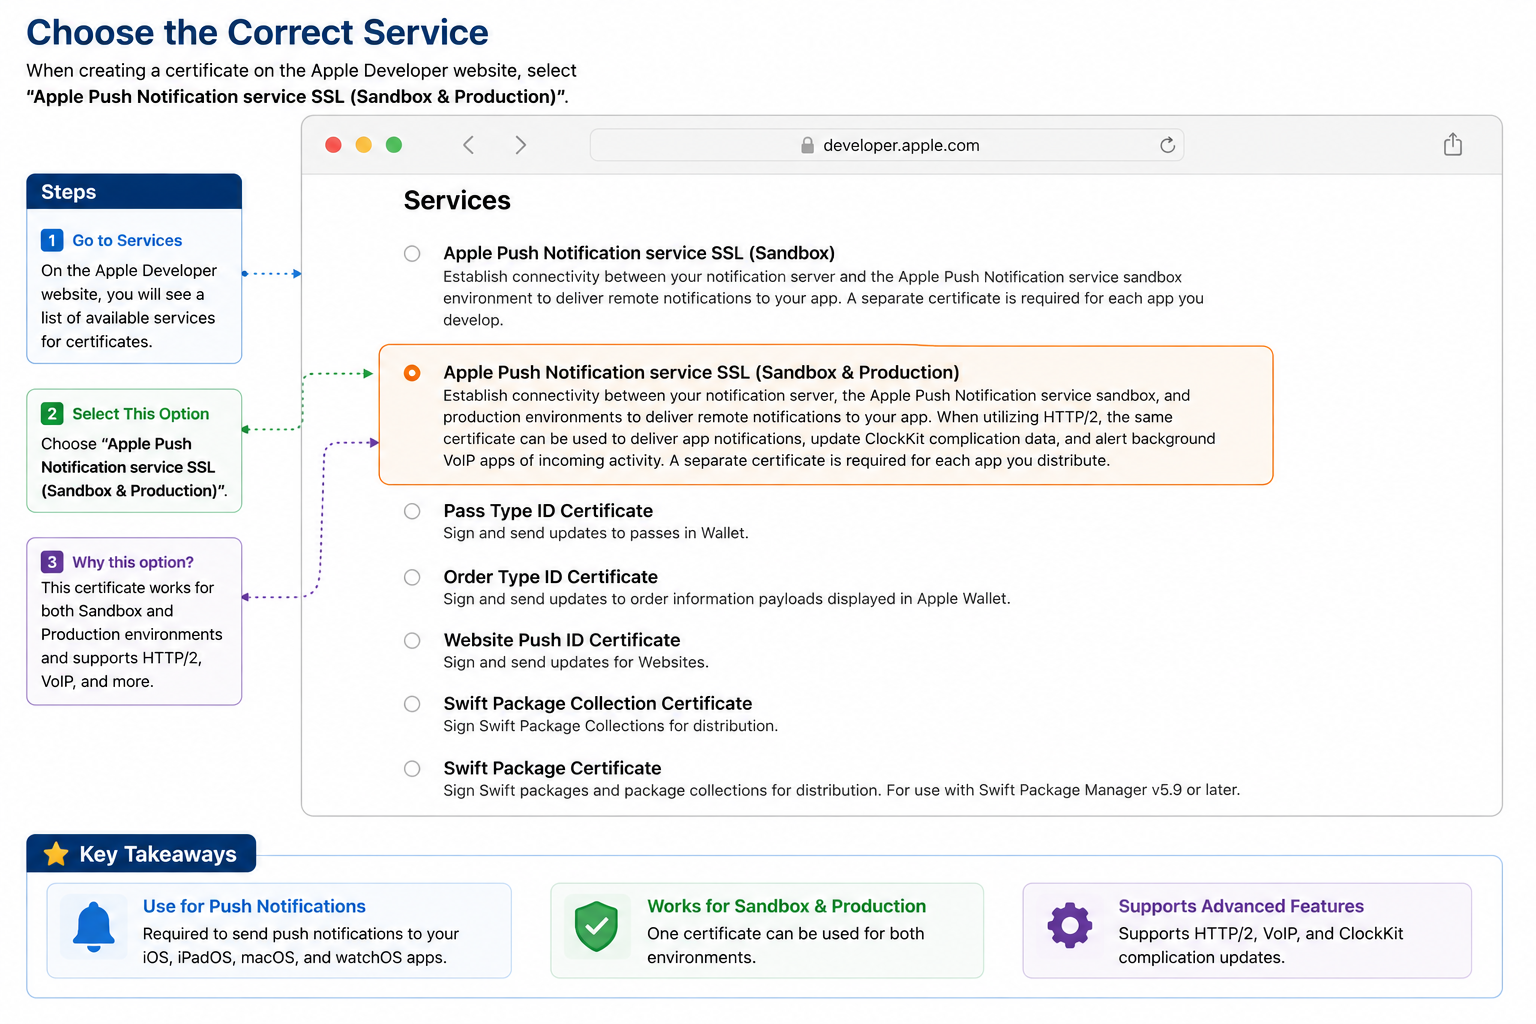
- Select "Apple Push Notification service SSL (Sandbox & Production)".
- Select the appropriate App ID.
- Click Continue and upload the CSR file you created.
- Download the generated certificate.
Step 3: Install the Certificate
- Double-click the downloaded certificate file to install it in Keychain Access.
- Go to Keychain Access → My Certificates.
- Locate the newly installed certificate.
- Right-click the certificate and select Export.
- Choose a location and export the certificate as a .p12 file.
- Set a password for the certificate.
Note: Store the password securely. Xcode may ask for the Keychain password when running the app. If you prefer not to enter the password each time, you may leave it empty.
Open the Project in Xcode
- Open Xcode on your Mac.
- Select File → Open or press Command + O.
- Navigate to your Flutter project directory.
- Open the ios folder.
- Select the .xcworkspace (recommended) or .xcodeproj file.
Xcode will open your Flutter project, allowing you to build, run, and configure your iOS application.
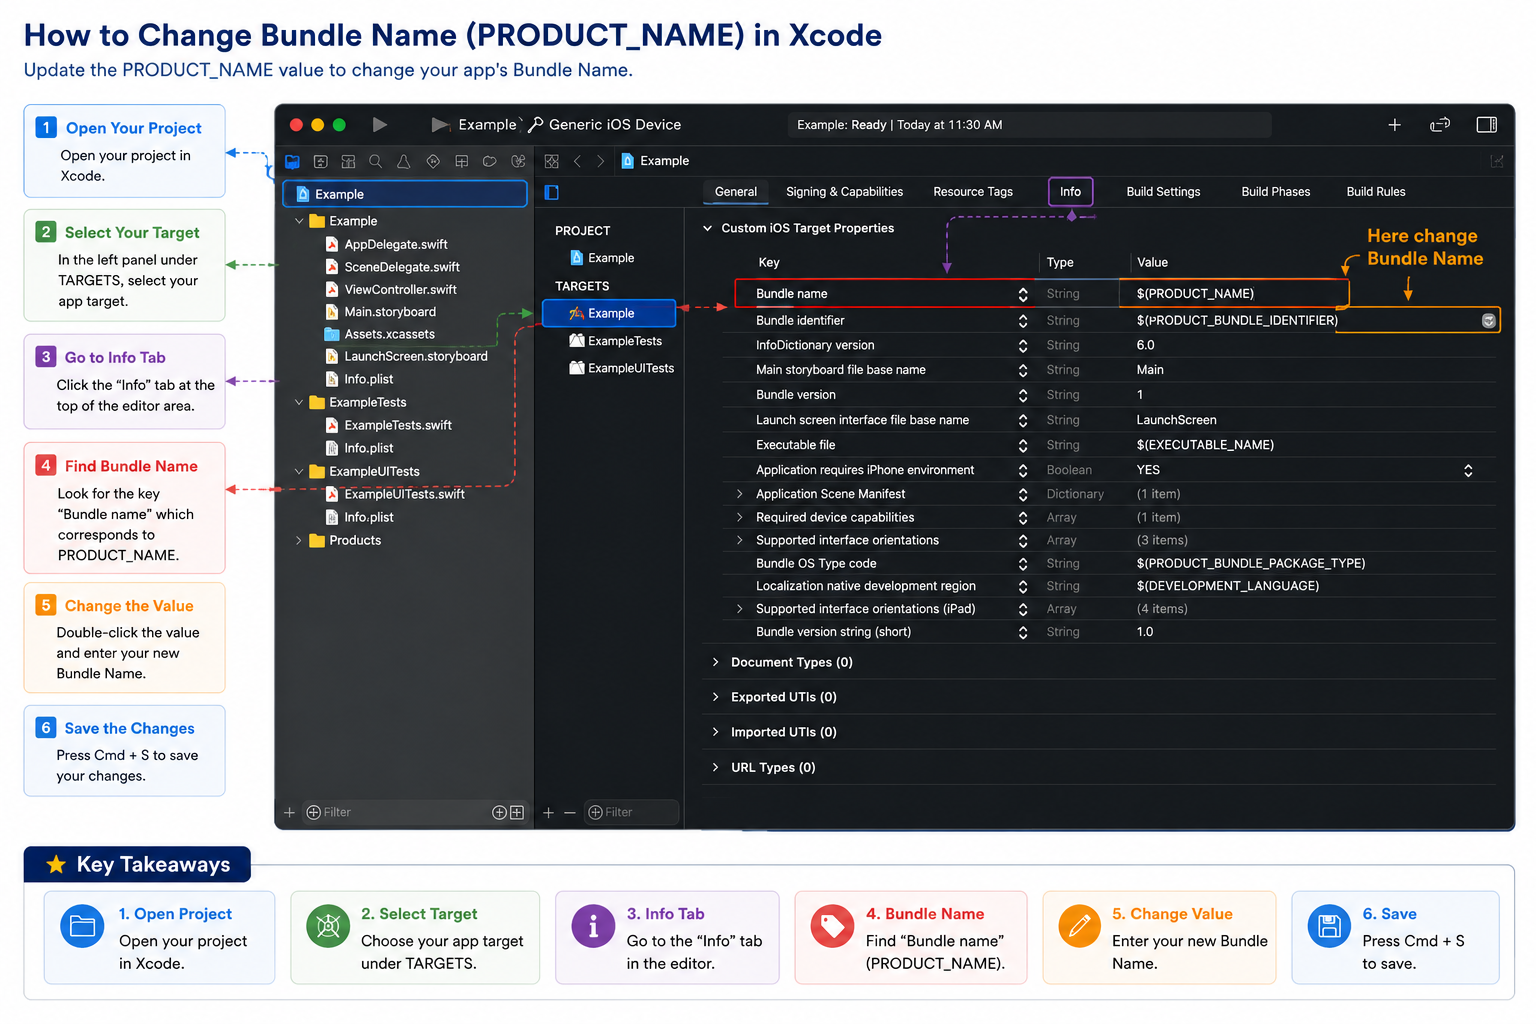
Change Bundle Name
- Select your project in the Xcode project navigator.
- Choose the target from the Targets section.
- Go to the Info tab.
- Scroll to Custom iOS Target Properties.
- Locate Bundle Name and edit its value.
- Save changes using Command + S.
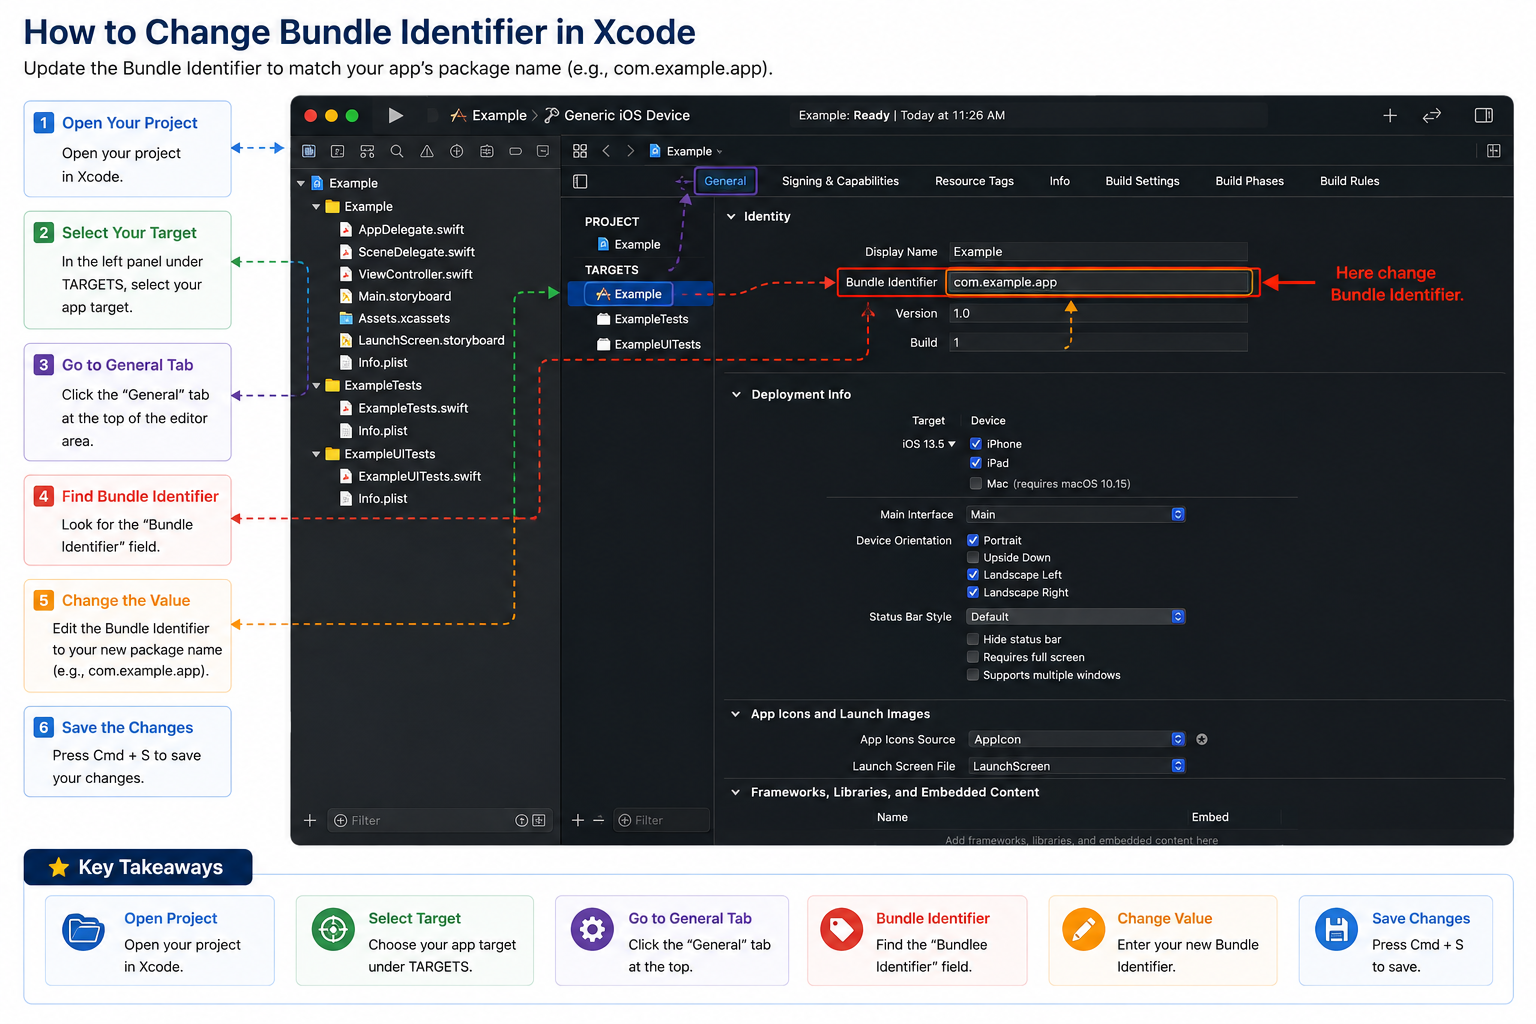
Change Bundle Identifier
The Bundle Identifier is a unique identifier for your application on iOS and macOS. It must be unique across all apps in the App Store.
- Select your project in Xcode.
- Go to the General tab.
- Under the Identity section, update the Bundle Identifier.
📖 User Guide
Mighty School is a complete School Management System. Every feature is run from the
web Admin Panel (accessed from a browser at your site's domain, e.g.
https://yoursite.com/sign-in), organized into the modules listed in the left
sidebar. This guide covers each module in the order it appears in the sidebar.
Every screen shows the active Branch and Session at the top right — set both correctly before entering data, since lists, reports, and dashboards are all scoped to whichever branch and session are currently selected.
Step 1: Login
- Open a web browser and go to your Mighty School Admin Panel URL (e.g.
https://yoursite.com/sign-in). - Enter your Admin Email and Password, then click Login.
- Choose the correct Branch and academic Session from the top-right dropdowns.
Full Feature List
The Admin Panel sidebar groups every feature into the following modules:
- Dashboard — At-a-glance summary cards, charts, and recent activity for the institute.
- Students Information — Student admission, profiles, categories, and ID cards.
- Staffs Information — Teacher and staff profiles, staff attendance.
- Student Attendance — Daily attendance, exam attendance, attendance reports, absent fines.
- QR Code Attendance — Camera-based attendance scanning using student ID QR codes.
- Academic Configuration — Academic session, shift, class, sections, groups, periods, subjects, departments.
- Fees Management — Fee setup, fee collection, waivers, paid/unpaid reports.
- Accounts Management — Ledgers, payments, receipts, contra, journal, fund transfers, chart of accounts.
- Accounting Reports — Balance sheet, trial balance, cash flow, income statement, cash summary.
- Payroll Management — Salary structure, salary assignment, salary slips, dues, advances.
- Routine Management — Class routines, syllabus, assignments, exam routines, seating plans.
- Library Management — Book catalog, members, issue/return, barcode printing.
- Exam Module — Exam setup, mark entry, results, tabulation sheets, result cards, online exams.
- Layout & Certificates — Admit cards, ID cards, certificates, and other printable layouts.
- SMS Module — SMS templates and messaging to students, parents, and staff.
- Administrator — Admin user accounts and role permissions.
- System — Core system configuration and maintenance tools.
- Master Configuration — System settings, roles, users, institutes, branches, payment gateways.
- CMS Management — Website content such as pages, news, and notices for the public site.
- WhatsApp — WhatsApp messaging integration and settings.
- Hostel Management — Hostel rooms, allocation, and resident tracking.
- Transport Management — Vehicles, routes, and student transport assignment.
- Google Meet — Schedule and join online classes via Google Meet.
- AI Assistant — In-panel AI assistant for quick help and lookups.
Step 2: Students Information
Navigate to Students Information to admit new students and manage existing student records — profile details, class/section assignment, guardian information, student categories, and ID cards. This is where a student's record is created before they can appear in Attendance, Fees, or Exam screens.
Step 3: Manage Staff & Teachers
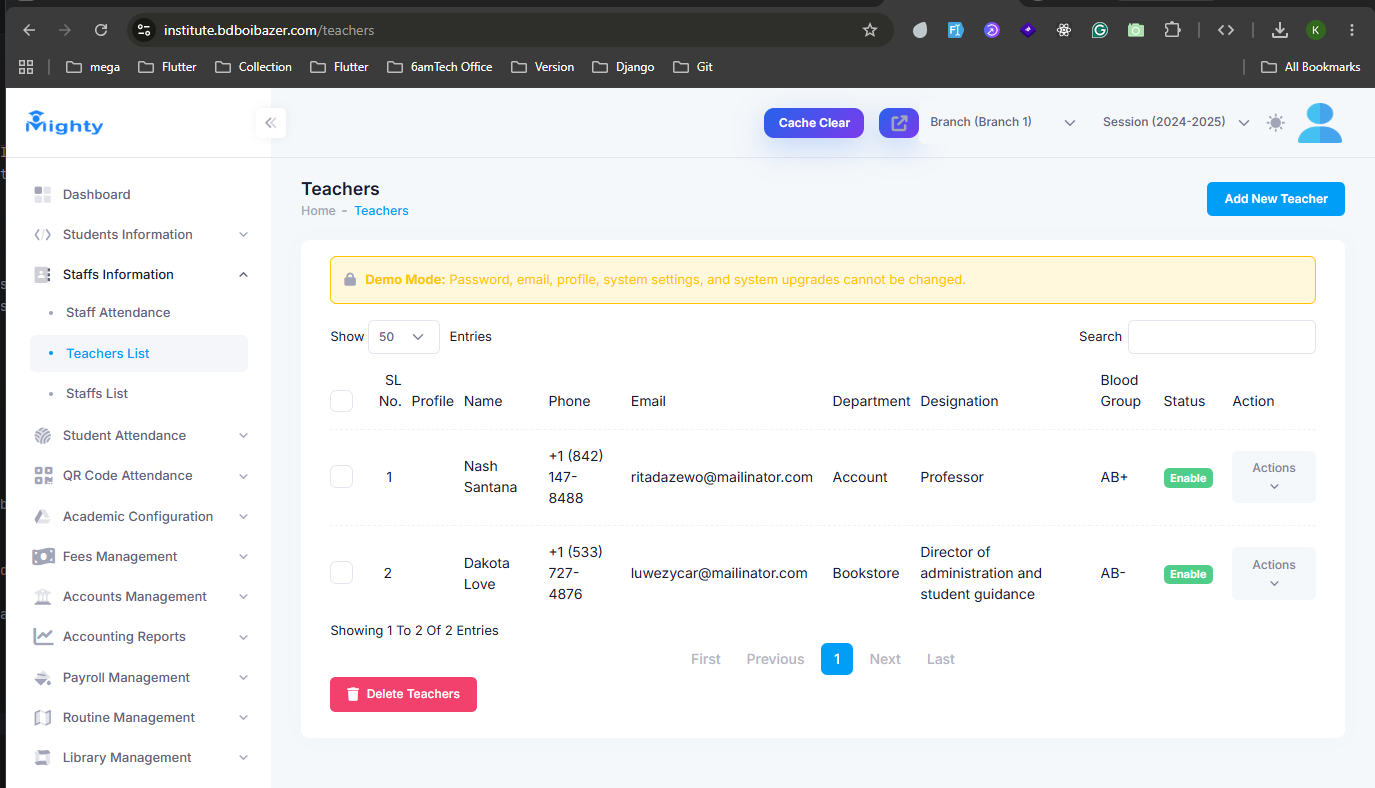
- Navigate to Staffs Information → Teachers List (or Staffs List for non-teaching staff).
- Browse each teacher's profile photo, phone, email, department, designation, and blood group, and toggle their status between Enable and Disable.
- Click Add New Teacher to register a new staff member, or use the row's Actions menu to edit or remove one. Staff Attendance, in the same menu, is used to mark daily staff attendance.
Step 4: Take Student Attendance
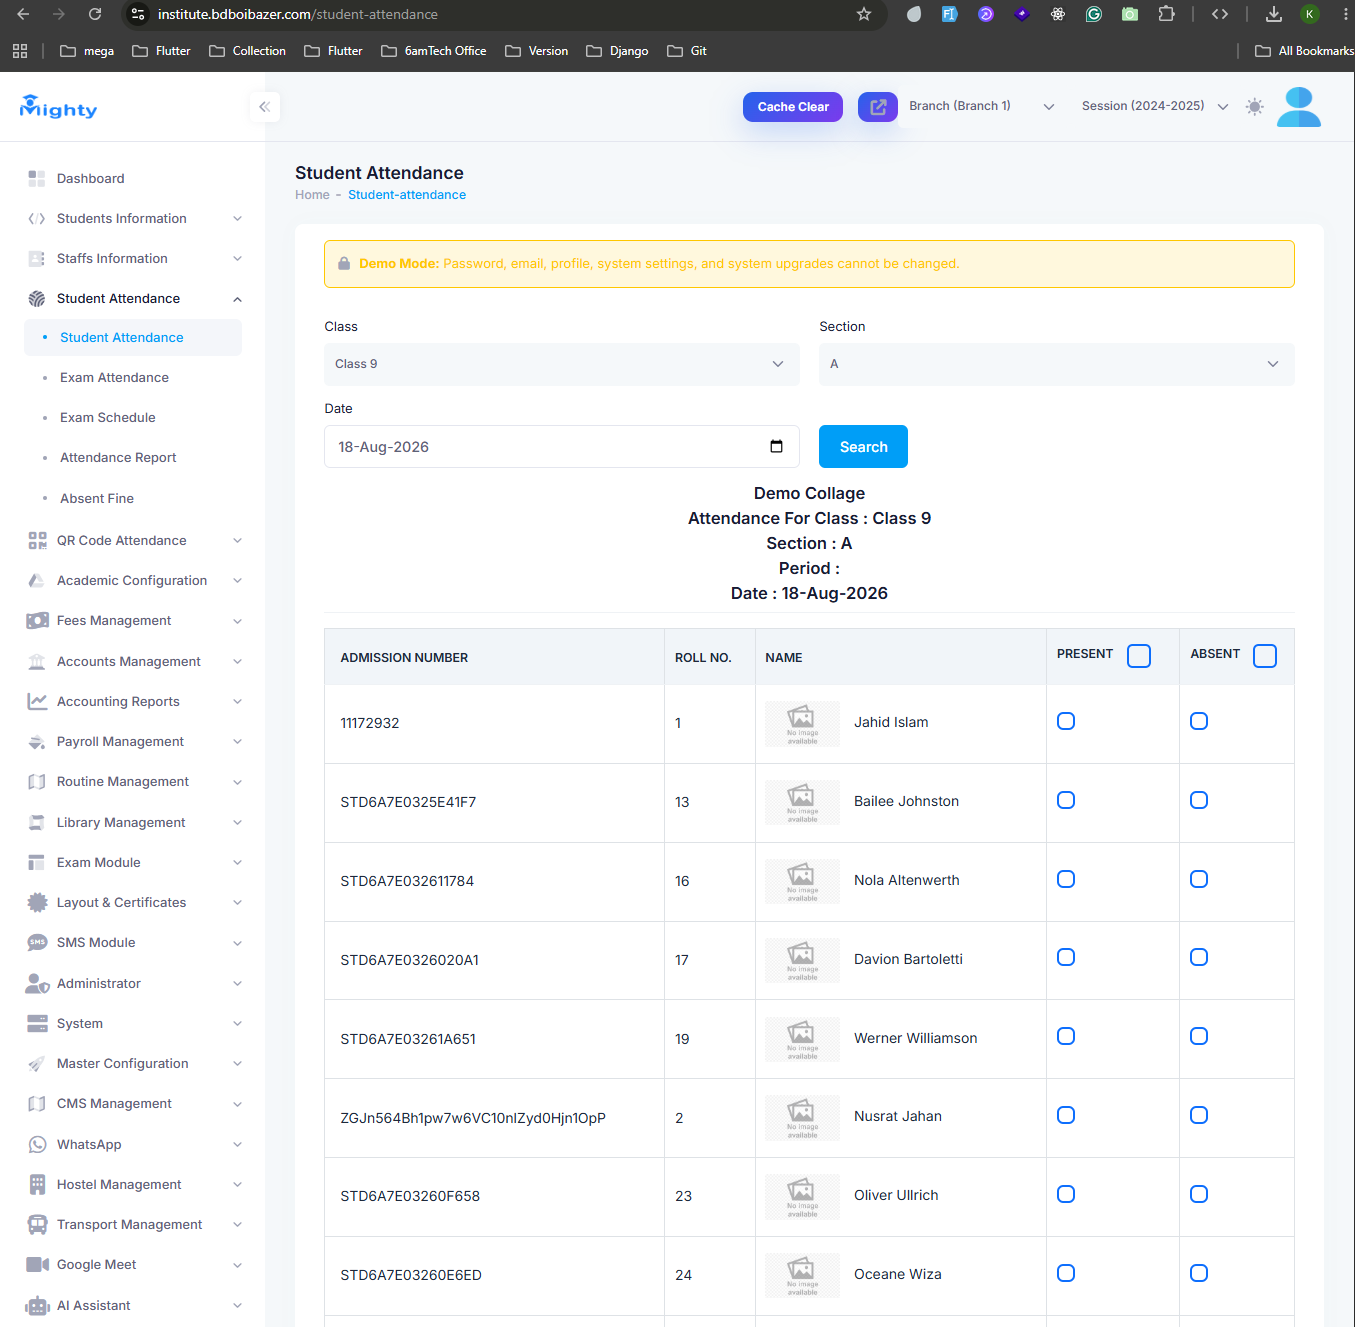
- Navigate to Student Attendance → Student Attendance.
- Select the Class, Section, and Date, then click Search to load the student list.
- Mark each student Present or Absent using the checkboxes next to their name and roll number, then save.
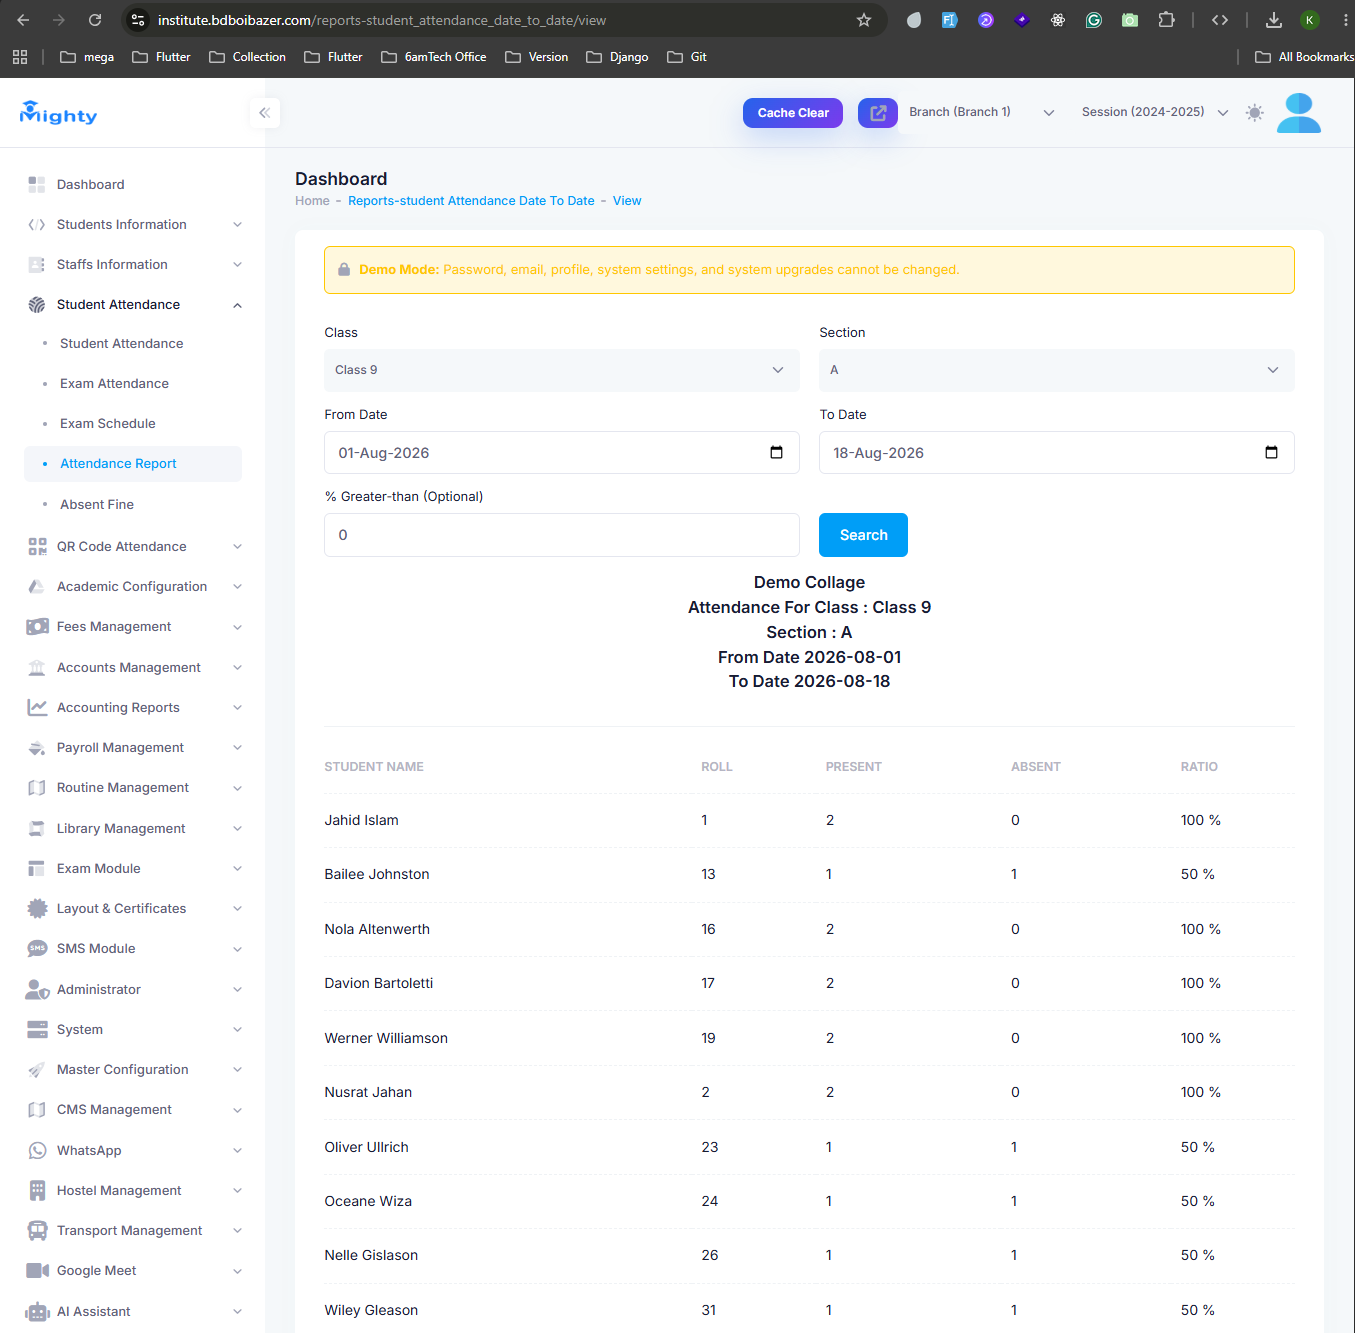
Exam Attendance and Exam Schedule, in the same menu, cover attendance during exams. To review daily attendance afterward, open Attendance Report, choose a class, section, and date range, and click Search to see each student's present/absent count and attendance ratio. Absent Fine lists any lab, quiz, or attendance-percentage fines generated from absences.
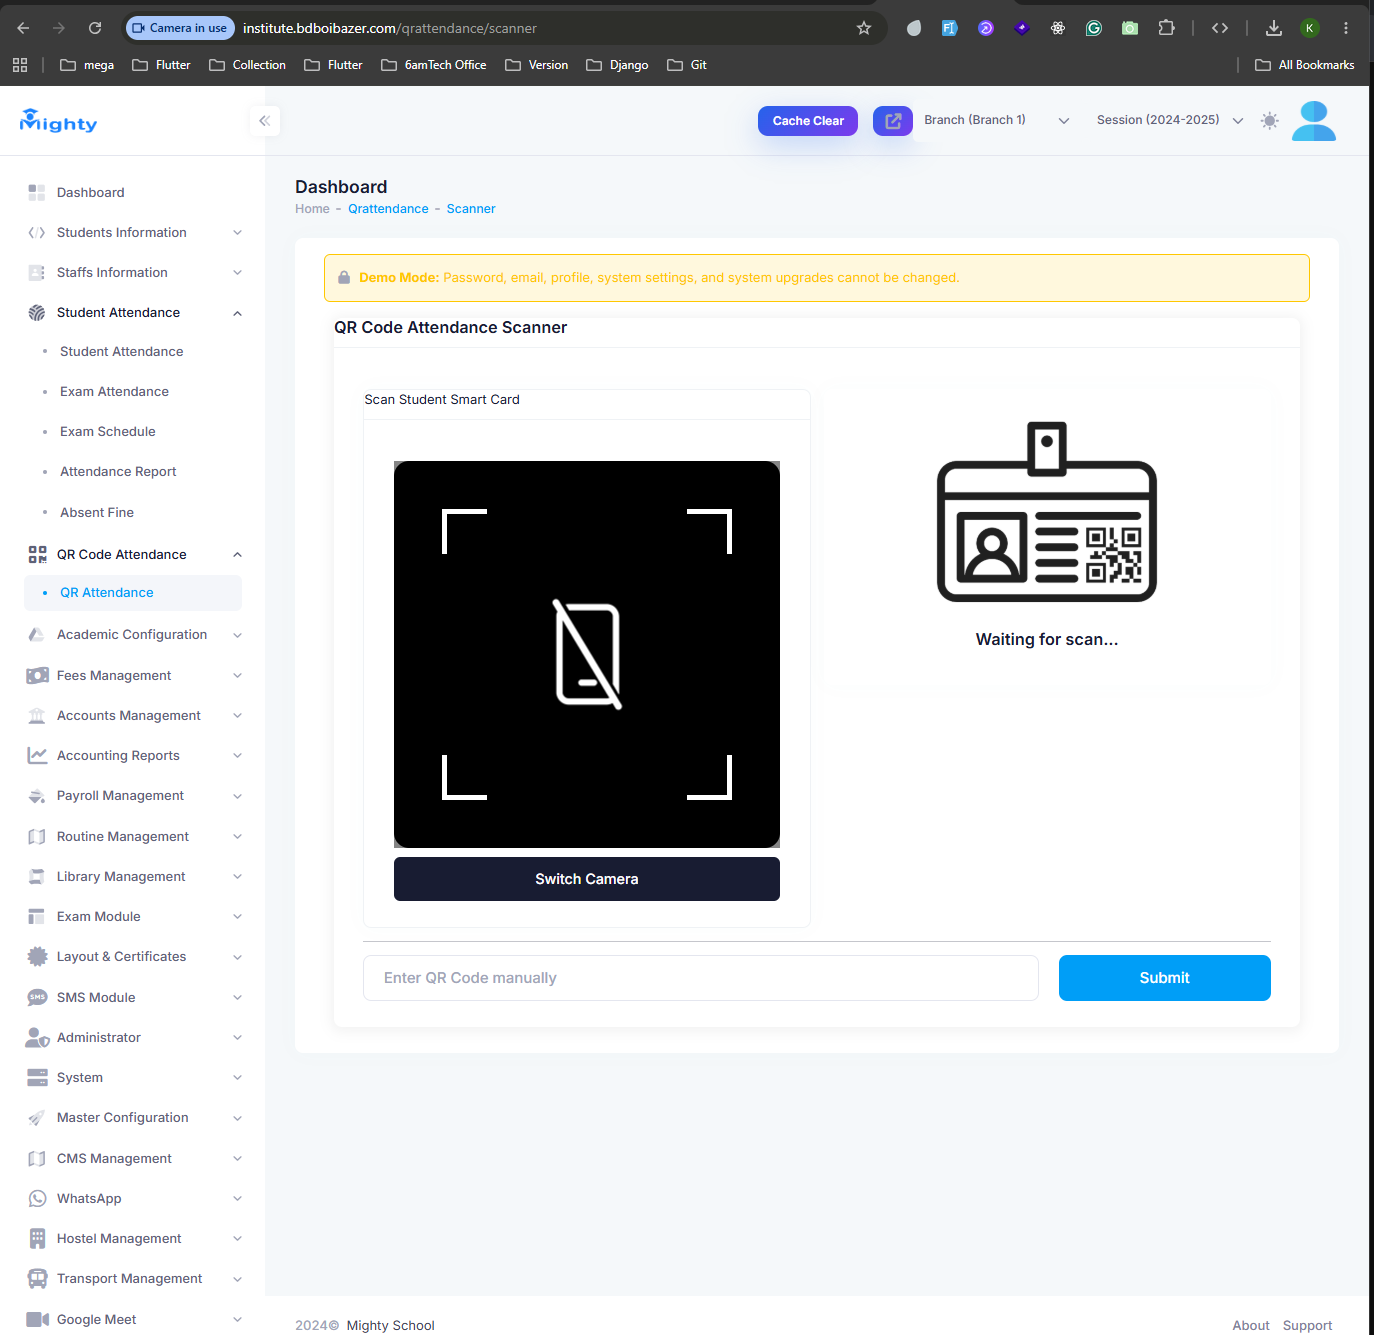
Step 5: QR Code Attendance
For faster check-in, Mighty School can take attendance by scanning a student's ID card QR code instead of ticking boxes manually.
- Navigate to QR Code Attendance → QR Attendance.
- Allow the browser to access your camera when prompted.
- Scan the student's smart card, or type the code into Enter QR Code manually and click Submit if a scanner isn't available.
Step 6: Academic Configuration
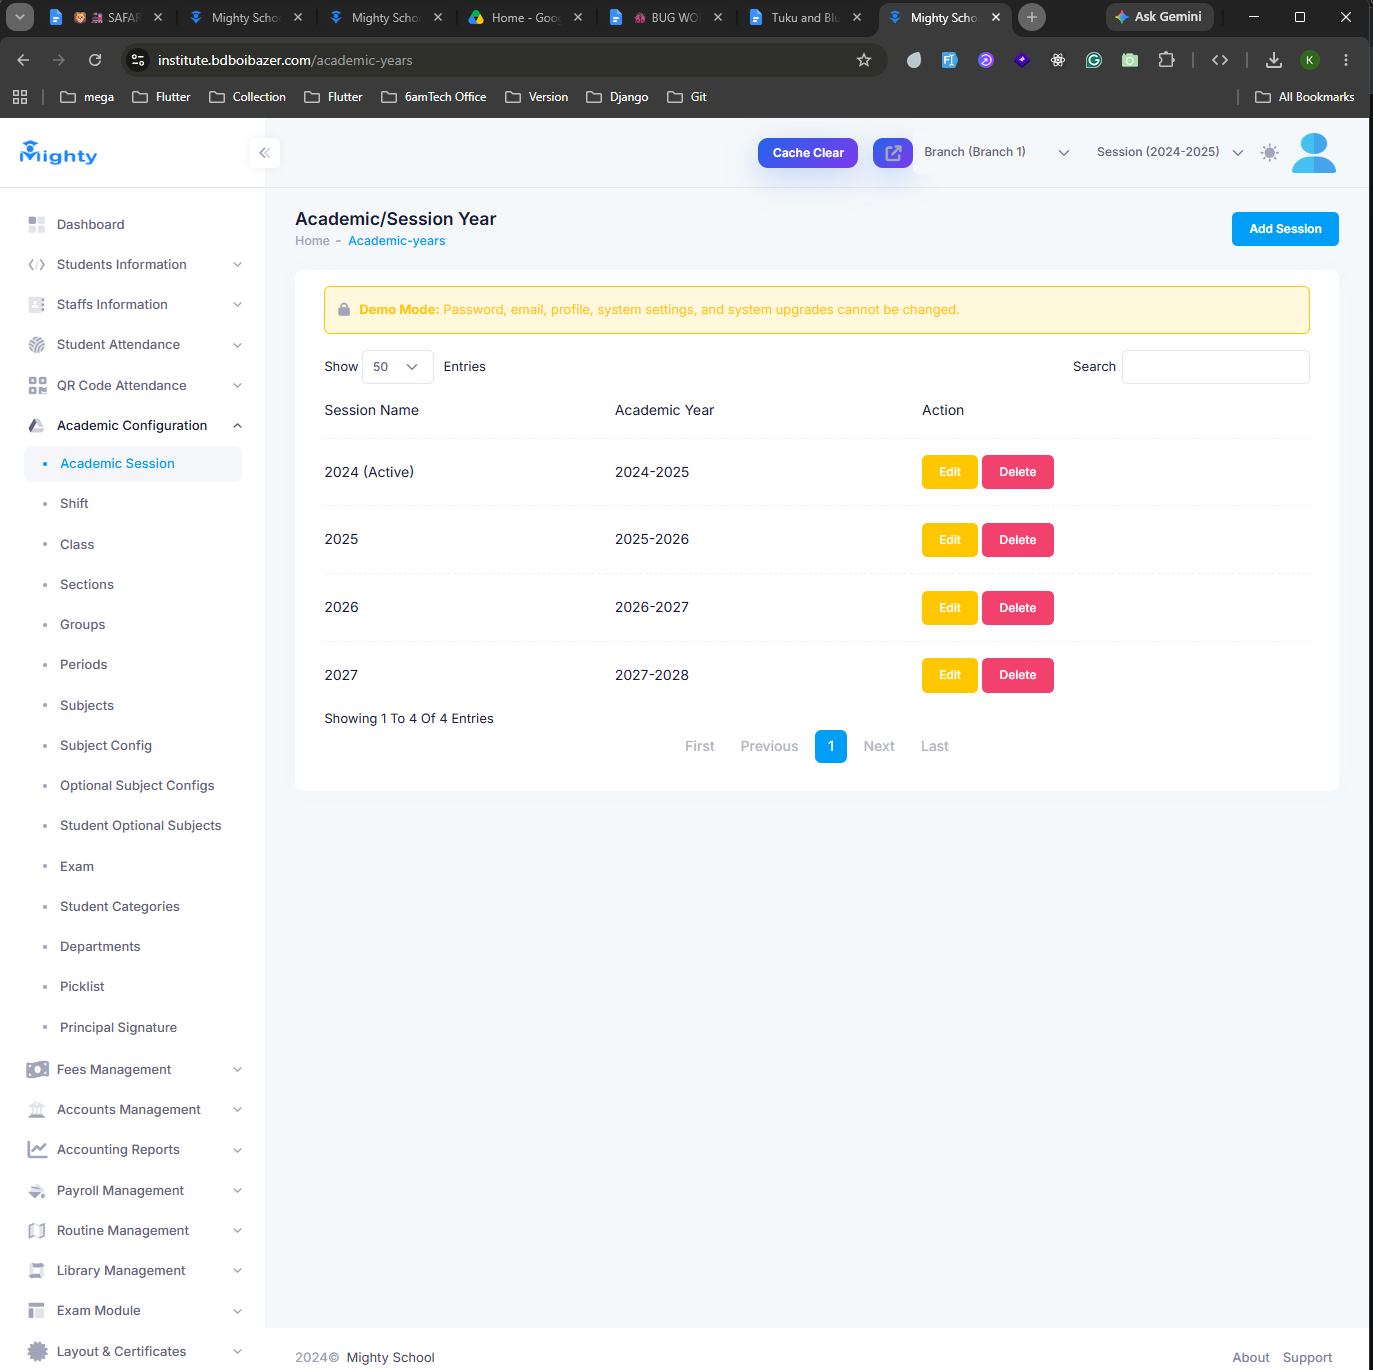
Before working with classes, exams, or fees, set up the institute's core academic structure under the Academic Configuration menu: Academic Session, Shift, Class, Sections, Groups, Periods, Subjects, Subject Config, Departments, Student Categories, and Picklist.
- Open Academic Configuration → Academic Session.
- Click Add Session to create a new academic year, or use Edit to update an existing one. Only one session can be Active at a time — data entry and reports use the session selected at the top of the page.
Step 7: Collect Fees
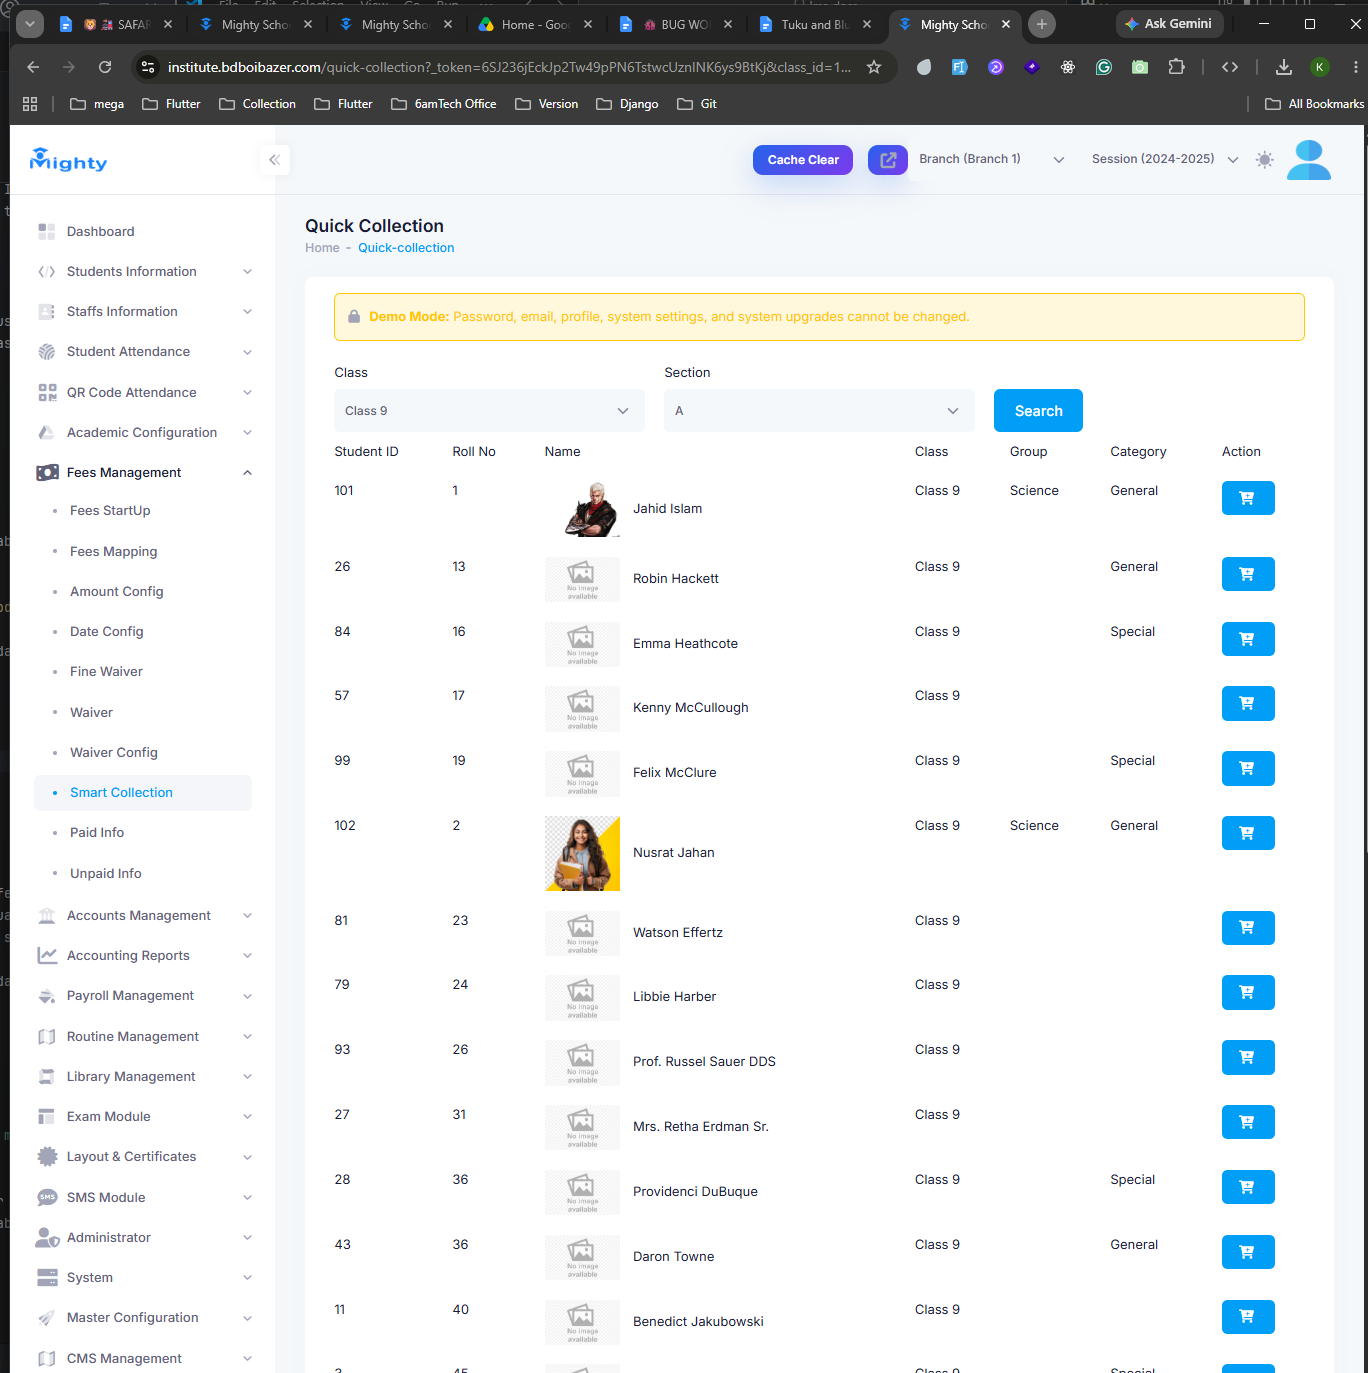
- Navigate to Fees Management → Smart Collection (Quick Collection).
- Select a Class and Section and click Search to list every student, along with their group and category.
- Click the cart icon on a student's row to open their fee items and collect payment.
The rest of the Fees Management menu handles setup and follow-up: Fees StartUp and Fees Mapping define fee heads and assign them to classes; Amount Config and Date Config set amounts and due dates; Fine Waiver and Waiver apply discounts or exemptions; and Paid Info / Unpaid Info show who has and hasn't paid.
Step 8: Accounts & Transactions
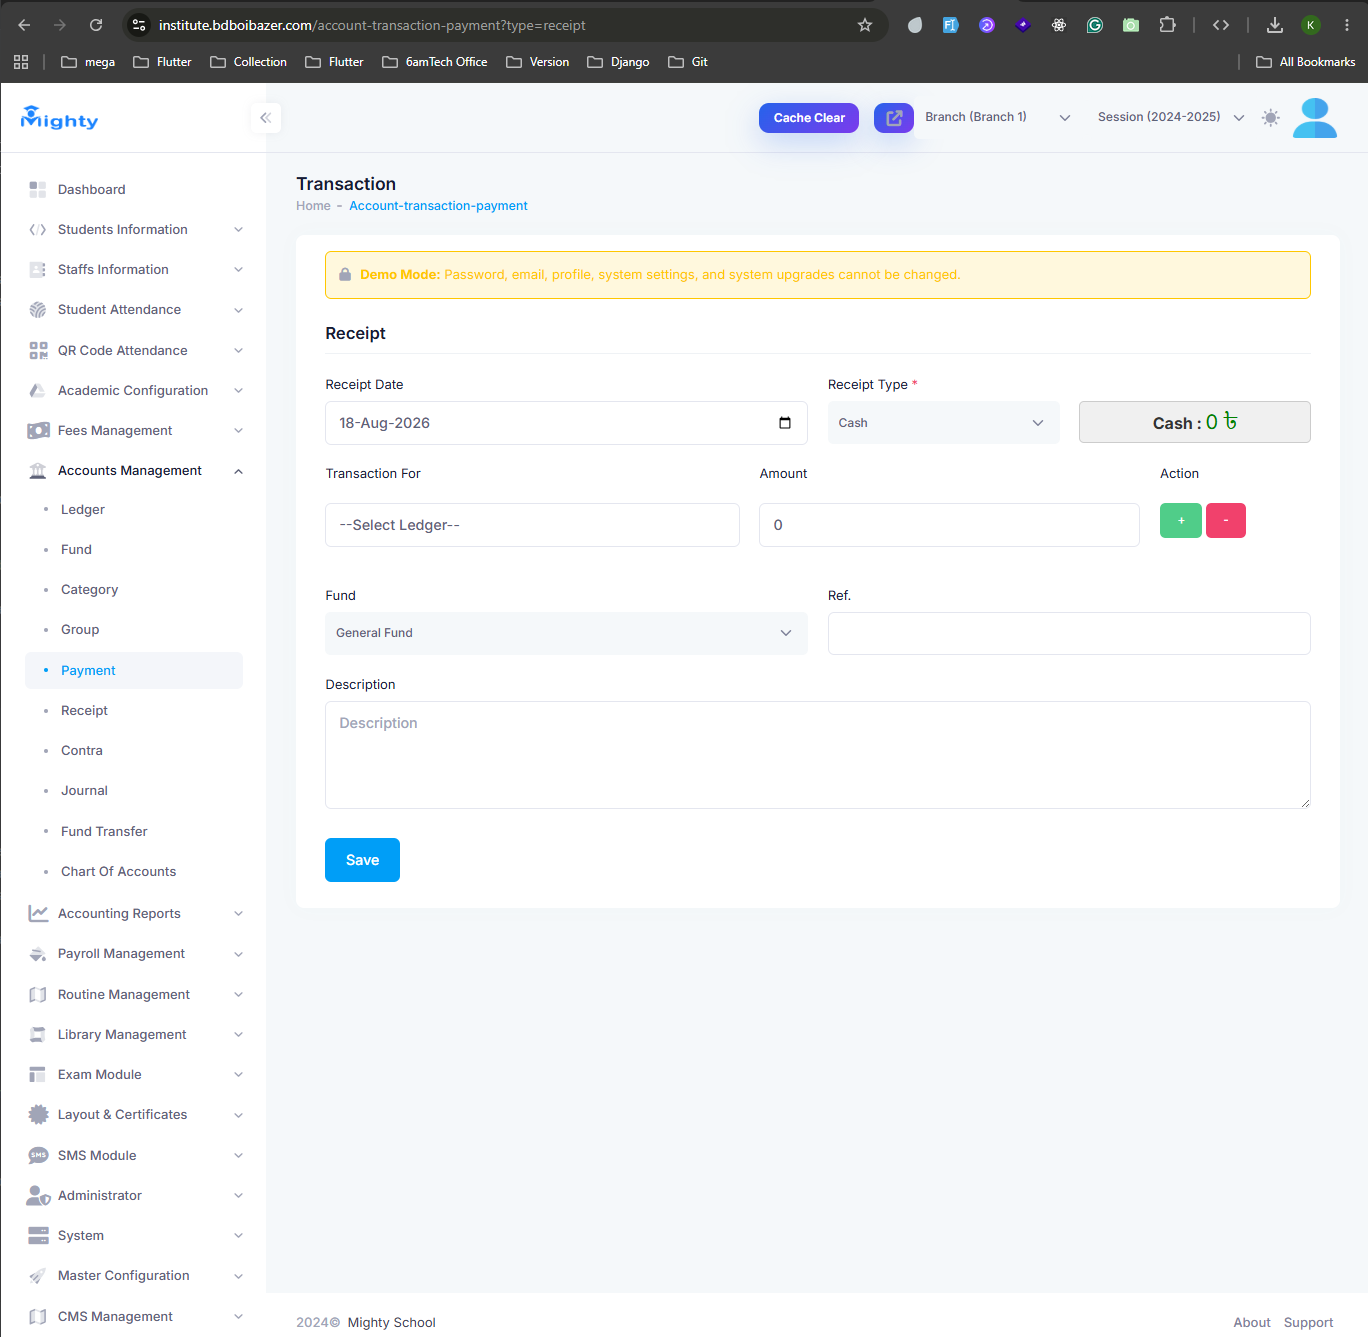
- Navigate to Accounts Management → Payment or Receipt to record money going out or coming in.
- Set the date and receipt type (e.g. Cash), choose a ledger under Transaction For, and enter the Amount, Fund, and an optional reference and description.
- Click Save to post the transaction.
Contra, Journal, and Fund Transfer cover other transaction types, while Ledger, Fund, Category, Group, and Chart of Accounts let you set up the underlying accounting structure.
Step 9: Accounting Reports
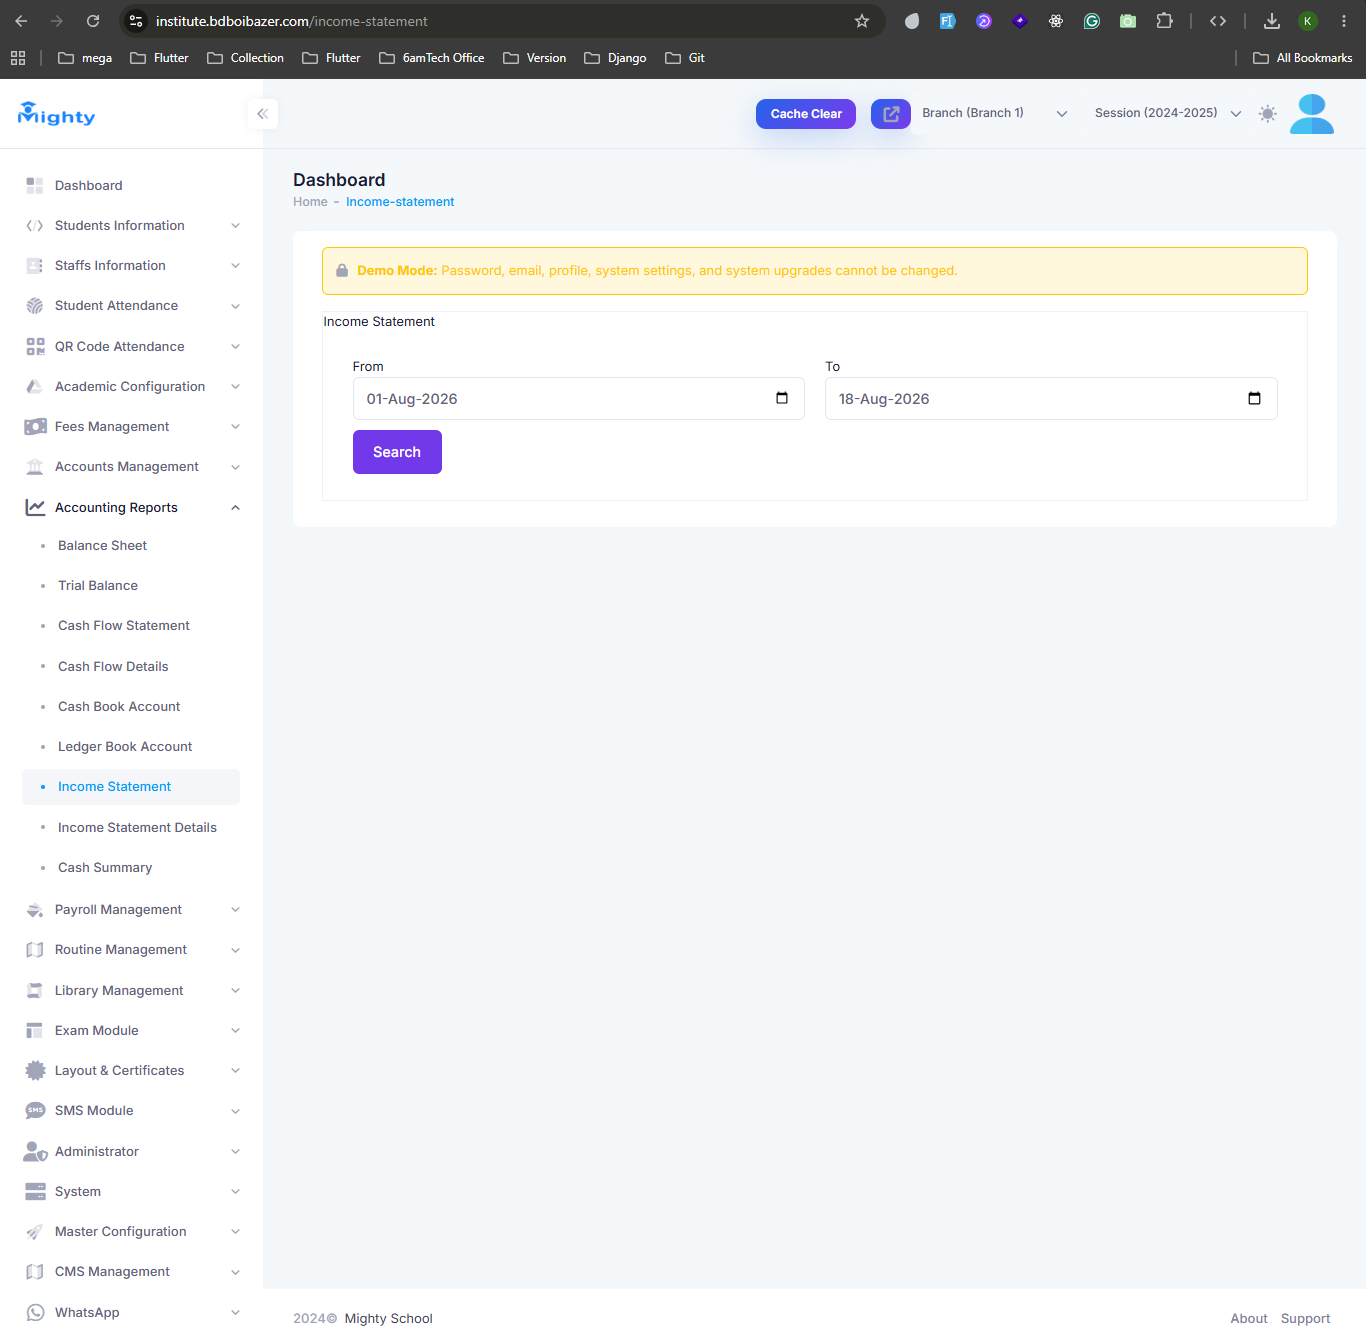
- Navigate to Accounting Reports and choose a report — Income Statement, Balance Sheet, Trial Balance, Cash Flow Statement, Cash Flow Details, Cash Book Account, Ledger Book Account, Income Statement Details, or Cash Summary.
- Set a From and To date and click Search to generate the report for that period.
Step 10: Payroll Management
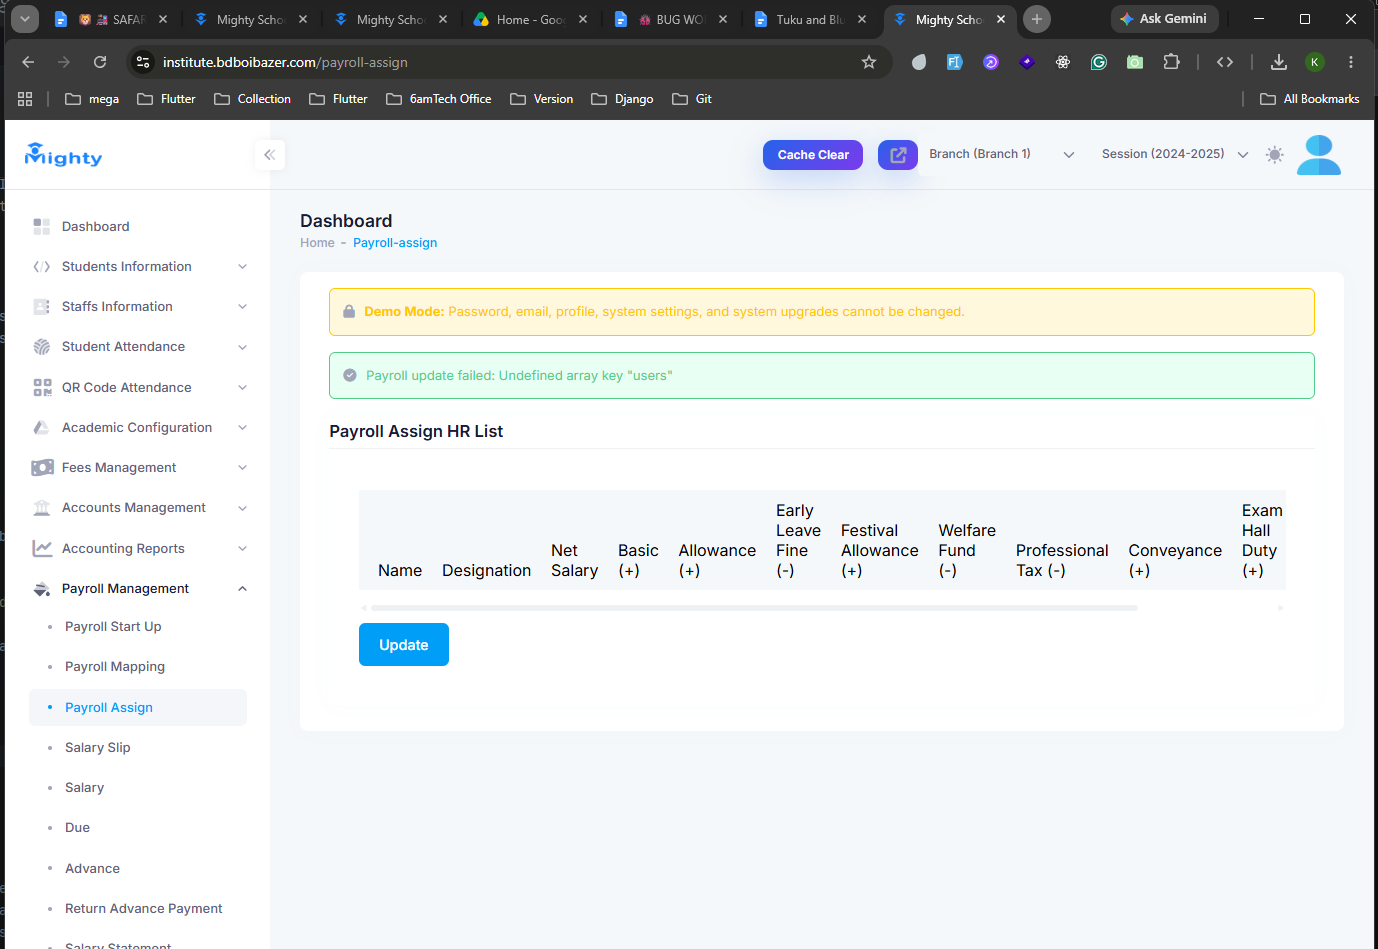
- Set up salary structures first under Payroll Management → Payroll Start Up and Payroll Mapping.
- Open Payroll Assign to review or adjust each staff member's Net Salary, Basic, Allowances, and deductions (Early Leave Fine, Welfare Fund, Professional Tax, and so on), then click Update.
- Use Salary Slip, Salary, Due, Advance, and Return Advance Payment to process monthly pay, track outstanding dues, and manage salary advances. Salary Statement pulls a summary by year and month.
Step 11: Routine Management
- Navigate to Routine Management → Class Routine.
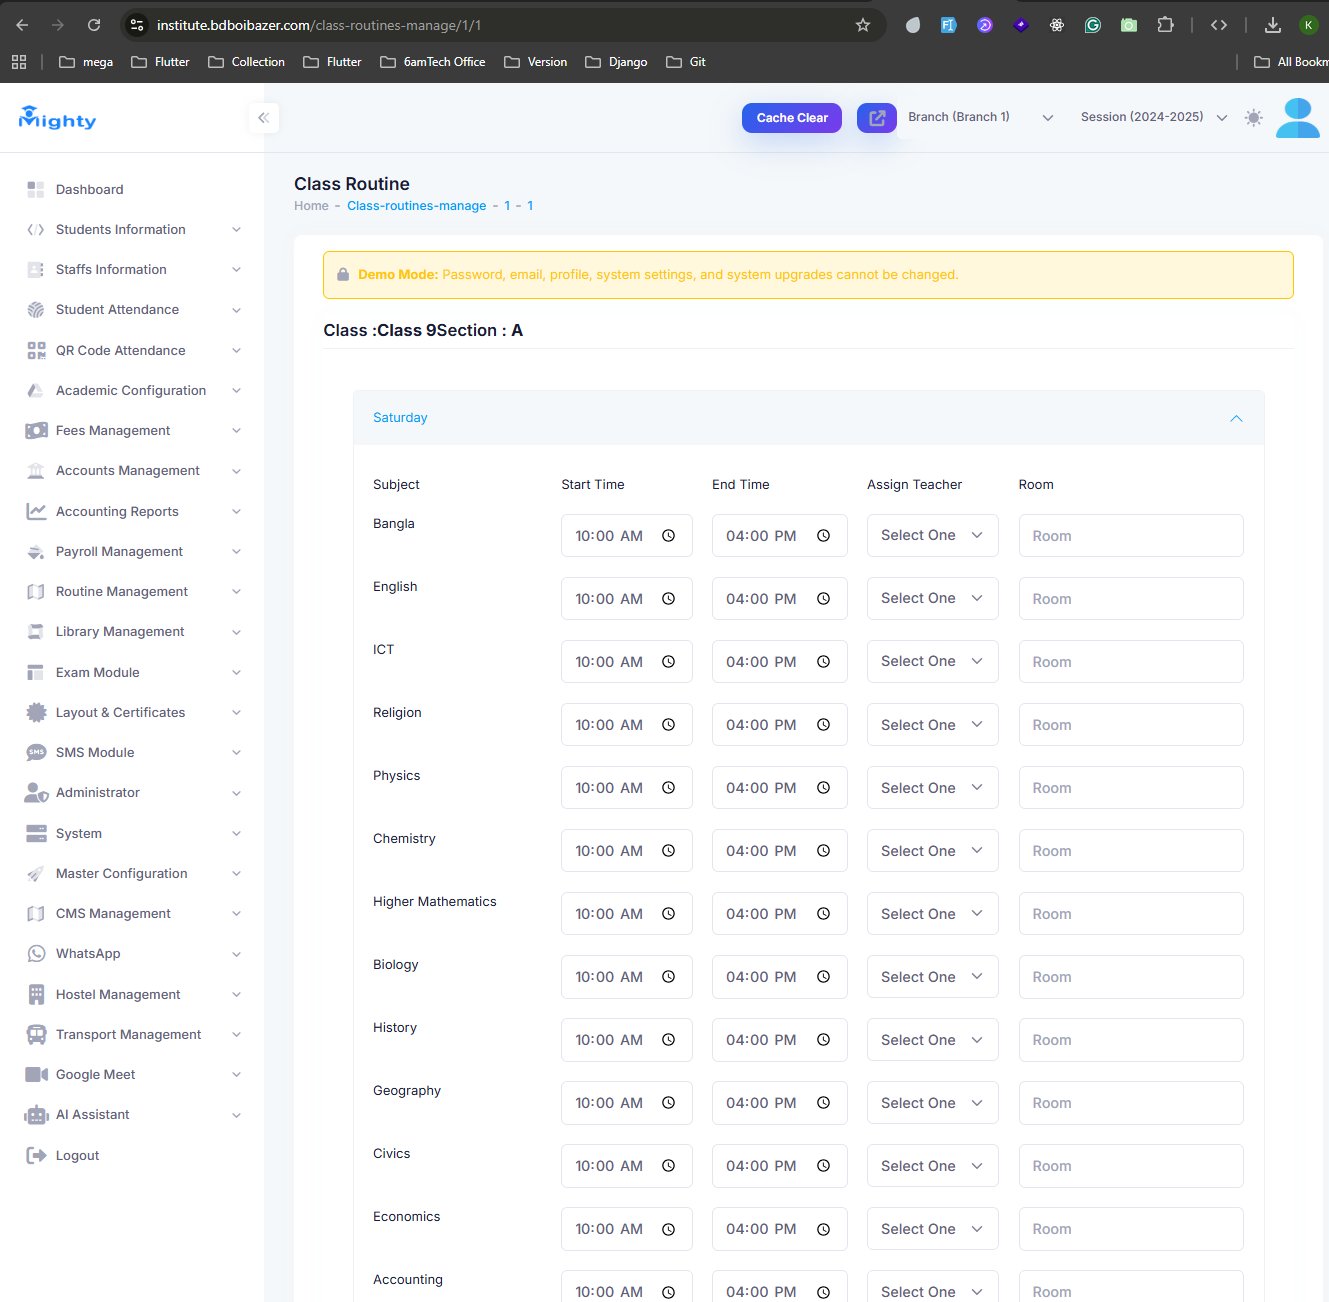
- Filter the list by class, then click View Routine to see a section's schedule, or Manage Routine to edit it.

- Inside Manage Routine, each weekday is its own collapsible panel. For every subject, set the Start Time, End Time, Assign Teacher, and Room, then save.
Syllabus and Assignments, in the same menu, publish the class syllabus and homework, while Exam Routine and Admit & Seat Plan handle exam-day scheduling and seating.
Step 12: Library Management
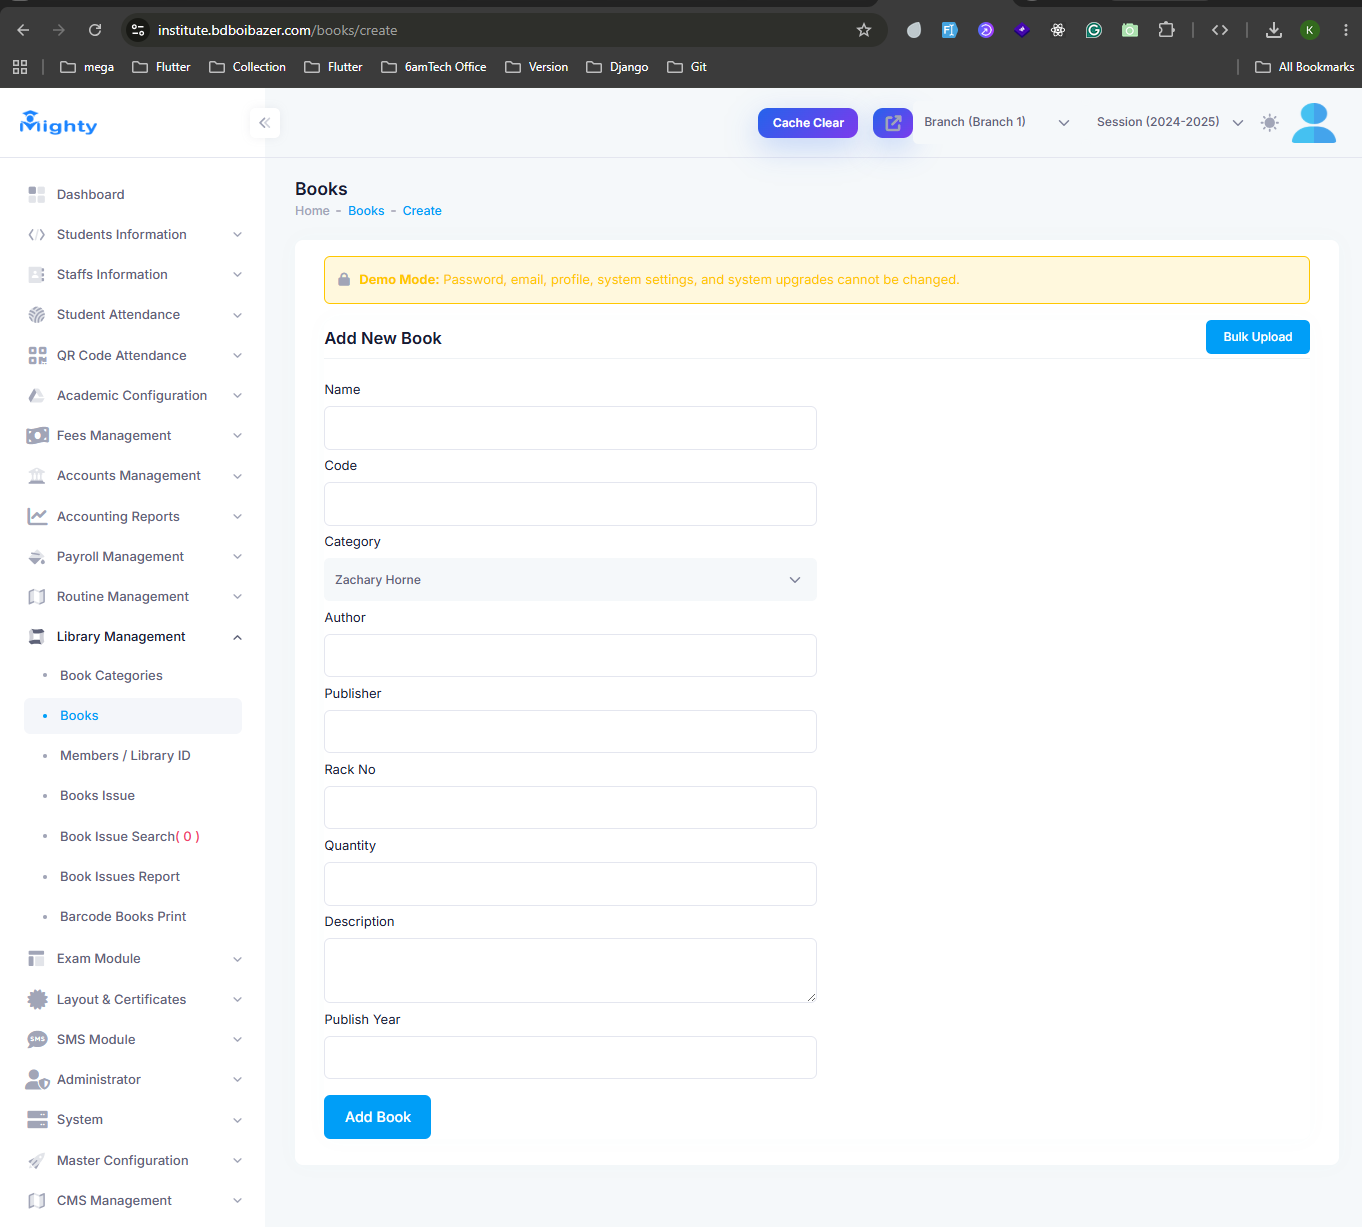
- Navigate to Library Management → Books and click Add New Book (or Bulk Upload for many books at once).
- Fill in the book's Name, Code, Category, Author, Publisher, Rack No., Quantity, and Publish Year, then click Add Book.
- Use Book Categories and Members / Library ID to manage catalog categories and library members, and Books Issue / Book Issue Search / Book Issues Report to track lending and returns. Barcode Books Print prints barcode labels for the catalog.
Step 13: Exam Module
The Exam Module covers the full exam cycle — from configuring exams to entering marks, publishing results, and generating printable result cards, tabulation sheets, and admit cards.
Set Up an Exam
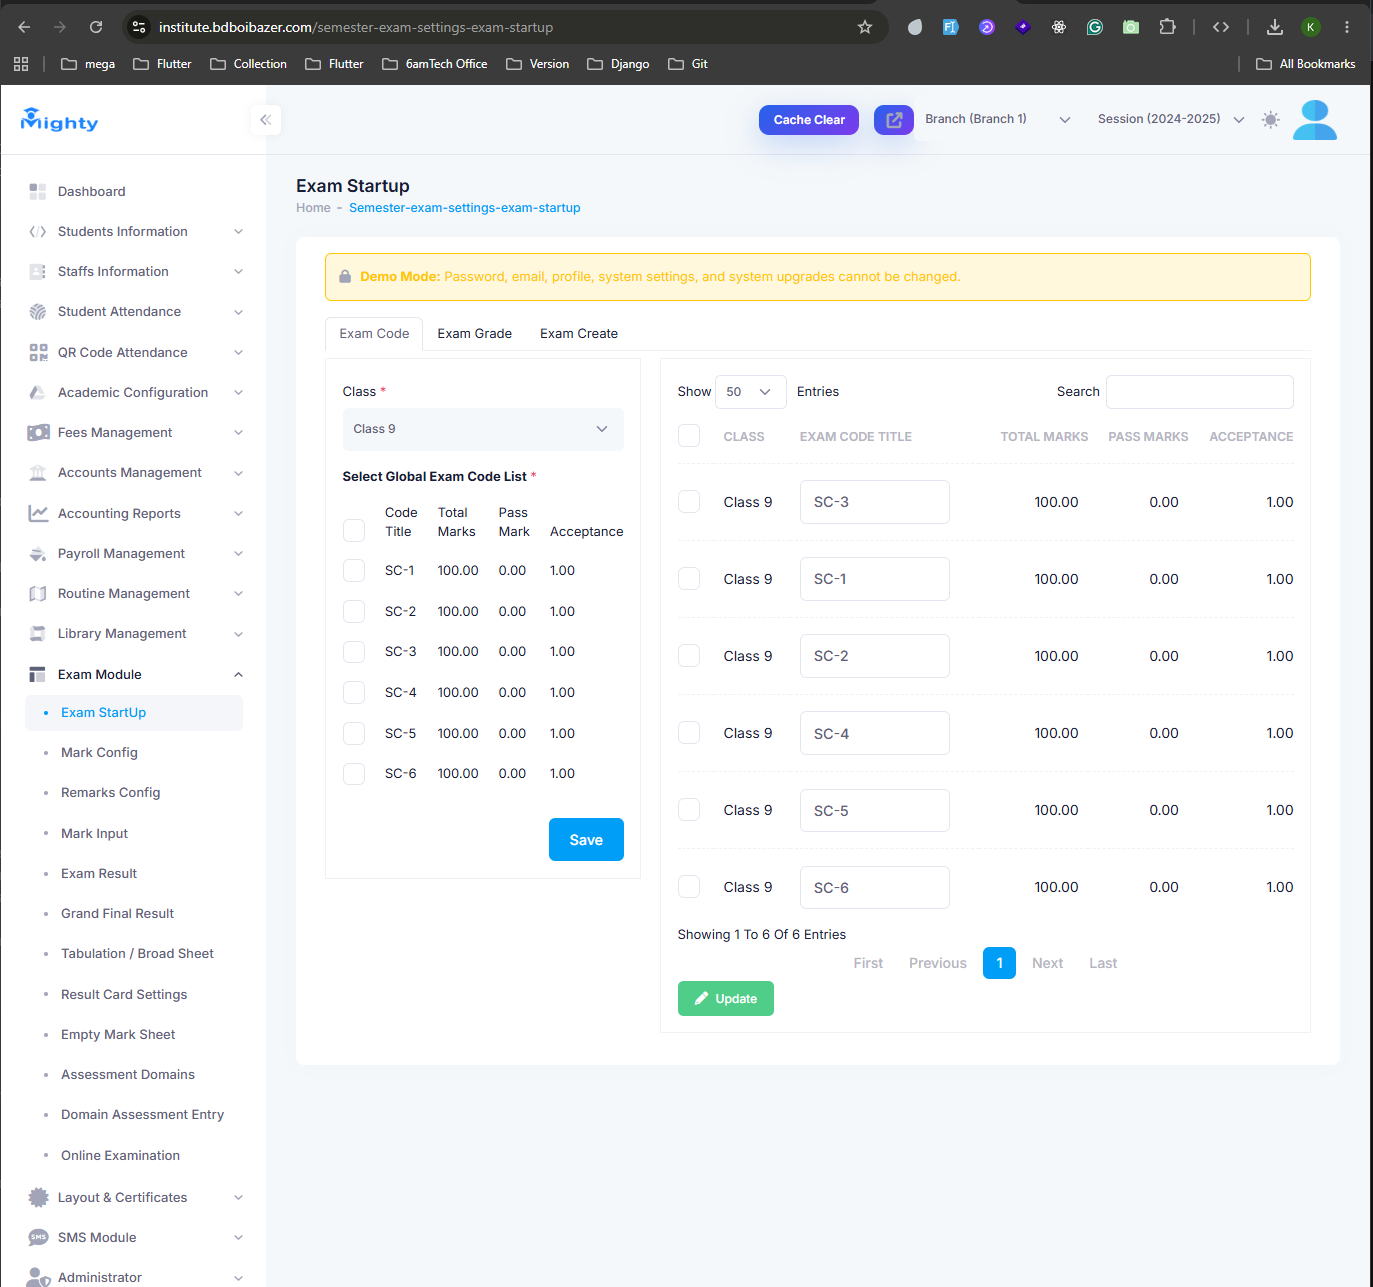
- Navigate to Exam Module → Exam StartUp.
- Select a Class, then choose which global exam codes apply to it from the Exam Code tab (each code shows its Total Marks, Pass Marks, and Acceptance ratio). The Exam Grade and Exam Create tabs configure grading scales and create the exam itself.
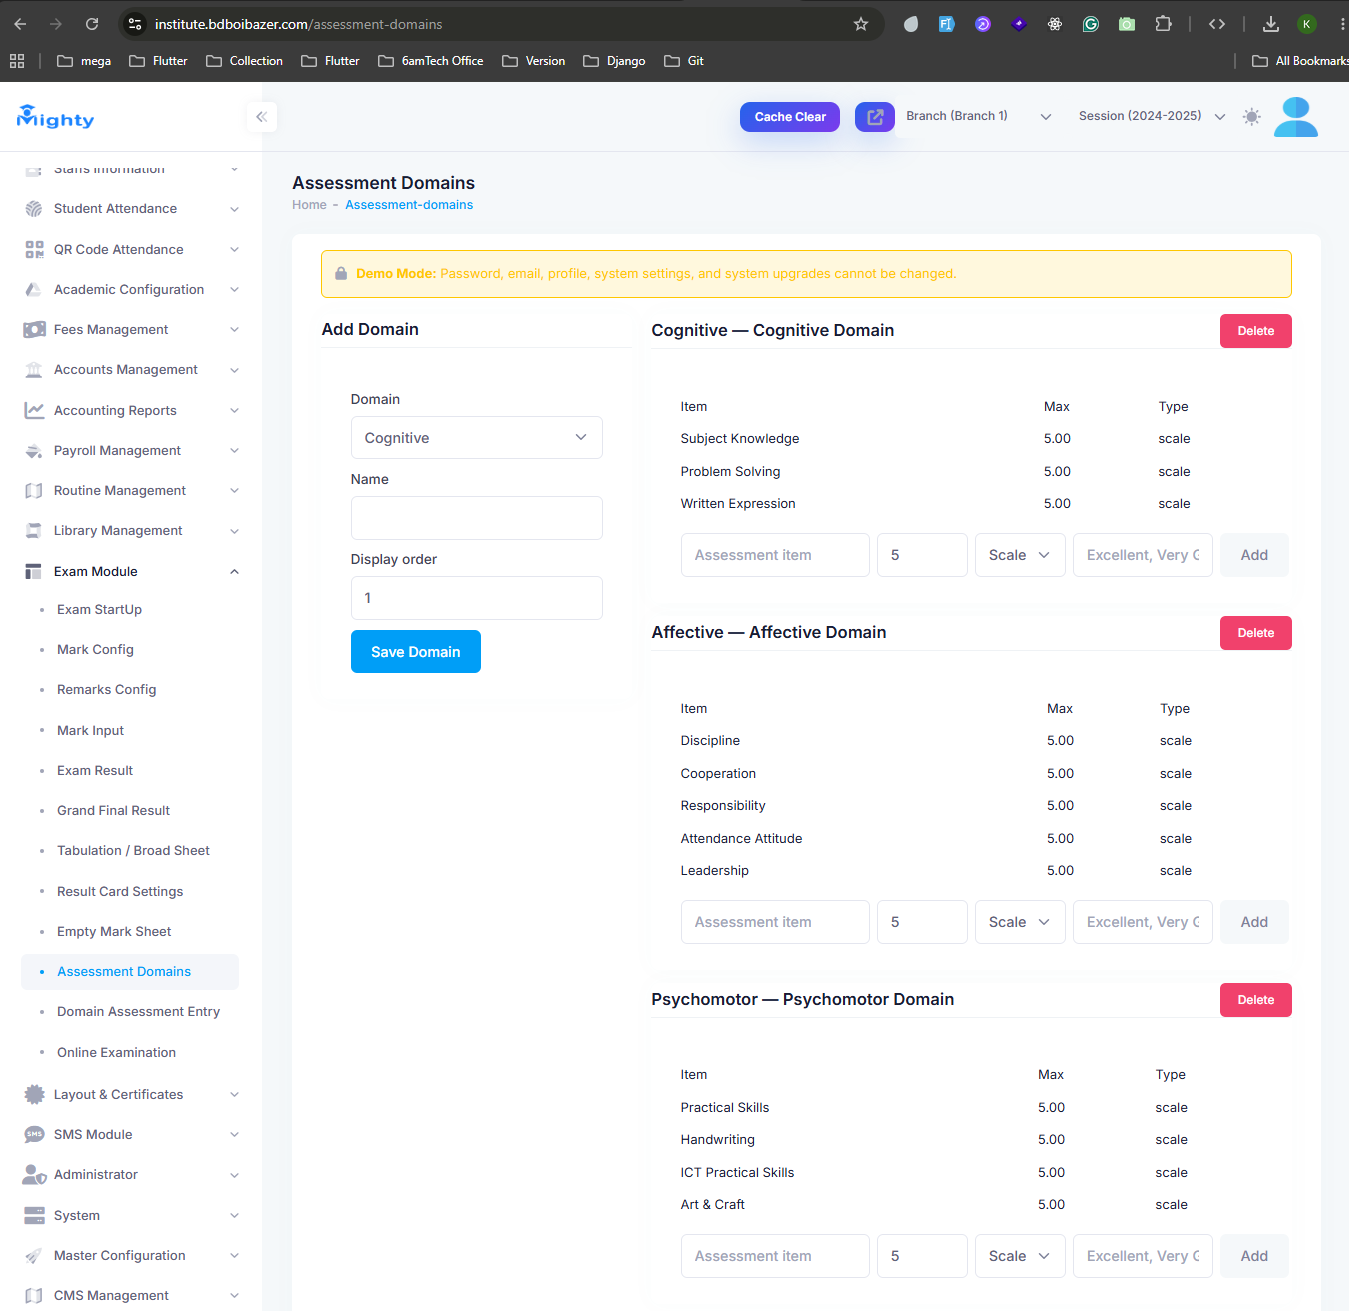
If you use domain-based (cognitive/affective/psychomotor) assessment alongside written marks, configure the domains first under Assessment Domains — each domain (e.g. Cognitive, Affective, Psychomotor) has its own list of scored items such as Subject Knowledge, Discipline, or Handwriting.
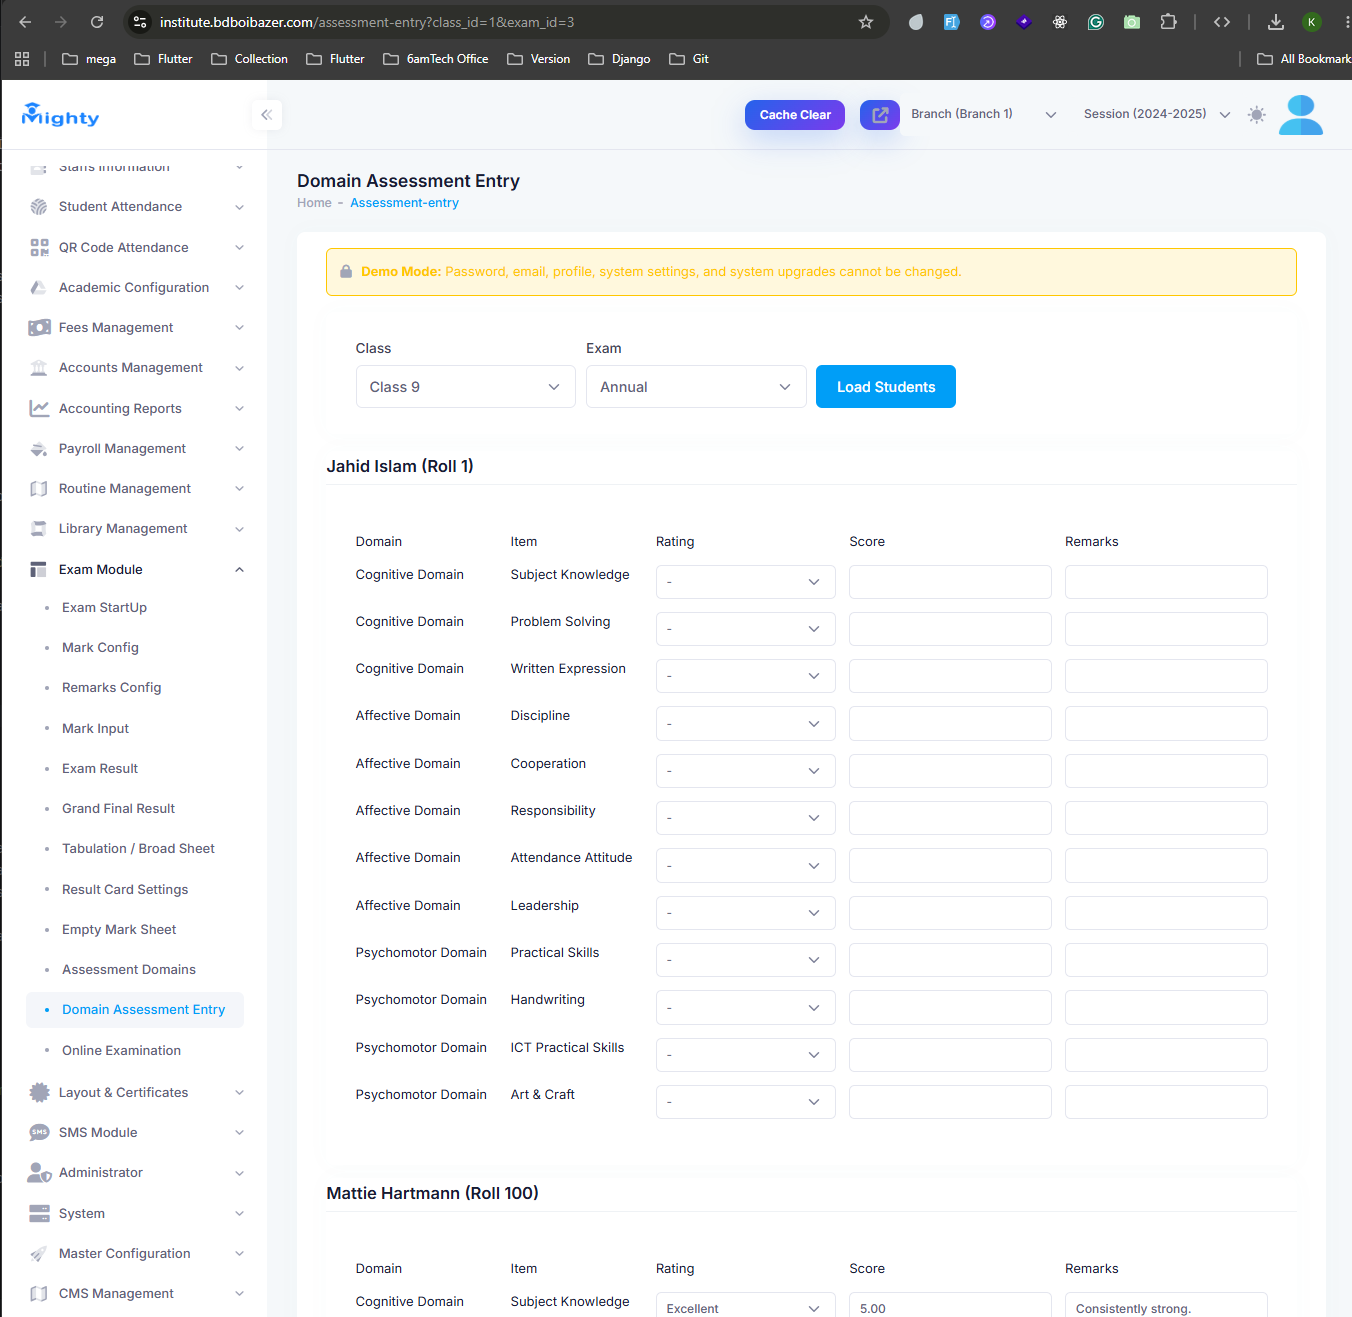
Then use Domain Assessment Entry to select a class and exam, load the student list, and rate each student on every domain item with a Rating, Score, and optional Remarks.
Enter Marks & Publish Results
- Use Mark Config and Remarks Config to define how marks map to grades and remarks, then enter written/MCQ marks under Mark Input (or print a blank Empty Mark Sheet for manual collection).
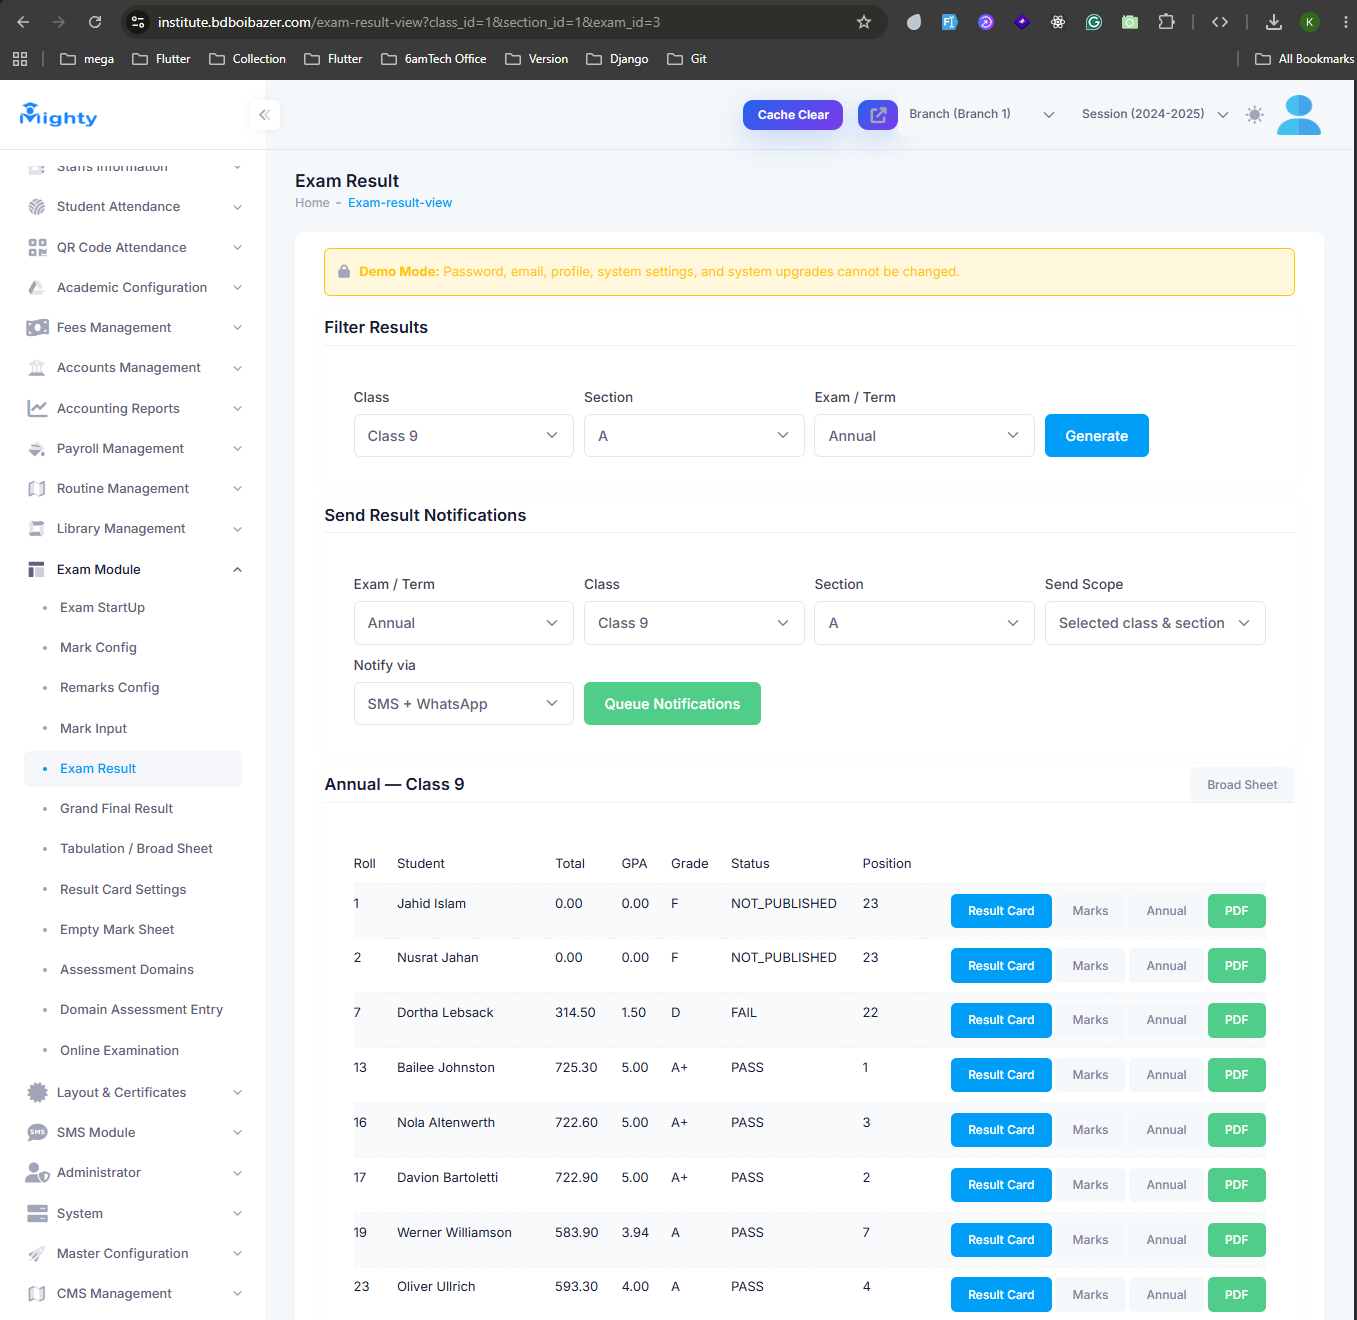
- Open Exam Result, filter by Class, Section, and Exam/Term, and click Generate to see each student's Total, GPA, Grade, Status, and Position.
- To notify parents and students once results are ready, set the Send Scope and delivery channel (SMS, WhatsApp, or both) under Send Result Notifications and click Queue Notifications.
Grand Final Result & Tabulation Sheet
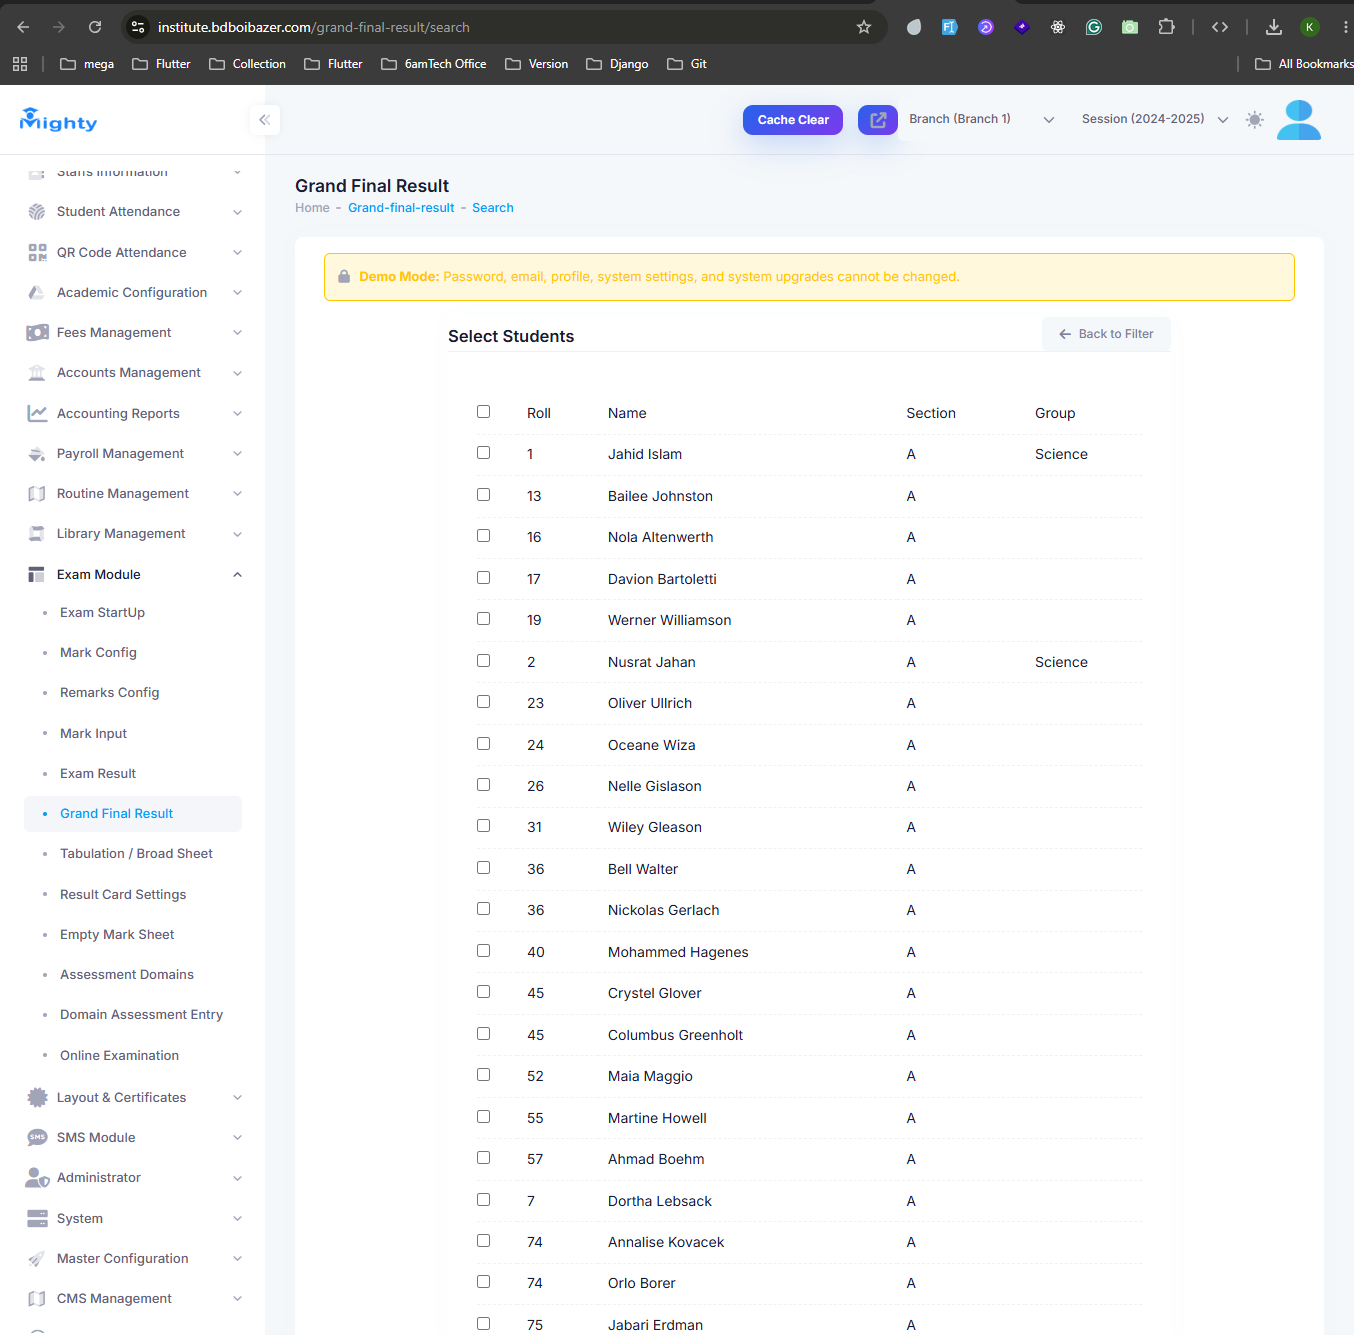
- Navigate to Grand Final Result to combine results across multiple exams/terms into one final result. Select the students to include and continue to generate it.
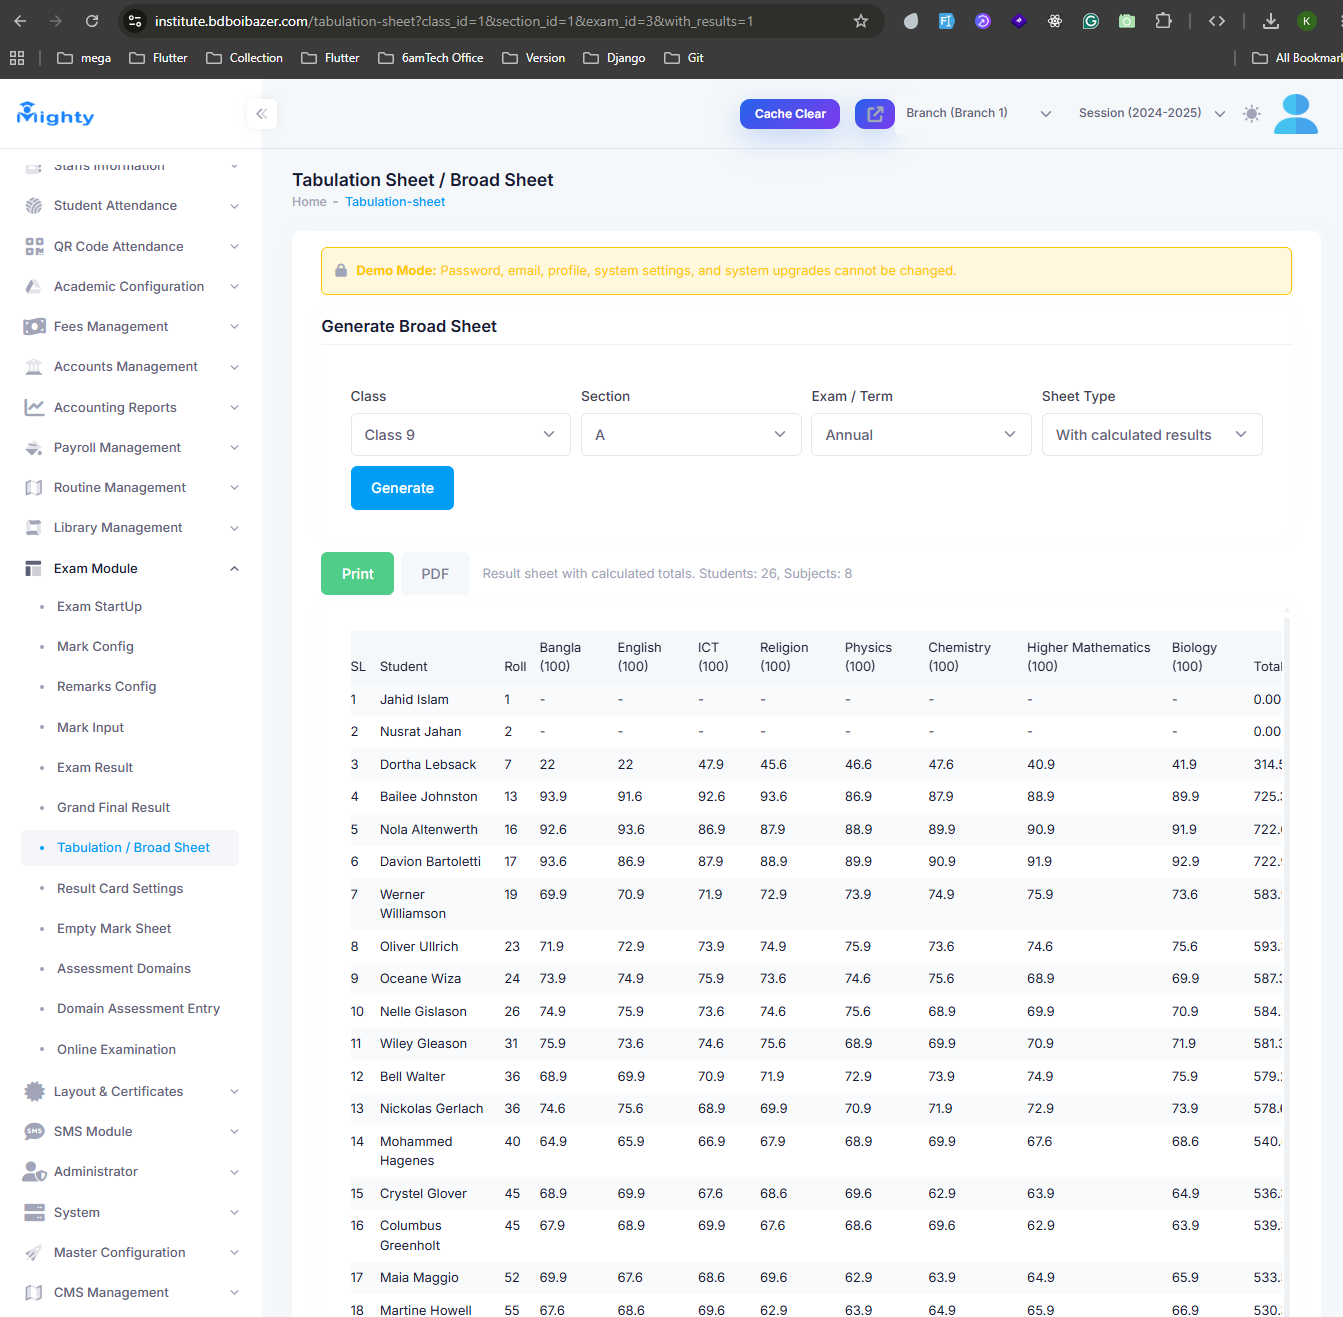
- Open Tabulation / Broad Sheet, choose a Class, Section, Exam/Term, and Sheet Type, then click Generate to view a subject-by-subject mark sheet for the whole class. Use Print or PDF to export it.
Result Cards & Admit Cards
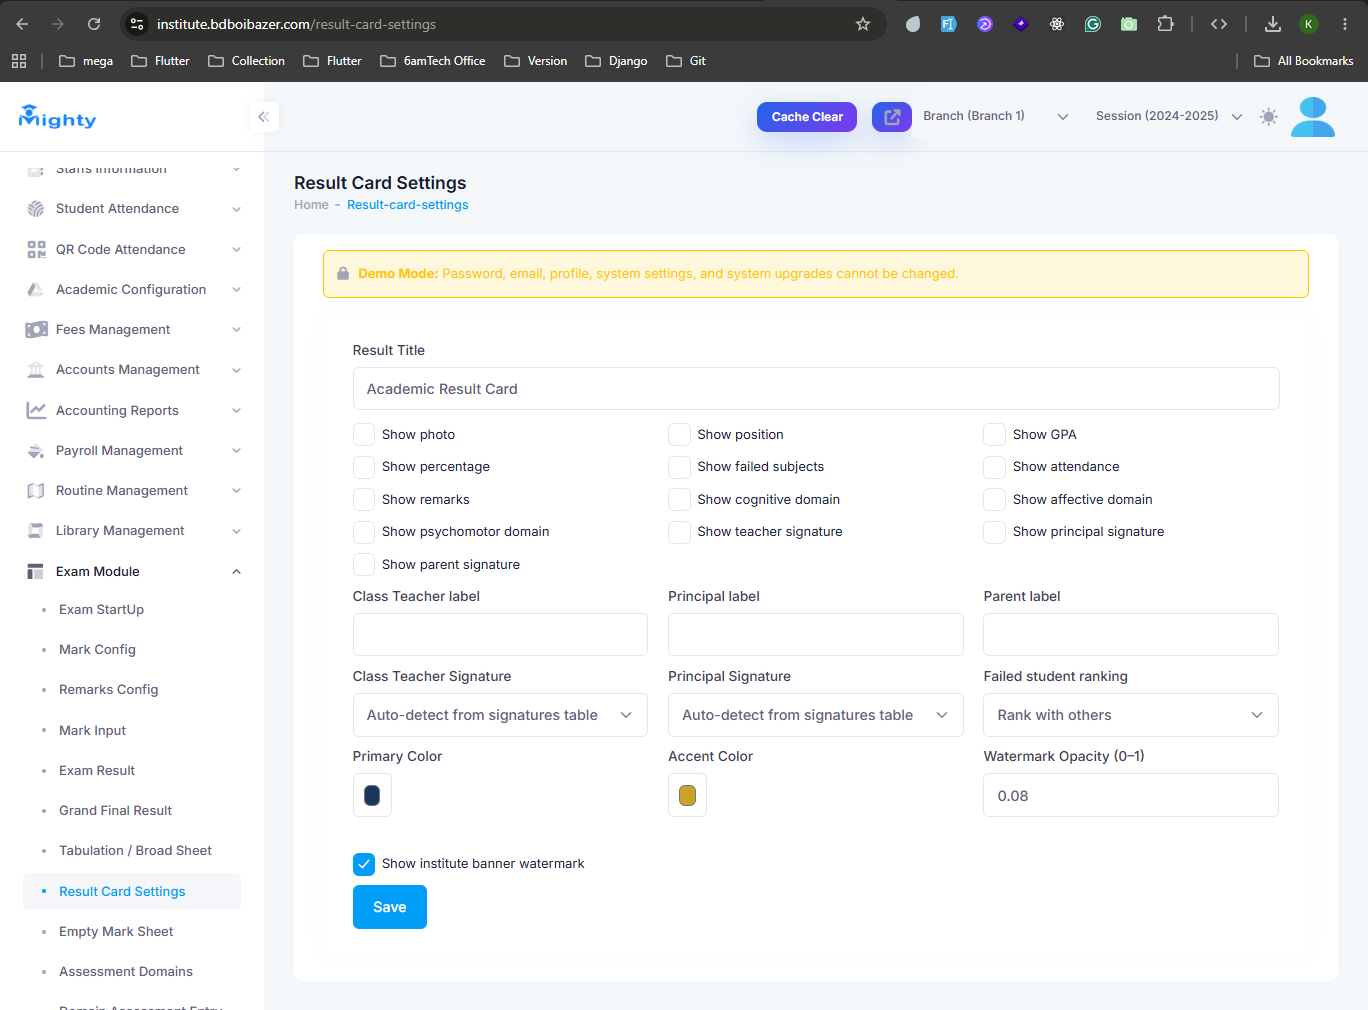
- Before printing individual result cards, open Result Card Settings to choose which fields appear (photo, percentage, GPA, attendance, signatures, and more) and set the card's title, labels, and color scheme.
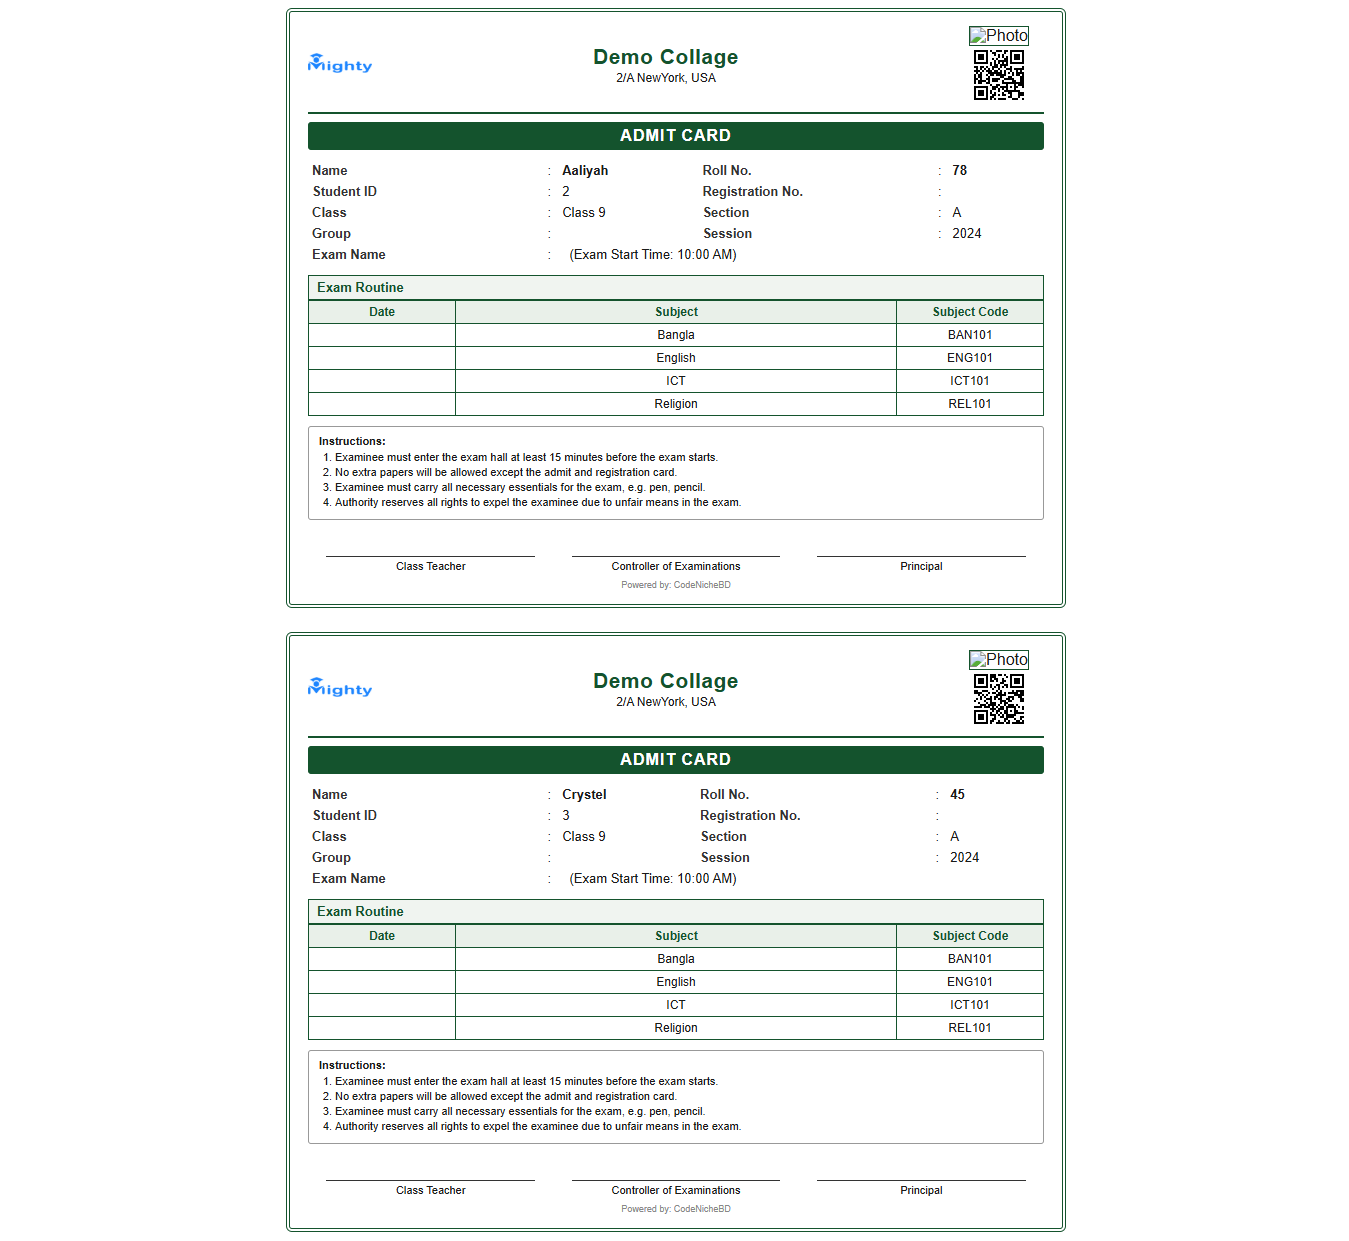
- Admit cards for each student — with their photo, subject/exam-code table, and exam instructions — can be generated and printed from Layout & Certificates or Admit & Seat Plan (under Routine Management).
Online Examination
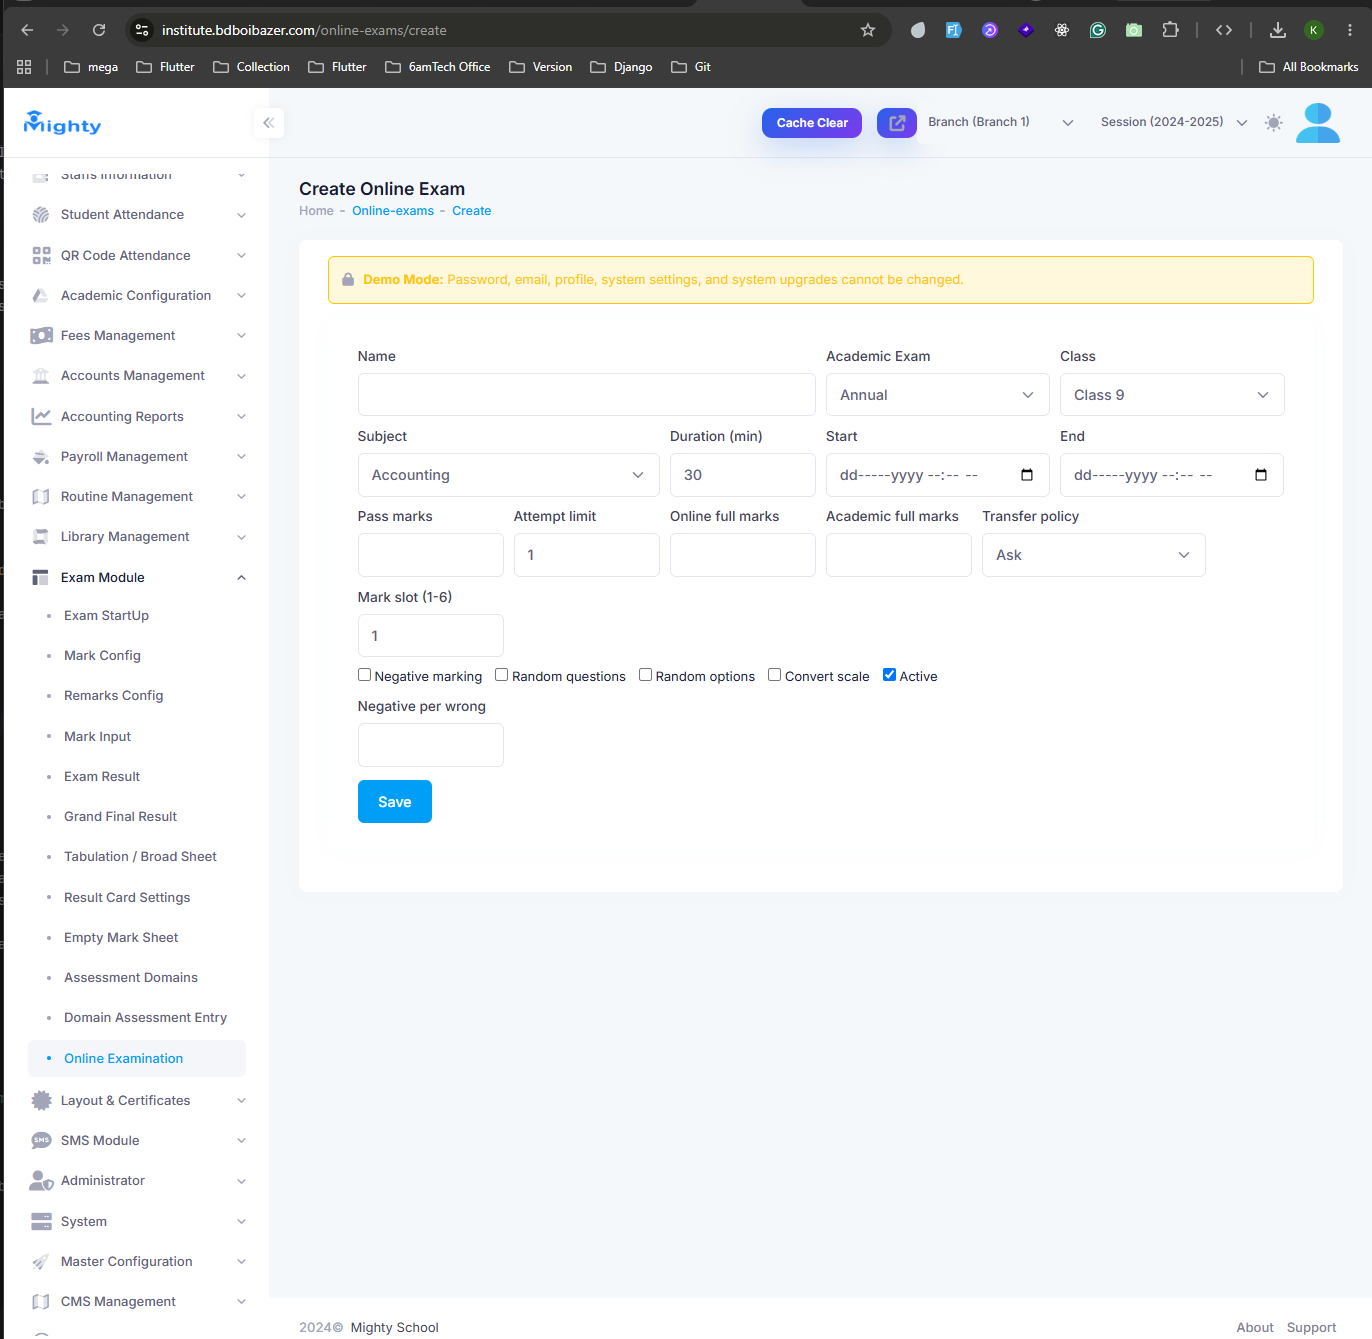
- Navigate to Exam Module → Online Examination → Create Online Exam.
- Enter the exam Name, and choose the linked Academic Exam, Class, and Subject. Set the Duration, Start/End window, Pass marks, Attempt limit, and marks, and toggle options like Negative Marking, Random Questions, or Random Options as needed.
- Click Save to publish it.
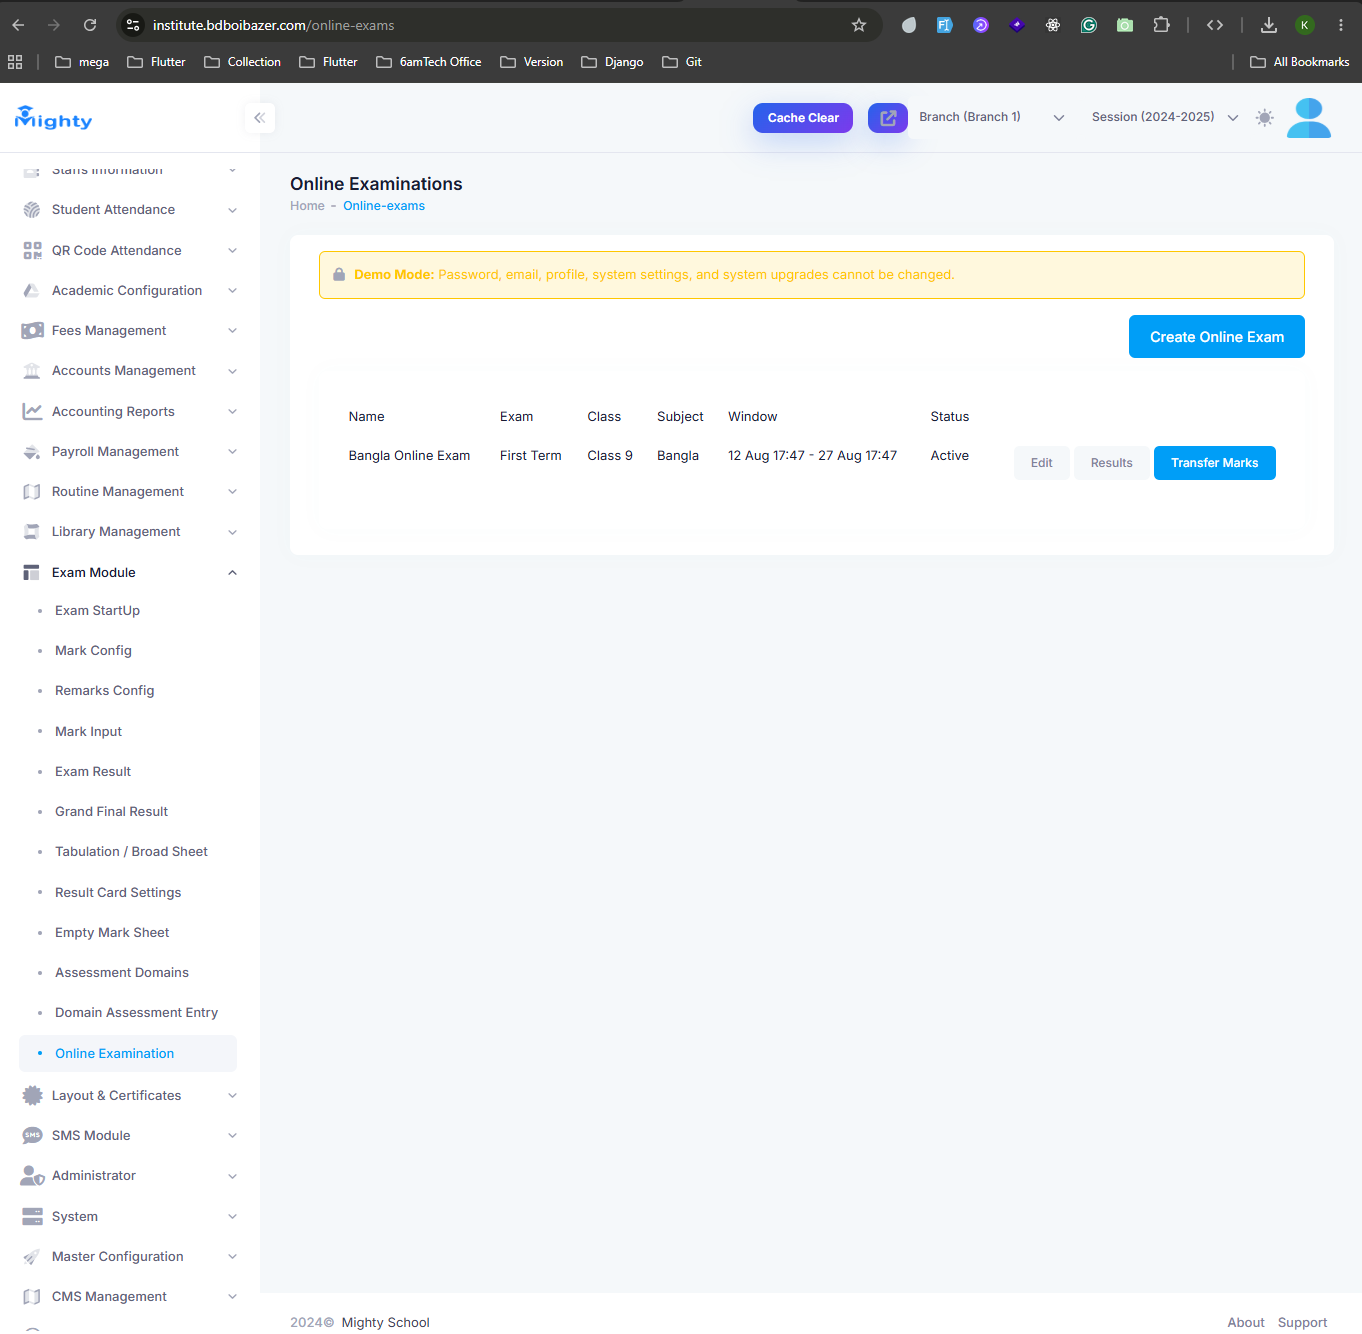
Every online exam you create is listed under Online Examinations, showing its subject, class, active window, and status, with quick links to Edit, Results, and Transfer Marks (to move online scores into the regular mark sheet). Other utilities in this menu — Assessment Domains, Domain Assessment Entry, and Grand Final Result — are covered above.
Step 14: Layout & Certificates
Navigate to Layout & Certificates to design and print institute documents — student and staff ID cards, admit cards, certificates, and other layout templates — with your own branding, colors, and fields.
Step 15: SMS Module
Navigate to SMS Module to create SMS templates and send messages to students, parents, or staff — either one-off broadcasts or messages triggered by events elsewhere in the system, such as attendance or exam results.
Step 16: Administrator & System
Administrator manages admin user accounts and login access to the panel itself. System holds core system configuration and maintenance tools for the installation.
Step 17: Master Configuration
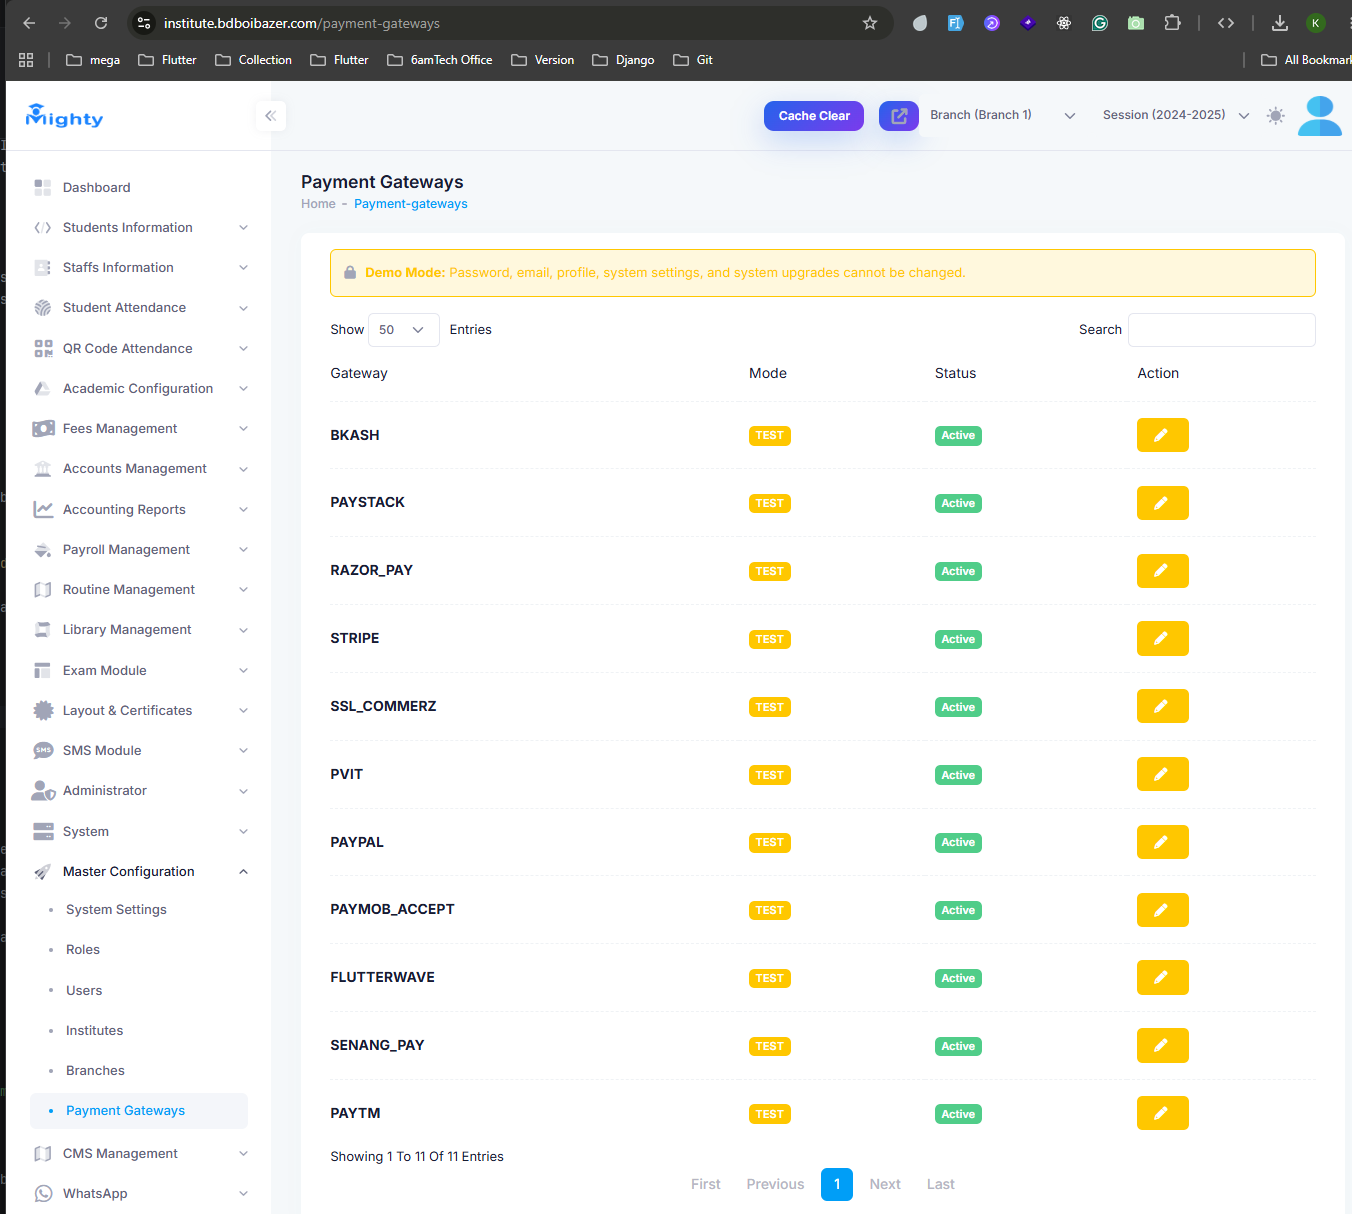
System-wide settings live under Master Configuration: System Settings, Roles and Users (admin accounts and permissions), Institutes and Branches (for multi-branch setups), and Payment Gateways, where you can enable and configure the online payment methods available for fee collection (bKash, Stripe, PayPal, SSLCommerz, RazorPay, and others). See Payment Gateway Setup for step-by-step credential configuration.
Step 18: CMS Management
Navigate to CMS Management to edit the content shown on the institute's public website — pages, news, notices, and similar content — without touching code.
Step 19: WhatsApp
Navigate to WhatsApp to configure the WhatsApp messaging integration used for notifications such as result announcements (see Send Result Notifications in the Exam Module above).
Step 20: Hostel Management
Navigate to Hostel Management to manage hostel rooms and beds, allocate students to rooms, and track hostel residents.
Step 21: Transport Management
Navigate to Transport Management to manage vehicles and routes, and assign students to a transport route/stop.
Step 22: Google Meet
Navigate to Google Meet to schedule and share online class links, letting teachers and students join live classes directly from the panel.
Step 23: AI Assistant
Navigate to AI Assistant for in-panel help — ask questions about how to use a feature or look up data without leaving the Admin Panel.
🔔 Notifications
Mighty School keeps everyone informed through the SMS Module and WhatsApp integration:
- Students & Parents: Attendance alerts, exam results, fee reminders, and admit card notices
- Staff: Payroll and duty-related updates
- Administrators: System alerts and notification delivery status
🔧 Technical Reference
This section is intended for developers who want to integrate with the Mighty API directly, understand how data is structured in the database, extend the Laravel backend with custom functionality, manage environment configuration, or safely apply updates and migrations.
API Endpoints
The Mighty backend exposes a REST API built on Laravel, secured with Laravel Passport (OAuth2). All endpoints are versioned and served from your API subdomain, for example:
https://api.yoursite.com/api/v1
Authentication
Most endpoints require a Bearer token obtained via the login endpoint. Include the token in
the Authorization header of every authenticated request:
Authorization: Bearer {access_token}
Accept: application/json
| Method | Endpoint | Description |
|---|---|---|
POST |
/auth/login |
Authenticate an admin, teacher, student, or parent and issue an access token |
POST |
/auth/logout |
Revoke the current access token |
GET |
/students |
List students with filters (branch, class, section, category) and pagination |
GET |
/students/{id} |
Retrieve a student's profile, class/section, guardian info, and category |
GET |
/students/{id}/attendance |
Retrieve a student's daily attendance history for a date range |
POST |
/attendance/mark |
Submit attendance (present/absent) for a class, section, and date, including QR-code check-ins |
GET |
/classes |
List classes, sections, and subjects for the active academic session |
GET |
/routine/{classId} |
Retrieve the class routine (subject, teacher, room, and time slots) for a class/section |
GET |
/exams/{examId}/results/{studentId} |
Fetch a student's marks, GPA, grade, and position for a given exam |
GET |
/fees/{studentId} |
Retrieve a student's fee items, paid/unpaid status, and due dates |
POST |
/fees/{studentId}/pay |
Collect a fee payment for a student, optionally via an enabled payment gateway |
GET |
/settings |
Fetch platform/branding configuration used by the Flutter app |
A complete, importable Postman collection is included with the download package (see Postman Collection) and documents request/response payloads, required parameters, and error formats for every endpoint.
Endpoint names and payloads may vary slightly between releases. Always confirm the current
routes with php artisan route:list on your installed copy, or refer to the
bundled Postman collection, rather than hard-coding assumptions into third-party integrations.
Sample Request & Response Payloads
The examples below illustrate the shape of the JSON returned by the most commonly used endpoints. Field names, pagination metadata, and error formats follow the same structure across the rest of the API. Treat these as illustrative — always confirm exact fields against the bundled Postman collection for your installed version.
POST /auth/login
{
  "status": true,
  "message": "Login successful",
  "data": {
    "access_token": "eyJ0eXAiOiJKV1QiLCJhbGciOiJIUzI1NiJ9...",
    "token_type": "Bearer",
    "expires_in": 3600,
    "user": {
      "id": 102,
      "name": "Jane Cooper",
      "email": "jane.cooper@example.com",
      "role": "student",
      "branch_id": 1,
      "avatar": "https://api.yoursite.com/storage/avatars/102.png"
    }
  }
}
GET /students
{
  "status": true,
  "data": {
    "current_page": 1,
    "per_page": 10,
    "total": 512,
    "items": [
      {
        "id": 15,
        "name": "Emma Watson",
        "roll_no": "23",
        "class": "Class 8",
        "section": "A",
        "category": "General",
        "guardian_phone": "+1555000123",
        "photo": "https://api.yoursite.com/storage/students/15/photo.png",
        "status": "active"
      }
    ]
  }
}
GET /students/{id}
{
  "status": true,
  "data": {
    "id": 15,
    "name": "Emma Watson",
    "roll_no": "23",
    "class": "Class 8",
    "section": "A",
    "date_of_birth": "2012-04-09",
    "blood_group": "O+",
    "guardian": {
      "name": "Robert Watson",
      "relation": "Father",
      "phone": "+1555000123"
    },
    "category": "General",
    "admission_date": "2021-06-01"
  }
}
POST /attendance/mark
{
  "status": true,
  "message": "Attendance saved",
  "data": {
    "class_id": 8,
    "section_id": 1,
    "date": "2026-08-19",
    "marked_count": 34,
    "present_count": 31,
    "absent_count": 3
  }
}
GET /routine/{classId}
{
  "status": true,
  "data": {
    "class": "Class 8",
    "section": "A",
    "days": [
      {
        "day": "Sunday",
        "periods": [
          { "subject": "Mathematics", "teacher": "Alex Morgan", "room": "204", "start": "08:00", "end": "08:45" },
          { "subject": "English", "teacher": "Priya Nair", "room": "204", "start": "08:45", "end": "09:30" }
        ]
      }
    ]
  }
}
GET /exams/{examId}/results/{studentId}
{
  "status": true,
  "data": {
    "exam": "Half Yearly Examination",
    "student_id": 15,
    "total_marks": 500,
    "obtained_marks": 421,
    "gpa": 4.67,
    "grade": "A",
    "status": "Pass",
    "position": 6,
    "subjects": [
      { "subject": "Mathematics", "marks": 88, "grade": "A+" },
      { "subject": "English", "marks": 79, "grade": "A" }
    ]
  }
}
GET /fees/{studentId}
{
  "status": true,
  "data": {
    "student_id": 15,
    "session": "2026-2027",
    "items": [
      { "fee_head": "Tuition Fee", "amount": 150.00, "due_date": "2026-09-05", "status": "unpaid" },
      { "fee_head": "Library Fee", "amount": 20.00, "due_date": "2026-09-05", "status": "paid" }
    ],
    "total_due": 150.00
  }
}
POST /fees/{studentId}/pay
{
  "status": true,
  "message": "Payment recorded",
  "data": {
    "payment_id": 5821,
    "student_id": 15,
    "fee_head": "Tuition Fee",
    "amount": 150.00,
    "gateway": "stripe",
    "paid_at": "2026-08-19T09:15:32Z",
    "receipt_no": "RCPT-000582"
  }
}
GET /settings
{
  "status": true,
  "data": {
    "app_name": "Mighty School",
    "currency": "USD",
    "currency_symbol": "$",
    "logo_url": "https://api.yoursite.com/storage/branding/logo.png",
    "payment_gateways": {
      "stripe": true,
      "paypal": false
    },
    "maintenance_mode": false
  }
}
Error Response Format
Failed requests follow a consistent shape so client apps can handle errors generically:
{
  "status": false,
  "message": "The given data was invalid.",
  "errors": {
    "email": ["The email field is required."],
    "password": ["The password must be at least 8 characters."]
  }
}
Database Schema Overview
The backend uses a relational MySQL/MariaDB schema managed entirely through Laravel migrations
located in database/migrations. Below is a high-level overview of the core tables;
refer to the migration files for exact columns, indexes, and foreign keys.
| Table | Purpose |
|---|---|
users |
Stores admin, teacher, student, and parent accounts with role assignment |
shops |
Platform/tenant settings, including primary domain and branding |
students |
Student profiles: name, roll number, class/section, category, guardian, admission details |
staffs |
Teacher and non-teaching staff profiles, department, designation |
classes / sections |
Academic class and section structure for the active session |
subjects |
Subject catalog, linked to classes and departments |
attendances |
Daily student and staff attendance records, including QR check-ins |
exams |
Exam/term definitions, exam codes, grading scales |
exam_results |
Per-student marks, GPA, grade, and position for each exam |
fees |
Fee heads, amounts, and due dates mapped to classes/students |
payments |
Transaction records for fee collection and payroll payments |
notifications |
Queued and sent SMS/WhatsApp notifications for users |
To inspect the live schema on your own installation, you can generate an entity diagram or dump the structure with standard tools, for example:
php artisan schema:dump
# or, using mysqldump
mysqldump -u DB_USER -p --no-data DB_NAME > schema.sql
Extending Functionality
The backend follows standard Laravel conventions, which makes it straightforward to add custom features without modifying core files directly.
-
Add new routes. Define additional API routes in
routes/api.php, grouped under your own prefix and middleware:Route::prefix('v1')->middleware('auth:api')->group(function () { Route::get('/custom-feature', [CustomFeatureController::class, 'index']); }); -
Create a controller. Use the Artisan generator to scaffold new controllers,
models, and migrations:
php artisan make:controller CustomFeatureController
php artisan make:model CustomFeature -m
-
Register service providers. For larger add-ons (custom payment gateways,
notification channels, third-party integrations), create a dedicated service provider in
app/Providersand register it inbootstrap/providers.php(orconfig/app.phpon older Laravel versions). -
Extend the admin panel. Admin views and controllers live under
resources/viewsandapp/Http/Controllers/Admin. New sections can be added by following the existing module structure (route, controller, view, and, if needed, a migration for supporting data). -
Extend the Flutter app. New screens and API bindings can be added under
lib/, following the existing folder structure (models, providers/controllers, screens, and API service classes) so new features stay consistent with the rest of the app.
Environment Variables & Configuration
Application configuration is controlled through the .env file at the project root,
which is read into the various files under config/. This file is not included in
version control and must be configured per environment (local, staging, production).
Key variables you will typically need to review or update:
| Variable | Purpose |
|---|---|
APP_URL |
Base URL of the API server (used for generated links and assets) |
APP_ENV / APP_DEBUG |
Environment name and debug mode; set APP_DEBUG=false in production |
DB_HOST, DB_DATABASE, DB_USERNAME, DB_PASSWORD |
Database connection credentials |
MAIL_* |
SMTP settings used for account, notification, and receipt emails |
FILESYSTEM_DISK |
Storage driver for uploaded content (local, S3, or another supported driver) |
PASSPORT_PRIVATE_KEY / PASSPORT_PUBLIC_KEY |
OAuth key paths used for issuing and verifying API tokens |
Payment gateway keys (e.g. STRIPE_KEY, PAYPAL_CLIENT_ID) |
Credentials for any payment gateways enabled on the platform |
After changing any .env value, clear the configuration cache so the change takes effect:
php artisan config:clear
php artisan config:cache
.env file, database credentials, or Passport keys to public source
control. Treat these values the same way as the key.properties file used for Android
signing.
System Updates & Migrations
Follow this process when applying a new version of the system to an existing installation.
-
Back up first. Take a full backup of the database and the
storagedirectory before updating anything — see Database Backup & Restore for the exact commands:mysqldump -u DB_USER -p DB_NAME > backup_$(date +%F).sql
-
Enable maintenance mode so users are not affected while files are replaced:
php artisan down
-
Replace application files with the new release, keeping your existing
.envfile,storagedirectory, and any custom code untouched. -
Install/update dependencies:
composer install --no-dev --optimize-autoloader
-
Run any new database migrations:
php artisan migrate --force
The
--forceflag is required to run migrations in a production environment. Review the release notes for that version to confirm whether new migrations are included. -
Clear and rebuild caches:
php artisan config:clear
php artisan cache:clear
php artisan route:clear
php artisan view:clear
php artisan optimize
-
Disable maintenance mode once you have verified the update:
php artisan up
-
Rebuild the Flutter app(s) only if the update includes changes to
lib/or API contracts, following the same steps described in Build for Android, Build for iOS, and Web Setup. If the build fails after pulling new dependencies, see Flutter Build Troubleshooting.
Always test updates on a staging copy of your site and database before applying them to production. Record the applied version in the Changelog so the update history stays traceable.
💳 Payment Gateway Setup
Mighty School supports collecting fee payments online through Stripe and PayPal. Both gateways are
configured in two places: your Laravel .env file (for the API keys) and the
Admin Panel Master Configuration → Payment Gateways screen (to enable/disable each
gateway and set the display currency).
Always test with sandbox/test-mode credentials first. Only switch to live keys once a full test purchase has been completed successfully end-to-end (checkout → webhook → enrollment).
Stripe Setup
Step 1 — Create/Access Your Stripe Account
- Sign up or log in at https://dashboard.stripe.com/.
- Complete Stripe's account activation (business details) before going live — test mode works without this.
Step 2 — Get Your API Keys
- In the Stripe Dashboard, go to Developers → API keys.
- Toggle Test mode (top-right) on while integrating.
- Copy the Publishable key (starts with
pk_) and the Secret key (starts withsk_).
Step 3 — Add Keys to Your Laravel .env File
STRIPE_KEY=pk_test_xxxxxxxxxxxxxxxxxxxxxxxx
STRIPE_SECRET=sk_test_xxxxxxxxxxxxxxxxxxxxxxxx
Step 4 — Configure a Webhook (Required)
Stripe notifies your backend when a payment succeeds via a webhook. Without this, fee payment status will not be confirmed automatically after payment.
- In the Stripe Dashboard, go to Developers → Webhooks → Add endpoint.
- Set the endpoint URL to:
https://api.yoursite.com/api/v1/payments/stripe/webhook
- Select the
checkout.session.completedandpayment_intent.succeededevents. - Copy the generated Signing secret (starts with
whsec_) and add it to.env:STRIPE_WEBHOOK_SECRET=whsec_xxxxxxxxxxxxxxxxxxxxxxxx
Step 5 — Enable Stripe in the Admin Panel
- Log in to the Admin Panel and navigate to Master Configuration → Payment Gateways.
- Toggle Stripe to enabled.
- Save changes and run
php artisan config:clearon the server.
PayPal Setup
Step 1 — Create a PayPal Developer App
- Log in at https://developer.paypal.com/dashboard/.
- Go to Apps & Credentials.
- Switch between the Sandbox and Live tabs depending on which credentials you need.
- Click Create App, give it a name (e.g., "Mighty School"), and select a Sandbox business account if using test mode.
Step 2 — Get Your Client ID and Secret
- Open the app you just created.
- Copy the Client ID and Secret shown on the app details page.
Step 3 — Add Credentials to Your Laravel .env File
PAYPAL_MODE=sandbox
PAYPAL_CLIENT_ID=your_paypal_client_id_here
PAYPAL_CLIENT_SECRET=your_paypal_client_secret_here
Set PAYPAL_MODE=live only once you switch to your Live app credentials from the
Live tab of the developer dashboard.
Step 4 — Enable PayPal in the Admin Panel
- Navigate to Master Configuration → Payment Gateways in the Admin Panel.
- Toggle PayPal to enabled and save.
- Run
php artisan config:clearon the server.
Step 5 — Test a Purchase
- Use a Sandbox buyer account to complete a test fee payment from the app or web build.
- Confirm the payment appears under the test student's Fees Management → Paid Info.
- Confirm the corresponding row appears in the
paymentstable.
📧 SMTP Email Configuration
Mighty School sends transactional emails — account confirmations, password resets, fee payment receipts, and exam result notifications — through Laravel's mail system. You must configure an SMTP provider before these emails will be delivered.
Step 1 — Choose an SMTP Provider
Any standard SMTP provider works, for example your hosting's built-in mail service, Gmail (via an app password), or a transactional provider such as Mailgun, SendGrid, Amazon SES, or Brevo. Transactional providers are recommended for production since they offer better deliverability and rate limits than a personal inbox.
Step 2 — Get Your SMTP Credentials
The exact steps vary by provider, but you will always need: an SMTP host, a port, a username, a password (or API key used as the password), and an encryption type (TLS or SSL). Example for Gmail:
- Enable 2-Step Verification on the Google account you'll send from.
- Go to Google Account → App Passwords and generate a new app password for "Mail".
- Use that generated 16-character password as
MAIL_PASSWORDbelow (not your normal Gmail password).
Step 3 — Add SMTP Settings to Your .env File
MAIL_MAILER=smtp
MAIL_HOST=smtp.yourprovider.com
MAIL_PORT=587
MAIL_USERNAME=your_smtp_username
MAIL_PASSWORD=your_smtp_password_or_api_key
MAIL_ENCRYPTION=tls
MAIL_FROM_ADDRESS="no-reply@yourdomain.com"
MAIL_FROM_NAME="${APP_NAME}"
Use port 587 with MAIL_ENCRYPTION=tls for most providers, or port
465 with MAIL_ENCRYPTION=ssl. Check your provider's documentation
if emails fail to send with the default settings.
Step 4 — Clear the Configuration Cache
php artisan config:clear
php artisan config:cache
Step 5 — Send a Test Email
From your server's terminal, run Laravel's Tinker console to send a quick test email and confirm delivery:
php artisan tinker
Mail::raw('Mighty School SMTP test', function ($msg) {
    $msg->to('you@example.com')->subject('SMTP Test');
});
Alternatively, trigger a real flow such as a new guardian registration or a password-reset request from the app, and confirm the email arrives (check spam/junk folders too).
Step 6 — Where Emails Are Triggered
- New account registration (verification/welcome email)
- Password reset requests
- Fee payment receipts
- Exam result notifications
- Admit card / certificate issued notices
storage/logs/laravel.log
first — most SMTP authentication and connection errors are logged there with the exact
rejection reason from your provider.
🛠️ Common Server-Side Error Logs
Most server-side issues (blank/white screens, HTTP 500 responses, failed installs, or API calls that silently fail) leave a trace in Laravel's log files. Checking the logs first is almost always faster than guessing at a fix.
Where to Find the Logs
The default Laravel log file lives at:
storage/logs/laravel.log
By default, Laravel writes a single rolling laravel.log file. If daily log
rotation is enabled in config/logging.php, you will instead see one file per
day:
storage/logs/laravel-2026-07-28.log
storage/logs/laravel-2026-07-27.log
You can view the most recent entries directly from SSH/terminal:
tail -n 100 storage/logs/laravel.log
Or watch it live while reproducing an issue:
tail -f storage/logs/laravel.log
If you don't have terminal access, open storage/logs/laravel.log directly
from your hosting File Manager. On shared hosting, also check your control panel's
Error Log viewer (cPanel → Metrics → Errors) for lower-level PHP/webserver
errors that never reach Laravel's own log.
The storage directory must be writable (see
Step 13 — Set Folder Permissions) or Laravel cannot write to
the log file at all, and you will see a blank white page with no log entry to debug from.
Common Errors and How to Resolve Them
| Log Message / Symptom | Likely Cause | Fix |
|---|---|---|
| Blank white page, no visible error | APP_DEBUG=false hiding the real error, or storage not writable |
Temporarily set APP_DEBUG=true in .env on a staging copy, reproduce the issue, then check storage/logs/laravel.log; also verify folder permissions |
SQLSTATE[HY000] [1045] Access denied for user |
Wrong database credentials in .env |
Re-check DB_DATABASE, DB_USERNAME, DB_PASSWORD, DB_HOST, then run php artisan config:clear |
SQLSTATE[42S02]: Base table or view not found |
Migrations were never run, or ran against the wrong database | Run php artisan migrate --force and confirm you're pointed at the correct database |
The stream or file "...laravel.log" could not be opened: failed to open stream: Permission denied |
storage/storage/logs not writable by the web server |
chmod -R 775 storage bootstrap/cache (adjust owner/group to match your web server user) |
No application encryption key has been specified |
Missing APP_KEY in .env |
Run php artisan key:generate, then php artisan config:cache |
Class "App\Http\Controllers\...Controller" not found |
Stale autoload cache after new files were uploaded | composer dump-autoload, then clear config/route/view caches |
| 401 Unauthorized on authenticated API calls | Missing/expired Bearer token, or Passport keys missing | Confirm the Authorization: Bearer {token} header is sent; verify storage/oauth-private.key / oauth-public.key exist (see Step 20 notes) and re-run php artisan passport:install if missing |
| 419 Page Expired / CSRF token mismatch (admin panel) | Session/cookie domain mismatch or expired session | Confirm APP_URL and session cookie domain match the domain you're browsing on; clear browser cookies and retry |
| 500 error only on image/file upload | storage/app/public not writable, or storage symlink missing |
Run php artisan storage:link and check permissions on storage/app/public |
| Installer fails at license/purchase-code step | Server cannot reach the external verification domain | Allowlist outbound HTTPS access to codenichebd.com (see the license verification notice in Step 1) and confirm no firewall/proxy is blocking it |
Enabling More Verbose Logging Temporarily
If the default log entries aren't enough to diagnose an issue, you can temporarily raise
the log level in your .env file:
LOG_CHANNEL=stack
LOG_LEVEL=debug
Then clear the config cache so the change takes effect:
php artisan config:clear
APP_DEBUG=true or a debug log level enabled on a live
production site can expose sensitive stack traces, file paths, and configuration values to
visitors. Always revert to APP_DEBUG=false and a less verbose log level once
you're done troubleshooting.
When to Contact Support
If you've checked storage/logs/laravel.log, your hosting error log, and the
table above without finding a resolution, contact support through the CodeCanyon support
channel with:
- The exact error message and stack trace from
storage/logs/laravel.log - PHP version, MySQL/MariaDB version, and hosting type (shared, VPS, cloud)
- Steps to reproduce the issue
- Your purchase code
🧩 Flutter Build Troubleshooting
Most build-time failures in the Flutter app come from dependency version mismatches, stale caches, or a local toolchain that doesn't match the versions the project was built against. Work through the steps below in order — the first two resolve the large majority of reported build issues.
Step 1 — Clean the Project First
Before investigating anything else, always start with a full clean:
flutter clean
flutter pub get
This removes the build/ and .dart_tool/ directories and
re-resolves every package, which clears out a large share of "phantom" errors caused by
stale generated files.
Step 2 — Check Your Flutter & Dart SDK Versions
The project targets a specific Flutter/Dart SDK range defined in pubspec.yaml.
Confirm what you have installed:
flutter --version
flutter doctor -v
If flutter doctor reports a Dart SDK outside the range declared under
environment: sdk: in pubspec.yaml, switch to a matching Flutter
version using a version manager such as fvm, or install the required SDK
directly from Flutter's
release archive.
Step 3 — Resolve Dependency Version Conflicts
If flutter pub get fails with a message such as
"version solving failed" or lists two packages that require incompatible versions
of the same dependency, use these commands to diagnose it:
flutter pub deps
flutter pub outdated
flutter pub outdated shows which packages have newer versions available and
flags ones that are constrained by another dependency. Common fixes:
-
Pin a conflicting package to the version already declared in
pubspec.yamlrather than upgrading it independently — mixed manual upgrades are the most frequent cause of solver conflicts. -
If you added a new plugin, check its
pubspec.yamlon pub.dev for its own SDK/dependency constraints before installing it, rather than after. -
As a last resort for a single stubborn package, override its resolved version under
dependency_overridesinpubspec.yaml— use this sparingly, and remove the override once the upstream packages catch up.
Step 4 — Reset the Local Pub Cache
If pub get succeeds but the build still references outdated package code
(mismatched method signatures, missing classes that exist in the changelog), the local pub
cache may be corrupted:
flutter pub cache repair
Then repeat Step 1.
Step 5 — Android-Specific Build Errors
-
Gradle/Kotlin version mismatch (e.g. "Could not resolve
org.jetbrains.kotlin..." or "Minimum supported Gradle version..."):
check the Gradle version in
android/gradle/wrapper/gradle-wrapper.propertiesand the Android Gradle Plugin / Kotlin versions inandroid/settings.gradle(orandroid/build.gradleon older projects) match what your installed Android Studio / command-line tools expect. -
"Duplicate class" errors after adding a new plugin usually mean two
dependencies bundle the same underlying library at different versions. Run
./gradlew app:dependenciesfrom theandroid/folder to see the dependency tree and identify which plugin needs to be excluded or upgraded. -
After changing any Gradle or Kotlin version, always run:
cd android
./gradlew clean
cd ..
flutter clean
flutter pub get
Step 6 — iOS-Specific Build Errors
-
CocoaPods version conflicts (e.g. "CocoaPods could not find
compatible versions for pod..."): update the local Pod repository and reinstall pods:
cd ios
pod repo update
pod install --repo-update
cd ..
-
If pods remain out of sync after a dependency change, delete the generated iOS pod
files and reinstall from scratch:
cd ios
rm -rf Pods Podfile.lock
pod install
cd ..
-
Confirm the
platform :iosversion at the top ofios/Podfilemeets the minimum iOS version required by any newly added plugin.
Avoid manually editing version numbers inside pubspec.lock,
Podfile.lock, or Gradle's cache files directly. Let flutter pub get,
pod install, and Gradle regenerate these automatically after you adjust the
source constraints — hand-editing lock files usually creates a second, harder-to-diagnose
conflict.
Step 7 — Still Stuck?
Run a verbose build and capture the full output before reaching out for support — the first error in a long Gradle/Xcode log is almost always the real cause, with everything after it being a downstream symptom:
flutter build apk --verbose
# or
flutter build ios --verbose
Include this output, your flutter doctor -v results, and the relevant section
of pubspec.yaml when contacting support (see
When to Contact Support for backend issues, or the
CodeCanyon support channel for app build issues).
💾 Database Backup & Restore
Your student, staff, attendance, exam, and fee data all live in the MySQL/MariaDB database. Taking regular backups — and knowing how to restore one — is one of the most important things you can set up, even if you're not familiar with server management. This section walks through both the point-and-click (phpMyAdmin) method and the command-line method.
Always take a fresh backup before installing an update, changing server settings, or
editing anything directly in the database (such as the shops table). See
System Updates & Migrations for when a backup is required
as part of the update process.
Option A — Backup via phpMyAdmin (No Terminal Required)
- Log in to your hosting control panel (cPanel or DirectAdmin).
- Open phpMyAdmin from the Databases section.
- Select your Mighty School database from the left-hand list.
- Click the Export tab at the top.
- Choose the Quick export method and SQL as the format — this is enough for most day-to-day backups.
- Click Go and save the downloaded
.sqlfile somewhere safe (a separate drive or cloud storage, not the same server).
Option B — Backup via Command Line (mysqldump)
If you have SSH access, this is the fastest and most reliable method:
mysqldump -u DB_USER -p DB_NAME > backup_$(date +%F).sql
Replace DB_USER and DB_NAME with the credentials from your
.env file. You'll be prompted for the database password interactively — this
avoids leaving it in your shell history. To also compress the backup:
mysqldump -u DB_USER -p DB_NAME | gzip > backup_$(date +%F).sql.gz
Option C — Automating Regular Backups (Recommended)
For production sites, don't rely on remembering to back up manually. Most hosting control panels include a built-in scheduler:
- cPanel: use the Backup Wizard or Backup tool to schedule automatic full or database-only backups, and configure a remote destination (FTP, Google Drive, Amazon S3) so backups don't live only on the same server.
-
Cron job (SSH access): add a scheduled task that runs
mysqldumpdaily and prunes old backups, for example viacrontab -e. Replace the path with your own account's home directory:0 2 * * * mysqldump -u DB_USER -pDB_PASSWORD DB_NAME | gzip > /home/YOUR_USERNAME/backups/school_$(date +\%F).sql.gz
Also Back Up the storage Directory
Uploaded files — student photos, ID cards, certificates, and library book covers —
are stored on disk under storage/app/public, not in the database. Back this
folder up alongside your database export:
tar -czf storage_backup_$(date +%F).tar.gz storage/app/public
Restoring a Backup
Restore via phpMyAdmin
- Open phpMyAdmin and select the target database (create a new empty database first if restoring to a fresh server).
- Click the Import tab.
- Click Choose File and select your saved
.sql(or.sql.gz) backup file. - Click Go and wait for the import to complete — large databases can take several minutes.
Restore via Command Line
mysql -u DB_USER -p DB_NAME < backup_2026-07-15.sql
For a compressed backup:
gunzip < backup_2026-07-15.sql.gz | mysql -u DB_USER -p DB_NAME
After Restoring, Always:
- Restore the matching
storage/app/publicbackup so file references in the database (photos, certificates, attachments) point to files that actually exist. - Confirm the
domaincolumn in theshopstable still matches the site you're running on — see Multi-Tenant Domain Management if it needs updating. - Clear the application cache:
php artisan config:clear
php artisan cache:clear
Always test a restore on a staging copy of the site before restoring over a live production database — an interrupted or partial import can leave the database in an inconsistent state.
Changelog
This changelog documents the version history of Mighty School, including new features, improvements, and bug fixes.
Version 2.2 — 14 Aug 2026
- ✅ Added Grand Final Result Module
- ✅ Added Tabulation / Broad Sheet for Comprehensive Results
- ✅ Added Result Card Settings & Customization
- ✅ Added Empty Mark Sheet Generation
- ✅ Added Assessment Domains Configuration
- ✅ Added Domain Assessment Entry System
- ✅ Added Online Examination Module
- ✅ Enhanced Exam Result Management & Reporting
- ✅ Improved Examination Module Navigation & Workflow
- ✅ Enhanced Result Processing & Mark Management
- ✅ Performance Optimization & Code Refactoring
- ✅ Fixed Bugs, Improved Validation & Increased System Stability
- ✅ General System Improvements & Maintenance Updates
Version 2.1 — 19 Jul 2026
- ✅ Enhanced Frontend Blade UI
- ✅ Completely Redesigned Student, Teacher & Staff ID Cards (CR80 Print Ready)
- ✅ Added Google Meet Integration & Improved Meeting Management
- ✅ Introduced Public Institute Onboarding & Self-Registration System
- ✅ Added SAAS Contact Form Module with API & Admin Settings
- ✅ Enhanced Compatibility for 12+ Payment Gateways
- ✅ Improved Dashboard Performance & Utility APIs
- ✅ Optimized SAAS Installation & Panel Seeders
- ✅ Enhanced Settings Management & Configuration System
- ✅ Performance Optimization & Code Refactoring
- ✅ Fixed Bugs, Improved Validation & Increased Stability
- ✅ Database Seeder Cleanup & Maintenance Improvements
- ✅ General System Upgrade & Production Readiness Enhancements
Version 2.0 — 27 Jun 2026
- ✅ Added WhatsApp Auto Message Notifications for Absence & Fee Collection
- ✅ Introduced QR Code-Based Attendance System
- ✅ Added 4th Subject Configuration & Student Assignment
- ✅ Added Own Branch & Institute Edit Functionality
- ✅ Added Class Routine Management Module
- ✅ Fixed Reported Bugs & Improved System Stability
- ✅ Performance Optimizations & General Improvements
Version 1.9 — 17 Jun 2026
- ✅ Fully Migrated to Blade Templates
- ✅ Fixed Reported Bugs & System Issues
- ✅ Enhanced Role & Permission Management
- ✅ Improved Exam Management Workflow
- ✅ Updated Result Generation & Processing
- ✅ General Performance & Stability Improvements
Version 1.8 — 24 May 2026
- ✅ Performance Optimization for Faster System Experience
- ✅ Enhanced Exam Module with Improved Functionality
- ✅ Upgraded Marksheet & Certificate Management
- ✅ Refined Role & Permission System
- ✅ Fixed Multiple Bugs & Stability Issues
- ✅ Resolved Minor Platform-Wide Issues
- ✅ Improved Overall Reliability & Usability
Version 1.7 — 24 April 2026
- ✅ Performance Optimization & Faster System Experience
- ✅ Exam Module Updated & Improved Functionality
- ✅ Marksheet & Certificate System Enhanced
- ✅ Role & Permission System Updated
- ✅ Bug Fixes & Stability Improvements
- ✅ Minor Issues Fixed & Overall System Stability Improved
Version 1.6 — 31 March 2026
- ✅ Bug Fixes & Stability Improvements
- ✅ Enhanced UI/UX & Design Improvements
- ✅ Performance Optimization & Faster Experience
- ✅ Minor Issues Fixed & System Stability Improved
- ✅ Partial Fees Collection Added
- ✅ Branch Migration Added
- ✅ Admission Number Added
Version 1.5 — 07 March 2026
- ✅ Issues Fixing
- ✅ Design Improvement
- ✅ Performance Improvement
Version 1.4 — 08 February 2026
- ✅ Monthly Absent Report Added
- ✅ Send Absent SMS Feature Added
- ✅ Exam Result & Marksheet Custom Design with Print Support Added
- ✅ Question Bank Module Added
- ✅ Exam Question Paper Printing Added
- ✅ Issue Fixes: Multiple reported issues have been fixed to improve stability
- ✅ UI Improvements: Enhanced interface for smoother and better user experience
Version 1.3 — 09 January 2026
- ✅ School Panel Added and SAAS Panel Separated
- ✅ Issue Fixes: Multiple reported issues have been fixed to improve stability
- ✅ Design Update: Fully refreshed design for a smoother and more modern user experience
Version 1.2 — 18 October 2025
- ✅ Subscription Control: Easily enable, disable, and manage subscriptions
- ✅ Bug Fixes: Issues with new institute registration have been resolved
- ✅ Design Enhancements: Enjoy a cleaner, more user-friendly interface
Version 1.1 — 08 October 2025
- ✨ Improved overall UI/UX for a smoother experience
- Fixed several minor issues and performance bugs
- Added multiple website templates (Kindergarten, College, University)
- Introduced Hostel Management Module for student accommodation
Version 1.0 — 23 September 2025
- First Release
Note: This changelog is updated with every new release to keep users informed about updates and changes.
Frequently Asked Questions (FAQ)
The Mobile App Addon, SaaS (Multi-School) Addon, Biometric Attendance Addon, and School Website Addon are sold separately and are NOT included in the standard Mighty School package.
1. What is Mighty School?
Mighty School is a complete School Management System for schools, colleges, universities, coaching centers, and educational institutions. It helps manage students, teachers, attendance, exams, fees, reports, and academic operations from a centralized platform.
2. Is this a Single School or Multi-Branch system?
The standard package supports both single-school and multi-branch school management.
3. Is the Mobile App included?
No. The Mobile App is available as a separate addon purchase.
4. Is the SaaS (Multi-School) Module included?
No. The SaaS Module is sold separately and is not included with the standard package.
5. Is the Biometric Attendance Module included?
No. Biometric Attendance integration is available as a separate addon purchase.
6. Can I purchase addons later?
Yes. You can purchase and activate addons at any time.
7. What user roles are available?
Super Admin, School Admin, Teacher, Student, Parent, Accountant, Librarian, and Staff roles are supported.
8. Does the system support attendance management?
Yes. Student and staff attendance can be managed digitally with detailed reporting.
9. Does the system support QR Attendance?
Yes. QR-based attendance functionality is included.
10. Does the system include exam and result management?
Yes. You can create exams, manage marks, generate report cards, marksheets, and certificates.
11. Does the system support fee collection?
Yes. The system includes fee setup, collection, due tracking, partial payments, and financial reporting.
12. Does the system include accounting features?
Yes. Income, expenses, fee collections, and financial reports can be managed from the accounting module.
13. Is library management included?
Yes. The library module supports book management, issue/return tracking, and reports.
14. Can parents monitor student progress?
Yes. Parents can view attendance, exam results, fee records, notices, and academic progress.
15. Does the system support SMS and email notifications?
Yes. SMS and email notifications can be configured for various school activities.
16. Is the system multilingual?
Yes. Multiple languages are supported and additional languages can be added.
17. Can I customize the branding?
Yes. You can change the logo, school name, favicon, theme colors, and other branding elements.
18. Is the source code included?
Yes. Full source code is included according to Envato licensing terms.
19. Can I customize the source code?
Yes. Developers can customize and extend the system according to project requirements.
20. What technologies are used?
The system is built using modern web technologies including Laravel, PHP, MySQL, and related technologies.
21. Does the purchase include hosting and domain?
No. Hosting, server setup, and domain registration are not included.
22. Is installation documentation included?
Yes. Complete installation and configuration documentation is provided.
23. Do you provide installation support?
Yes. Installation support is provided according to the support policy included with your purchase.
24. Are future updates included?
Yes. Future updates for the purchased item are available through CodeCanyon according to Envato policies.
25. What addons are available?
Mobile App Addon, SaaS (Multi-School) Addon, Biometric Attendance Addon, and School Website Addon.